In this tutorial, we’ll set up GitHub Actions to manage translation files using Lokalise: no manual uploads or downloads, no reinventing a bicycle. Instead of relying on the Lokalise GitHub app, we’ll use open-source GitHub Actions. These let you push and pull translation files directly via the API in an automated way.
You’ll learn how to:
Push translation files from your repo to Lokalise
Pull translated content back and open pull requests automatically
Work with branches, file structures, and tag-based filtering
Customize filenames, languages, reviewers, and post-processing logic
Most of it will be configured with simple YAML files.
We’re going to set up two GitHub Actions workflows to handle content exchange between your GitHub repo and Lokalise TMS. Think of it like the Witcher’s two swords — one for uploading, one for downloading. These workflows can be triggered manually or scheduled (e.g., using Cron).
Here’s the first part:
Create a "push" workflow It will upload translations to Lokalise. We’ll execute it from a separate non-main branch.
Set up a separate branch as your "hub" This branch will act as the central point for managing translations. It’s where you’ll run workflows and sync files. While optional, using a dedicated branch for translation updates helps keep things clean, and you can later merge changes into main whenever you’re ready.
Now, how it works:
The push workflow, when triggered from the hub branch, scans your translation folders and uploads all base language files to the specified Lokalise project.
Uploaded keys get tagged with the name of the triggering branch and retain their filenames. This is very handy as it lets you:
Filter GitHub-related keys by tag
Download files later with the original structure intact
Then we’ll add the second piece:
Create a "pull" workflow This one grabs the keys tagged with your hub branch name and creates a pull request with the updated translation files. Once you merge that PR, your hub branch will have the latest translations.
These workflows handle the heavy lifting: they deal with errors (including rate limits like 429), optimize uploads and downloads, unpack ZIPs, and more. You can customize quite a few parameters but don’t worry, only a few are required to get started.
Before we jump into setting up Lokalise GitHub Actions for translation exchange, make sure you’ve got a couple of things ready:
A GitHub account with a repository You’ll need a GitHub repo to work with. It can be a real project or even an empty repo with no commits yet, that’s totally fine.
A Lokalise account If you don’t already have one, you can sign up here for a 14-day free trial (no credit card needed!). You’ll get access to all features, so it’s perfect for testing things out.
Creating a Lokalise project
To manage translations, you’ll need a Lokalise project. This will be the central place where your translation keys live.
Log in to Lokalise.
Go to your projects dashboard and click New project.
Choose the Web and mobile project type (it supports JSON and other common formats).
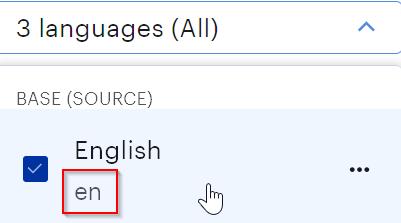
Give it a name, set your base language (e.g. English), and add one or more target languages (e.g. French and Spanish).
Click Create project.
Once the project is created, go to More > Settings, and grab your Project ID — we’ll need it soon.
Generating your Lokalise API token
We’ll use the Lokalise API to sync files, so you’ll need a token with read/write access:
Click your avatar in the sidebar and go to Personal profile.
Open the API tokens tab and generate a new token.
Make sure it has read/write permissions.
Important: Don’t commit this token to your repo. Instead, add it as a secret:
Go to your GitHub repo and then open Settings > Secrets and variables > Actions
Click New repository secret
Name it LOKALISE_API_TOKEN
Paste your token and save
GitHub permissions
To let GitHub Actions create pull requests (used in the pull workflow), you’ll need to update your repository settings:
Go to your repo’s Settings
Navigate to Actions > General
Scroll to Workflow permissions
Select Read and write permissions
Enable Allow GitHub Actions to create and approve pull requests
Creating translation files
For this demo, we’ll organize our translations into two folders:
locales/ – for app-specific translations
public/messages/ – for public-facing messages
Inside each folder, we’ll structure the files by locale, for example: locales/en/ and public/messages/en/.
Each locale folder contains one or more JSON files using a simple key-value format.
This setup gives us some more or less realistic files to work with.
Configuring push workflow
Alright, now that we’ve got everything set up, let’s move on to the main event: implementing the push action to upload your translation files to Lokalise.
Create the workflow to upload translation files
Create a new file at .github/workflows/push.yml. This will hold the config for your push workflow:
name: Push base language translations to Lokaliseon: workflow_dispatch:jobs: build: runs-on: ubuntu-latest steps: - name: Checkout Repo uses: actions/checkout@v4 with: fetch-depth: 0 - name: Push to Lokalise uses: lokalise/lokalise-push-action@v4.0.0 with: api_token: ${{ secrets.LOKALISE_API_TOKEN }} project_id: LOKALISE_PROJECT_ID base_lang: en translations_path: | locales public/messages file_format: json file_ext: json
This workflow does two things:
Checks out your repo
Uploads translation files for the base language (en) to Lokalise
We’ve used on: workflow_dispatch so the workflow runs manually. If you prefer to run it on a schedule (like once a day), just update the on block:
on:
  schedule:
    - cron: "0 0 * * *"
In most cases you’ll use Linux environment to run this workflow but if your platform is different (say, Mac), adjust the os_platform parameter accordingly.
The setup is pretty simple, but there are a few config details worth calling out. Let’s break them down!
API token
The api_token parameter contains (quite unsurpisingly) your Lokalise API token, the one you generated earlier. It should always be stored securely in your GitHub repo as a secret. In this demo we called it LOKALISE_API_TOKEN.
A few important things to note:
Never hardcode the token in your workflow.
API tokens are user-based, meaning they inherit the same access rights as the user who created them.
If your token doesn’t have permission to upload files to the selected project, the workflow will fail.
Project ID
Set the project_id param to your Lokalise project ID (you copied it from the Lokalise settings earlier). You can hardcode it in the workflow or store it in a secret or repo variable.
If you’re using Lokalise project branching, you can specify the branch like this:
PROJECT_ID:YOUR_BRANCH
Just a heads up: using project branches with GitHub Actions adds complexity and isn’t always smooth, so use it only if you know what you’re doing.
Base language
This is the base language of your translations, the one you’re uploading. In our example, it’s en (English).
Be sure to use the exact locale code as defined in your Lokalise project. For example:
✅ pt_BR for Brazilian Portuguese
❌ pt-br or pt — these will fail if they don’t match exactly
The base_lang value is also used together with translations_path to locate the files to upload. Only files for the base language will be uploaded; all others will be skipped by default.
Paths to translation files
The next very important parameter is the translations_path. This tells the action where to look for your translation files. You can specify one or more paths (line-separated), and paths should not include leading or trailing slashes.
In our example:
translations_path: |
  locales
  public/messages
The action will scan these directories for files under the subfolder matching base_lang (in our case, en), and upload them in parallel.
Here’s how it works:
TRANSLATIONS_PATH / BASE_LANG / ** / *.FILE_EXT
So with the above config, it’ll match things like:
locales/en/common.json
public/messages/en/footer.json
…but not:
locales/fr/dashboard.json (wrong language)
locales/en.json (not inside an en/ folder)
public/messages/common.yaml (wrong file type)
What if your files aren’t nested by language?
If your translation files are stored flat (for example, locales/en.json) just enable the flat_naming option:
flat_naming: true
This tells the action to skip scanning subfolders and only look for files directly under the given path(s).
Finally, if you need even more control over which files are uploaded, you can use name_pattern to define a custom file-matching pattern. This overrides the default base_lang-based behavior.
name_pattern: "en/**/custom_*.json"
Examples:
"en/**/custom_*.json" — matches files like en/section/custom_home.json
"custom_*.json" — matches files named like custom_home.json directly under the specified folder
Just remember: the pattern should include both the filename and the extension (e.g., **/*.yaml, *.json, etc.).
File format
Next mandatory parameter is file_format. This is a required parameter that tells Lokalise what file format you’re uploading. It must be one of the formats supported by the Lokalise API, and should not include a leading dot.
Example:
file_format: json
Lokalise supports plenty of formats, like json_structured, xml, ruby_yaml, strings, etc.
File extension
The file_ext parameter is optional, but recommended to avoid weird surprises. This is because the action uses the file_ext to locate files for upload, using a pattern like:
TRANSLATIONS_PATH / BASE_LANG / ** / *.FILE_EXT
By default, file_ext is auto-inferred from file_format. So if you set:
file_format: json
…the action will assume:
file_ext: json
That’s usually fine, but some formats (like json_structured or ruby_yaml) don’t have matching file extensions. For example, even if you’re using json_structured, your files are still named *.json.
In that case, you’ll want to explicitly set:
file_format: json_structuredfile_ext: json
Pushing the changes and creating the hub branch
Now that your push workflow is ready and you’ve added some base language translation files, it’s time to commit and push everything to GitHub.
Start by pushing your changes to the main branch (or whatever your default branch is). This is important as GitHub won’t show the workflow until it exists in the remote repo.
git add .git commit -m "Add push workflow and base translations"git push origin main
Next, create a hub branch where you’ll manage your translation updates. You can name it however you want; in this example we’ll call it lokalise-hub. In simpler setups, you can even skip this and just use main, but having a dedicated branch keeps things more manageable.
And that’s it! You’re ready to run the push workflow from the Actions tab in GitHub!
Running the push workflow and how it works under the hood
You’re all set! Let’s actually run the workflow and see it in action.
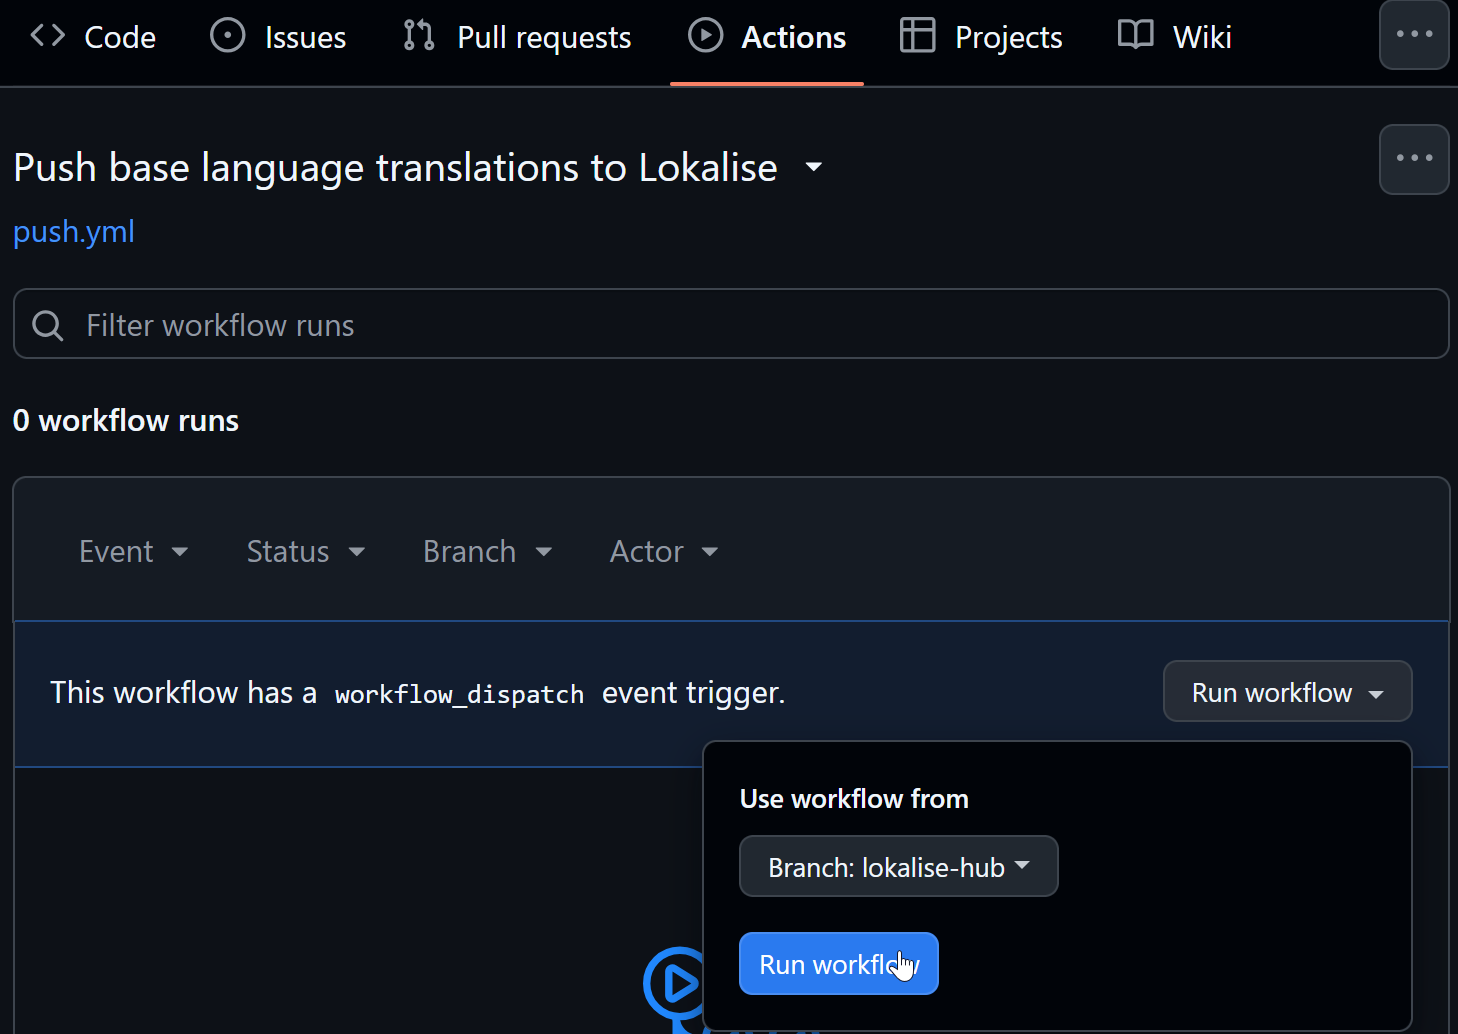
Executing the workflow manually
Open your GitHub repo
Go to the Actions tab
Find the Push base language translations to Lokalise workflow
Choose the lokalise-hub branch from the dropdown (or whatever branch you’re using)
Click Run workflow
Done! The action will now scan your translation folders (locales/ and public/messages/), look inside the base language subfolder (en/), and upload any matching .json files to your Lokalise project.
Note: Lokalise only considers an upload finished once any configured "process automations" (like translation memory, machine translation, or AI post-processing) have completed. If you’ve enabled translation memory-related, MT, or AI automations, uploads may take longer, but you can then pull and publish those fully processed translations immediately, without any manual steps.
But the question is: will it always upload all base language files to Lokalise regardless of the changes? Let’s discuss that!
What actually gets uploaded?
Here’s where things get interesting.
First run
On the first run of the push workflow, all matching base language files will be uploaded meaning every .json file under locales/en/ and public/messages/en/.
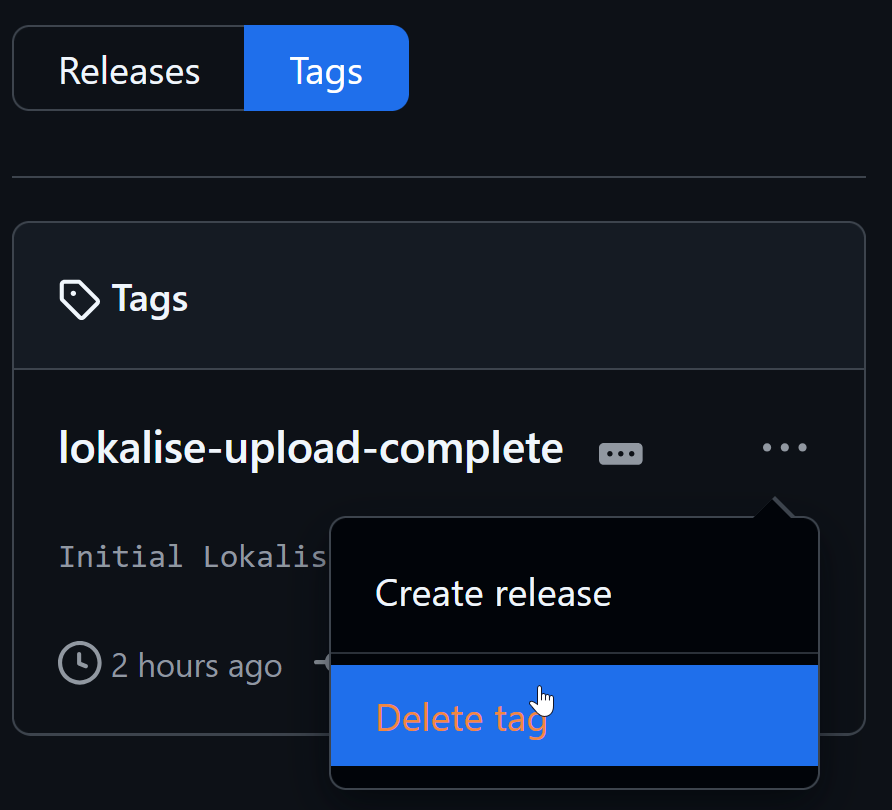
But how does the action "know" it’s the first run? It adds a Git tag to your repo: lokalise-upload-complete.
If this tag doesn’t exist yet, the action treats it as a fresh start and uploads everything.
Subsequent runs
On the next runs, the action will check for that tag. If it’s there, it assumes this is not the first run and behaves differently:
It compares just the last two commits: HEAD (the latest commit) and HEAD~1 (commit before the latest one)
It uploads only the files that changed between those two commits
So if you edit locales/en/common.json, push that change, and re-run the workflow, only that one file gets uploaded. Nice and efficient.
Still, you can always remove this tag easily and start fresh:
A gotcha to be aware of
If you run the workflow again without any new commits, the action will compare the same two commits again. That means the same file(s) will be re-uploaded because from its perspective, they’re still "recent changes."
If nothing changed between the last two commits, the action will just exit and do nothing.
What if I want to compare files between action runs?
By default, the push workflow only looks at what changed between the last two commits (HEAD vs. HEAD~1). While it works in simpler scenarios, that can miss translation updates if you batch several commits before running the action.
Let’s fix that with the experimental use_tag_tracking option, which remembers the last successful sync point via Git tags.
use_tag_tracking: true
Here’s how it works in practice:
Initial run (or very first time)
Suppose you’ve just set everything up and run the workflow at commit C0. The action uploads base‑language files and then creates a sync tag pointing to C0. This tag is named after the triggering branch:
... ──> C0   ← action run
           ▲
           └─ tag: lokalise-sync-lokalise-hub at C0
Please note that if this is the first action run for the repo, the action will upload all translation files and still create a global lokalise-upload-complete tag. If this is not the first action run but sync tag is not yet present, the action will revert to HEAD~1 to detect changes.
Make a batch of local commits
Now you do three commits locally without running the action in between:
C0 ──> C1 ──> C2 ──> C3   ← latest (all pushed at once)
 ↑
 tag still at C0
C1: unrelated source code changes
C2: updated /locales/en/common.json
C3: bumped package.json
Run the action again (at C3)
When you trigger the workflow now:
It finds the lokalise-sync-lokalise-hub tag at C0.
It diffs C0 → C3, picks up the translation change in C2, and uploads only those modified files.
After a successful run, it moves the tag to point at C3.
... ──> C0 ──> C1 ──> C2 ──> C3   ← action run #2
                             ▲
                             └─ tag: lokalise-sync-lokalise-hub moved to C3
It means:
You catch translation changes no matter how many non‑translation commits occur in between.
You only upload what actually changed since the last successful sync run.
Okay, I just want to push everything!
Got a small project and don’t want to worry about diffs, commits, tags, or tracking changes? No problem as you can just upload all base language files every time the workflow runs.
To do that, flip the switch to full Rambo mode:
rambo_mode: true
When rambo_mode is enabled, the action skips all comparison logic and always uploads every base language file no matter what changed (or didn’t). It’s simple but somewhat brute-force.
A couple of warnings:
This can be fine for small projects or rare manual syncs
But don’t abuse it: uploading unchanged files all the time adds unnecessary load
Lokalise reserves the right to rate-limit or block API access if excessive usage is detected
So yeah, use it if you need it but maybe don’t go full Rambo all the time.
Skip adding tags and custom tagging
By default, the push action automatically assigns a tag to all uploaded keys using the name of the triggering branch (e.g., lokalise-hub). This helps keep things organized and traceable inside Lokalise.
But if you don’t want any tags applied, you can disable this behavior:
skip_tagging: true
This prevents the action from assigning any tags at all.
But what if you need to assign custom tags instead? No problem. You can use the additional_params option.
skip_tagging: true — disables the default branch-name tag
tag_inserted_key — tells the API to tag newly uploaded keys
tags — applies your custom tags
You can pass any other parameters supported by the Lokalise API upload endpoint here. It’s a flexible escape hatch if you need more advanced control. Just keep in mind that the action also sets some more parameters when communicating with the API by default.
Checking the push result
Now that we’ve covered how the push action works, let’s take a look at what actually happens when it runs.
After triggering the workflow, open the Actions tab in GitHub and click into the latest run. You’ll see something like this (trimmed down for clarity):
Checking if this is the first action run... (tag: lokalise-upload-complete)This is the first action run.Collecting all translation files...No file changes detected, and it's the first action run: uploading all files.All files collected!Pushing files to Lokalise...Starting to upload file locales/en/common.jsonStarting to upload file public/messages/en/footer.jsonStarting to upload file public/messages/en/homepage.jsonStarting to upload file locales/en/dashboard.jsonAll translation files have been pushed!Lokalise tagging...Marking first run with global tag 'lokalise-upload-complete'...To https://github.com/bodrovis/Lokalise-gha-workflows * [new tag] lokalise-upload-complete -> lokalise-upload-completeCreated global tag 'lokalise-upload-complete'.Tagging step completed.Verifying upload success...Files have been uploaded.
Here’s what actually happened:
The action detected that this was the first time it ran on this branch.
It collected all base language files under the specified paths.
The files were uploaded in parallel with automatic retries in case of errors.
Once everything succeeded, a Git tag (lokalise-upload-complete) was created and pushed to the repo to mark this sync point.
The action verified the upload and exposed outputs you can use in later workflow steps.
Since a new Git tag was pushed by the action, you may want to update your local repo:
git pull origin lokalise-hubFrom https://github.com/bodrovis/Lokalise-gha-workflows * branch lokalise-hub -> FETCH_HEADAlready up to date.
What happens on the next run?
If you run the same workflow again without changing any translation files, you’ll see something like this:
Checking if this is the first action run... (tag: lokalise-upload-complete)This is not the first action run.Verifying upload success...Nothing has been uploaded.
The action sees that nothing changed since the last sync, it’s not the first run anymore, so it simply exits.
But if you modify any base language files, push the changes, and re-run the workflow, those modified files will be uploaded automatically.
Check Lokalise: Everything’s there!
Now head over to your Lokalise project. You should see:
All the uploaded keys from your base language files
A tag matching the triggering branch (e.g. lokalise-hub)
Filenames correctly assigned based on where the files came from
You can now translate the keys, auto-translate, or invite translators — whatever your flow is.
However, when adding new keys via Lokalise UI make sure to:
Add the same tag (e.g., lokalise-hub) — unless you’ve disabled tagging. We’ll discuss this in more detail when configuring the pull action.
Assign a filename that matches your file structure, for example locales/%LANG_ISO%/dashboard.json. You can even create new files during the pull step — just assign any valid path like: locales/%LANG_ISO%/my_new_file.json. Lokalise will include that file the next time you download translations. You can read more about how Lokalise handles filenames in our docs.
Configuring pull workflow
Now that we’ve got the push side working, let’s take care of the pull workflow. This one will download translation files from Lokalise and create a pull request with the changes making it easy to review and merge updates into your repo.
Create the workflow to download translation files
Let’s switch back to your main branch to add the workflow:
git checkout main
Then create a new file at .github/workflows/pull.yml and paste in the following config:
Checks out your repo — So it can track changes and open a pull request later.
Downloads updated translations — It pulls translations for all target languages (like fr, es, etc.) from Lokalise and writes them into the correct folders in your repo.
Creates a pull request — Any new or changed translation files get committed, and the workflow opens a PR against the current branch.
As you can see, the initial configuration is quite similar to what we had for the push workflow. In fact, many parameters are identical and explained above. Therefore, let me cover only the most important parts.
Base language
Set this to match your base language on Lokalise (e.g. en, en_US, etc). By default, the pull action ignores base language files and only pulls target languages.
If you want to also pull updates to the base language (e.g., in case someone added keys manually on Lokalise), you can override the default:
always_pull_base: true
By the way, if your app uses different language codes than Lokalise (e.g. en-US vs en_US), you can map them using additional_params:
Files outside the defined paths will be ignored. For example, even if Lokalise has keys assigned to i18n/%LANG_ISO%/main.json, they won’t be pulled unless you’ve added i18n to translations_path.
If your translation files are stored directly under the translation path (e.g. locales/fr.json) rather than in language-specific subfolders, set:
flat_naming: true
This disables the language-folder nesting behavior.
File format and extension
Just like with push, you must specify the file_format (e.g. json, json_structured, ruby_yaml, etc). It tells Lokalise how to format the downloaded files.
file_ext is optional but recommended, for example if you’re using structured formats that still end in .json. It ensures the files land where you expect.
That’s it! You’re now ready to run the pull workflow from the Actions tab on GitHub.
Running the pull workflow and how it works under the hood
You’re all set! Let’s fire up the pull workflow and see what it actually does.
Executing the workflow manually
Open your GitHub repo
Go to the Actions tab
Find the Pull changed translations from Lokalise workflow
Choose your translation branch (e.g. lokalise-hub) from the dropdown
Click Run workflow
Nice! The action will download your translation keys filtered by the tag matching the triggering branch, check for any changes to the target language files under the specified paths, and open a pull request with the updates.
What actually gets downloaded?
Let’s break down what the pull action downloads from Lokalise and how it decides what to include.
By default, the action:
Downloads all translation keys that are tagged with the name of the triggering branch (e.g., lokalise-hub)
Reconstructs the files using the specified file_format (like json) and unzips them to the defined translations_path according to the filenames (because the download bundle is in fact an archive)
But there’s more to it and this is where platforms come into play.
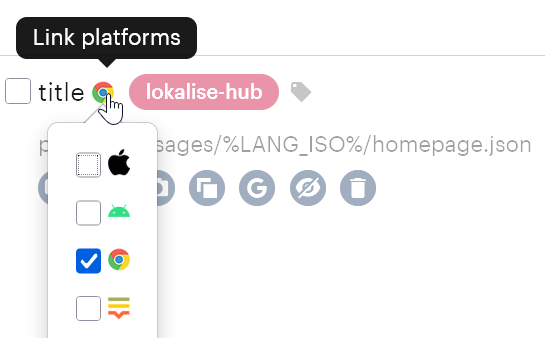
Lokalise platforms explained
Every translation key in Lokalise must be assigned to at least one platform. There are four supported:
Web
iOS
Android
Other
These platforms control which formats the key is considered relevant for. For example:
A key assigned only to iOS won’t be included when downloading in JSON format because Lokalise doesn’t associate JSON with the iOS platform.
A key assigned to Web will be included in the JSON download, since JSON is considered a Web-friendly format. However, it won’t be included when the strings format is chosen because this is an iOS-related thing.
So why does this matter?
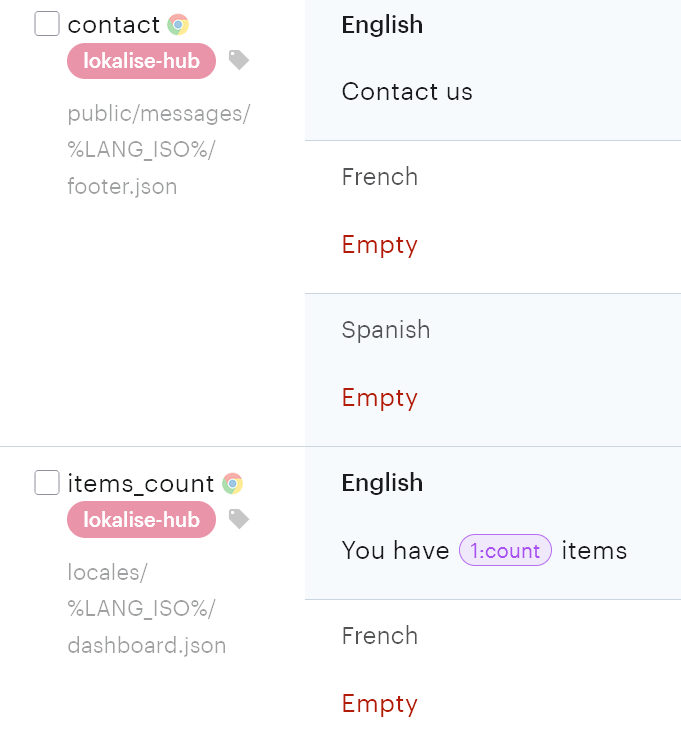
Let’s say you previously uploaded a key using the push action and set file_format: json. Lokalise automatically assigned it to the Web platform (you’ll even see a little Chrome icon next to it).
If later you try to download your translations using a format that doesn’t match the platform, that key simply won’t be included.
Therefore, if you want a key to be included in multiple download formats (e.g., for both iOS and Web), assign it to multiple platforms inside Lokalise. You can even set up separate filenames per platform, as explained in our documentation.
Bottom line: Make sure your keys are assigned to the correct platform that matches the download format you’re using (e.g., JSON → Web). Otherwise, they won’t show up in your pull requests even if they’re tagged correctly.
Optional override: Download everything
If you really want to force-download all keys regardless of platform, you can pass this parameter to additional_params:
additional_params: >
  {
    "all_platforms": true
  }
However, this isn’t recommended for larger projects as you might end up pulling in a bunch of irrelevant or out-of-scope keys, which could clutter your repo or cause confusion.
Filenames and directory structure
Yeah, we already talked about this, but seriously: using proper filenames is absolutely critical. When you set your translations_path, the filenames in Lokalise must match the directory structure in your repo. If they don’t, the action won’t be able to compare downloaded files with the ones already in your project, and you’ll just see a “No changes detected” message, even if something actually changed.
For example, if you define:
translations_path: locales
Then the keys in Lokalise should have filenames like:
Here, %LANG_ISO% is a special Lokalise placeholder. It’s automatically replaced with the actual language code, like en, fr, de, etc.
If the filenames in Lokalise don’t start with the expected directory prefix (locales/ in this case), the pull action won’t be able to match them to files in your repo. As a result, it’ll assume there are no changes, and you’ll see something like this in the workflow logs:
No changes detected in translation files.
Even though Lokalise did return something, it just didn’t match what the action was looking for.
Note that by default, the pull action adds two parameters behind the scenes:
These ensure Lokalise preserves the original filename paths when rebuilding translation files during download. If you want to ignore the assigned filenames, you can disable this logic:
skip_original_filenames: true
Use this only if you know what you’re doing, otherwise we recommend keeping the default behavior to avoid file mismatch issues.
Bottom line: Make sure your Lokalise filenames mirror the directory structure defined in translations_path. This is what allows the action to correctly detect changes and create pull requests with the right files.
Skip tags filtering and custom filtering options
By default, the pull action only downloads keys tagged with the name of the triggering branch (e.g., lokalise-hub). This is how it keeps things scoped to just the relevant keys. If no such keys are found, the workflow exits with “No matching translation keys found.”
If you want to skip this default tag-based filtering entirely and download all keys, just set:
skip_include_tags: true
This tells the action not to apply any tag filter at all. It might be useful in small projects or specific workflows.
You can also filter by one or more custom tags. To do that, combine skip_include_tags: true with additional_params like this:
When the pull action detects changes in the downloaded translation files, it automatically creates a pull request with those updates. Here’s how it works behind the scenes, and what you can customize.
Temporary branch creation
By default, the action creates a temporary branch to hold the changes. The branch name looks something like this:
lok-<ref>-<SHA>-<timestamp>
It’s long and unique to avoid collisions.
You can change the default prefix using:
temp_branch_prefix: my-custom-prefix
Or override the branch name entirely:
override_branch_name: my_branch_for_pr
This is useful if you want to keep using the same branch across multiple workflow runs: for example, to update the same PR with new translations. If the branch already exists, the action will check it out and update it instead of creating a new one. In this case, however, you might need to set:
force_push: true
GitHub token and permissions
By default, the pull request is created using the default GitHub token provided by the Actions environment. That’s usually enough.
But if you need more control (e.g., assigning whole team as reviewers, interacting with protected branches), you can provide a custom token:
custom_github_token: ${{ secrets.CUSTOM_PAT }}
Make sure to store your personal access token (PAT) as a repo secret and limit its scope as needed.
Customizing the PR content
You can easily tweak the pull request’s title, description, commit message, and even labels:
pr_title: "Translations from Lokalise"pr_body: "New translations"git_commit_message: "updates to lokalise-hub"pr_labels: lokalise
These help keep your PRs consistent and descriptive, especially in automated translation workflows. For example, assigning labels might come in handy when configuring automerge for your pull requests as explained in the follow guide.
Assigning reviewers
Want your pull requests to be reviewed automatically by specific people or teams? You can do that by adding one (or both) of these parameters:
pr_reviewers — use this to assign individual GitHub users as reviewers. Just provide a comma-separated list of GitHub usernames.
pr_team_reviewers — use this to assign teams as reviewers. You’ll need to provide team slugs (not names), and the repo must belong to a GitHub organization.
Requesting team reviewers also requires a token with special scopes: repo and read:org. This token can be provided via the custom_github_token parameter.
Checking the pull result
We’ve covered almost everything — now it’s time to actually run the pull workflow and see what happens.
Reminder: By default, the pull action doesn’t download base language files (en in our case) unless you’ve enabled always_pull_base: true. Before running the workflow, make sure your target languages (like French or Spanish) have some actual translations in Lokalise. You can quickly generate them using Lokalise’s AI-powered tasks.
Now, as before switch to the Actions tab, find the pull workflow, choose the lokalise-hub branch from the dropdown, and hit Run workflow. In the logs, you’ll see something like this (trimmed for clarity):
Downloading translation files from Lokalise...Starting download from LokaliseDownload complete! Detecting changed files...Detected changes in translation files.Committing changes...Switched to a new branch 'lok_lokalise-hub_3728ce_1758105383'remote:remote: Create a pull request for 'lok_lokalise-hub_3728ce_1758105383' on GitHub by visiting:remote: https://github.com/bodrovis/Lokalise-gha-workflows/pull/new/lok_lokalise-hub_3728ce_1758105383remote:To https://github.com/bodrovis/Lokalise-gha-workflows * [new branch] lok_lokalise-hub_3728ce_1758105383 -> lok_lokalise-hub_3728ce_1758105383Changes have been commited!Creating or updating PR...Created new PR: https://github.com/bodrovis/Lokalise-gha-workflows/pull/2Run echo "Verifying created PR..."Verifying created PR...PR has been created.
So, here’s what happened:
The action downloaded translation files based on your config
It checked for any changes in the specified translations_path folders
A temporary branch was created (with a unique name like lok_lokalise-hub_<id>)
All changed files were committed
A pull request was created (or updated)
Output values were set (in case you want to use them in later steps)
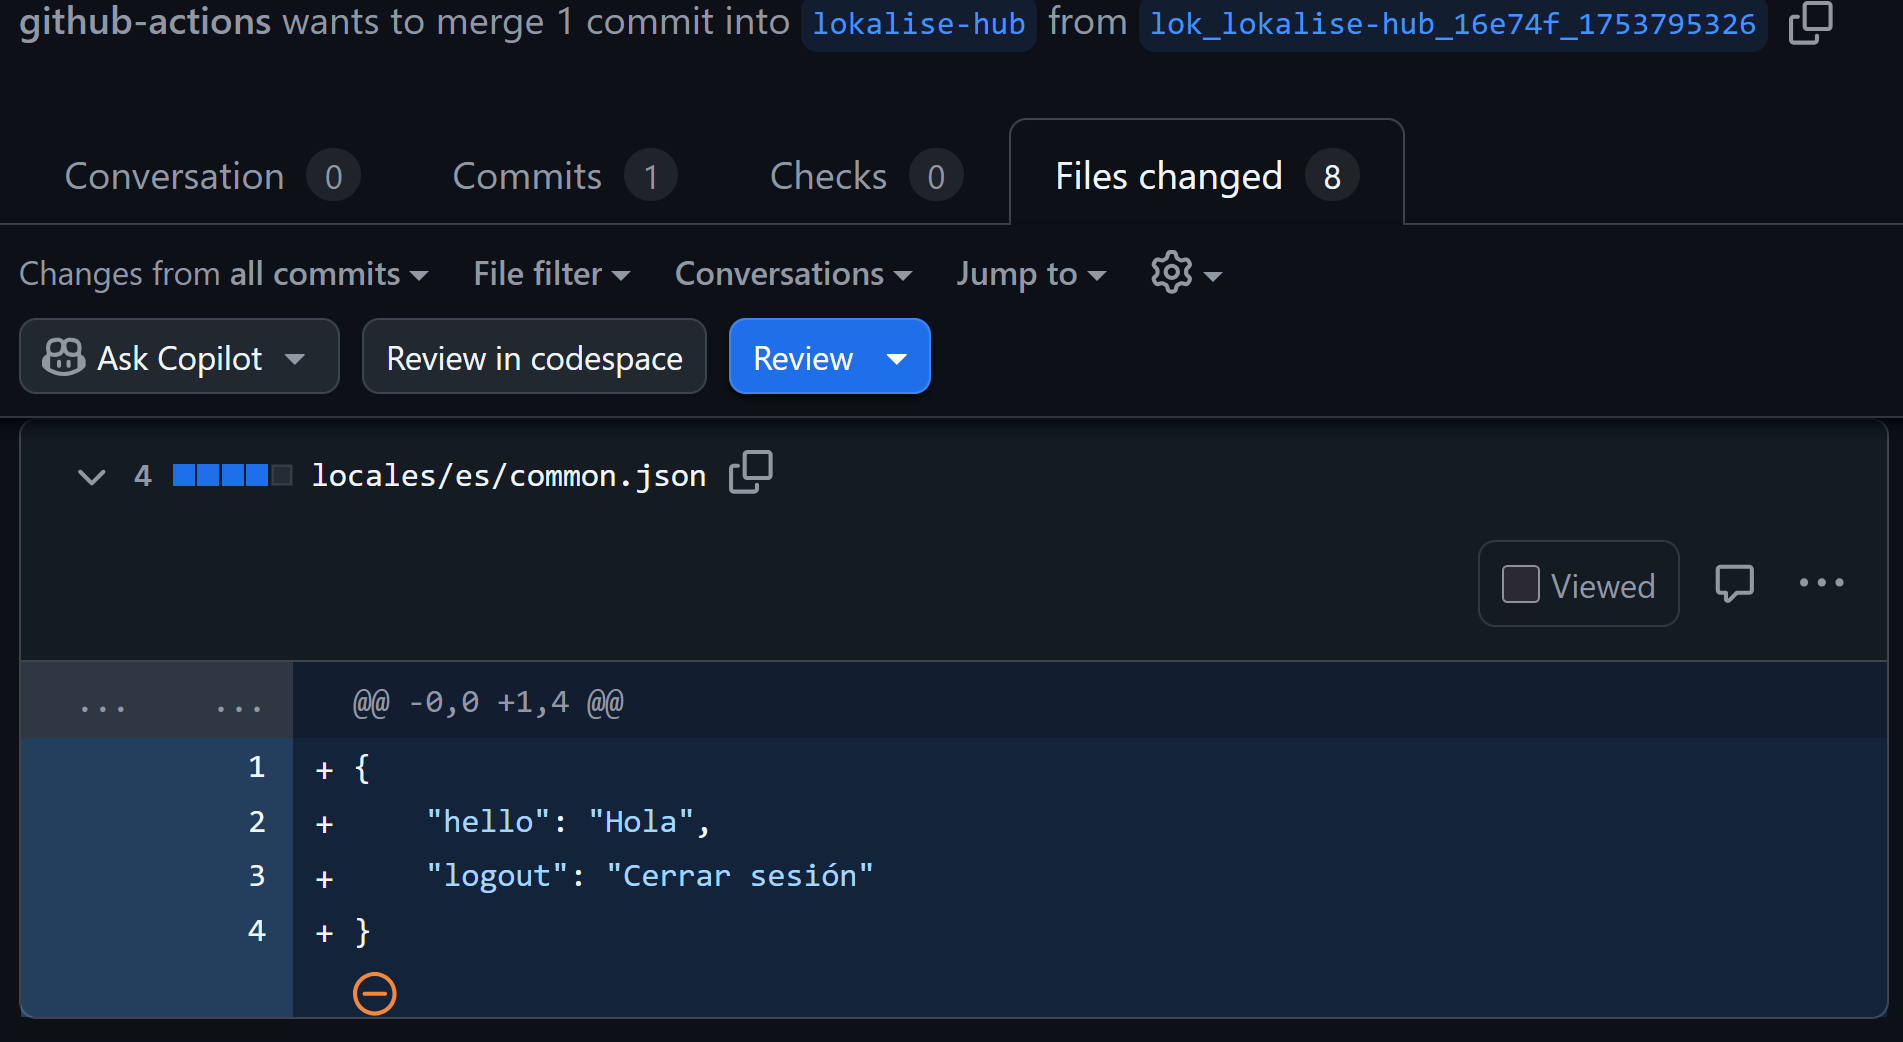
Pull request
Head over to the newly created pull request in your repo. You should see:
PR ready to review and merge
All target language translation files (fr, es, etc.) downloaded and committed
Why some files change even if values didn’t
Even if your target files looked the same before, Lokalise might still generate changes. For example:
Key order might differ
Indentation levels may not match your repo defaults
File formatting may be adjusted during the export
This happens because Lokalise reconstructs files from scratch when exporting. You can fine-tune this behavior using flags via additional_params. For example:
But I also need post-processing for the downloaded files!
Yeah, I hear you. In more complex setups, you might want to modify the downloaded files before opening a pull request. Maybe to clean up some keys, reformat values, or apply custom logic. Good news: the pull action supports this out of the box using the post_process_command parameter.
How it works
You can run any shell command after the files are downloaded and before the PR is created. For example:
Your script can do whatever you want: modify, reformat, move files, or validate their contents. It’s fully under your control.
If you want the workflow to fail and stop when post-processing fails (e.g. bad data, exit code ≠ 0), enable strict mode:
post_process_strict: true
Things to keep in mind on post-processing
The command runs in the root of your repo
You have access to several environment variables:
TRANSLATIONS_PATH
BASE_LANG
FILE_FORMAT
FILE_EXT
FLAT_NAMING
PLATFORM
This is an experimental feature
You’re responsible for the logic inside your scripts. If something breaks or misbehaves, it’s on your side, not Lokalise’s.
If your command requires tools not installed on GitHub runners (e.g. Node, Ruby, custom CLI tools), you must install/setup those tools yourself earlier in the workflow.
Debugging tips
Things won’t always go smoothly, especially the first time you set this up. Here are a few common issues and how to deal with them:
No changes detected in translation files
In 95% of the cases it’s because of misconfiguration. In general, this means:
Your Lokalise filenames don’t match the paths in translations_path
The file(s) were downloaded, but not placed where the workflow expected them
Lokalise exported the files, but nothing changed compared to what’s in the repo
What to check:
Filenames in Lokalise: do they start with locales/ or whatever your translations_path is?
Are you using skip_original_filenames: true by chance? If yes, the downloaded bundle will have a different structure.
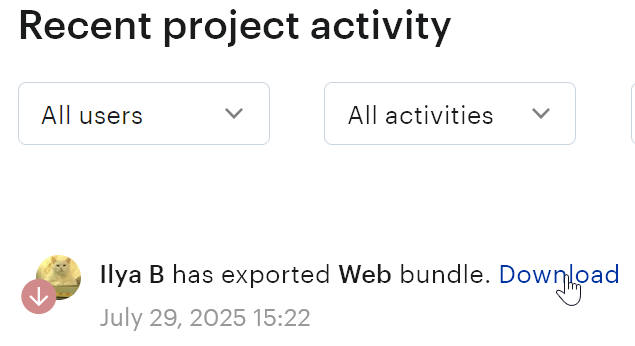
You can navigate to your Lokalise project, open the Activity tab, and manually download the generated bundle. Make sure that it has the expected structure.
No matching translation keys found
Usually it means the pull action couldn’t find any keys tagged with your branch name. Also it might mean that all keys are assigned to a different platform (e.g., iOS instead of Web).
Fixes:
Make sure you are using the correct platform and the file format. You can find the list of all supported platforms along with their file formats on Lokalise download page within your project.
Check that your push workflow tagged the keys using the correct branch name (you can also assign tags on Lokalise manually using the bulk actions menu)
Or skip tag filtering with skip_include_tags: true
Or use "include_tags": ["some_custom_tag"] if you’re managing tags manually
Files aren’t uploading at all
Could be:
The user who generated the API token doesn’t have permissions to perform file uploads in the project.
Your base_lang doesn’t match the actual base language code in your Lokalise project.
Files are outside the expected path (translations_path/base_lang/**/*.json) or have different extension.
You’re trying to upload without making any new commits or the last commit had no changes related to translation files. Remember that the action only compares HEAD vs HEAD~1 unless using tag tracking.
You can try enabling:
use_tag_tracking: true
…or just make sure you’re committing changes properly between workflow runs.
Post-processing script fails silently
If your custom script runs but doesn’t do what you expect:
Enable post_process_strict: true to make it fail loudly
Check that the script path is correct and any required tools are installed (e.g., python, jq, etc.)
Echo environment variables like $TRANSLATIONS_PATH inside the script to make sure things are being passed correctly
Still stuck? Check the actions log: it’s detailed and usually tells you where things broke. Search for keywords like error, failed, or skipping. If you’re not sure how to proceed, feel free to reach out to our support team.
Conclusion
And so that’s it! You now have a complete GitHub Actions setup for pushing and pulling translation files to and from Lokalise like a pro. With just two workflows, you’ve got:
Push: Uploading base language files from your repo to Lokalise
Pull: Downloading translated files back and opening a PR automatically
Along the way, you’ve learned how to:
Structure your translation files properly
Handle branch-specific tags and file filtering
Customize filenames, formats, platforms, and export behavior
Assign reviewers, manage PR branches, and even run custom post-processing scripts
This setup scales from simple projects to pretty complex ones, and it’s fully customizable to fit into your team’s workflow.
So go ahead: sync your content, localize your product, and stop wasting time doing translation updates manually. Your repo now speaks multiple languages, and GitHub Actions is doing the heavy lifting.
Thank you for staying with me, and until next time!
Ilya is the lead for content, documentation, and onboarding at Lokalise, where he focuses on helping engineering teams build reliable internationalization workflows. With a background at Microsoft and Cisco, he combines practical development experience with a deep understanding of global product delivery, localization systems, and developer education.
He specializes in i18n architectures across modern frameworks — including Vue, Angular, Rails, and custom localization pipelines — and has hands-on experience with Ruby, JavaScript, Python, Elixir, Go, Rust, and Solidity. His work often centers on improving translation workflows, automation, and cross-team collaboration between engineering, product, and localization teams.
Beyond his role at Lokalise, Ilya is an IT educator and author who publishes technical guides, best-practice breakdowns, and hands-on tutorials. He regularly contributes to open-source projects and maintains a long-standing passion for teaching, making complex internationalization topics accessible to developers of all backgrounds.
Outside of work, he keeps learning new technologies, writes educational content, stays active through sports, and plays music. His goal is simple: help developers ship globally-ready software without unnecessary complexity.
Build a smooth translation pipeline with Lokalise and Vercel
Internationalization can sometimes feel like a massive headache. Juggling multiple JSON files, keeping translations in sync, and redeploying every time you tweak a string… What if you could offload most of that grunt work to a modern toolchain and let your CI/CD do the heavy lifting? In this guide, we’ll wire up a Next.js 15 project hosted on Vercel. It will load translation files on demand f
Syncing Lokalise translations with GitLab pipelines
In this guide, we’ll walk through building a fully automated translation pipeline using GitLab CI/CD and Lokalise. From upload to download, with tagging, version control, and merge requests. Here’s the high-level flow: Upload your source language files (e.g. English JSON files) to Lokalise from GitLab using a CI pipeline.Tag each uploaded key with your Git branch name. This helps keep translations isolated per feature or pull request
In one of my previous articles I was covering Lokalise APIv2 basics, explaining its key features, and how to get started with it. Today we are going to work a bit more with the API using Node, Ruby, and Python SDKs. We are going to cover some real-world scenarios and discuss different code samples. By the end of this article you’ll be able to put your knowledge to work in real projects.