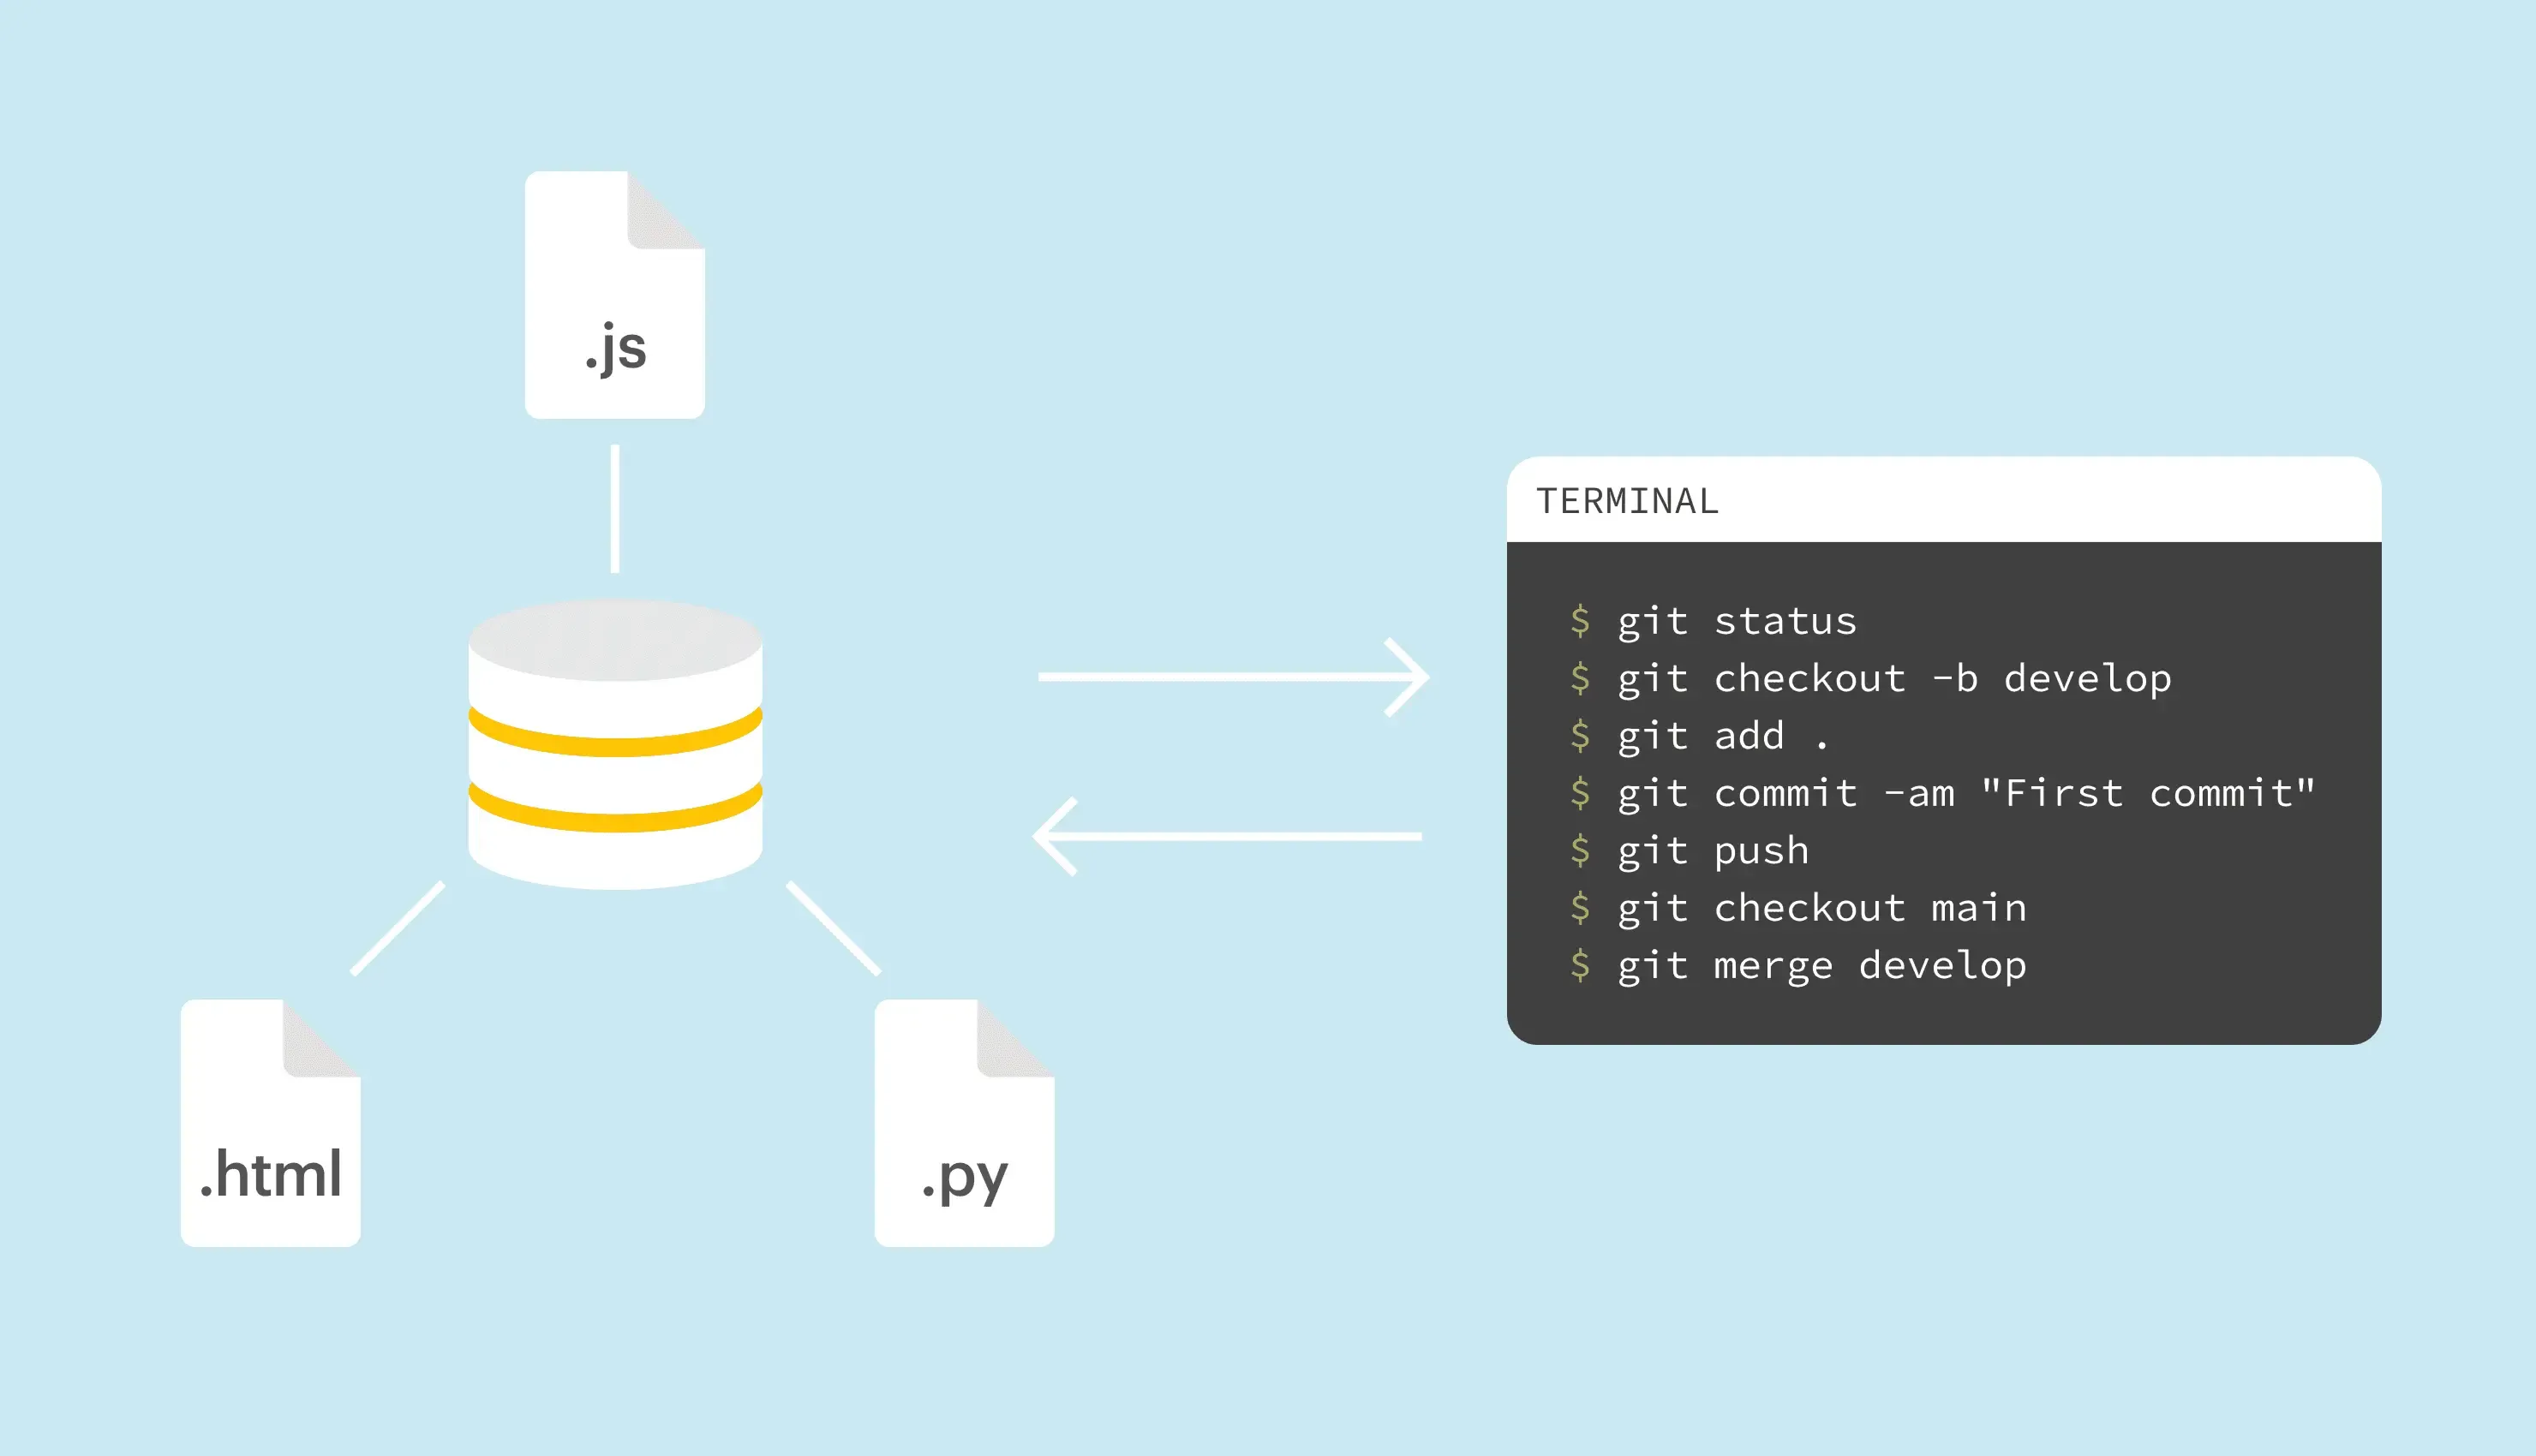
Git is a version control system which became a de-facto standard for many developers. Basically, any programmer nowadays is expected to know the basics of Git and understand how to work with this system.
As you work with Git, incorporating software internationalization practices can enhance your version control process, ensuring that your codebase is prepared for localization across different languages and regions.
Therefore, in this article we're going to list and discuss the most common and useful Git commands that you're most likely going to utilize in your day-to-day work. We are going to see some examples and talk about the usage of these commands, including how they can reflect localized time, so hold on tight, and let's get started!
To follow this article, you'll need to have Git installed on your PC (obvious, isn't it?). I'm going to use Git 2.32.0 which is the latest version at the time of writing this article.
Apart from that, there are no special requirements: you can use any operating system and any command line tool.
git init
initis a Git command that initializes or reinitializes a Git repository in the current folder. So, after you have created a folder for your new shiny project, just cd into this folder and run:
git init
Basically, this command creates a hidden .git folder with all the Git goodies that are required to properly perform version control. This folder is very important as it's going to store all history for your project therefore do not delete it unless you fully understand what you are doing.
By default, git init creates a single "primary" branch in your project. Depending on your setup, this branch may be named either masteror main. To override the primary branch name, provide the -bflag:
git init -b primary
Some terminology
Before proceeding, let's cover some common terms.
First of all, it's important to understand that the changes that we perform are done in a so-called working tree of the project. Basically, the working tree is a collection of your files and folders (excluding files inside the .git folder) in their present state as they exist on the file system. You can freely create, modify, and delete files and folders in the working tree as usual. The working tree observes all your changes and makes notes of them.
An index (or "staging area") is like a snapshot of your working tree that contains all the current changes. Simply speaking, it's a large file inside the .git folder which contains all your files and their checksums.
When we perform a commit, the created snapshot is added to the project history. You can browse the created commits and even restore the previous versions of the files.
Branch is like an independent version of the same project stored in the same folder. You can switch between these independent versions, make changes as necessary, and at some point merge two versions together (or delete one of the versions completely). As the Git book says, "Branching means you diverge from the main line of development and continue to do work without messing with that main line".
Git doesn’t think of or store its data this way. Instead, Git thinks of its data more like a series of snapshots of a miniature filesystem. With Git, every time you commit, or save the state of your project, Git basically takes a picture of what all your files look like at that moment and stores a reference to that snapshot. To be efficient, if files have not changed, Git doesn’t store the file again, just a link to the previous identical file it has already stored. Git thinks about its data more like a stream of snapshots.
Now that we know some terminology let's discuss other useful Git commands!
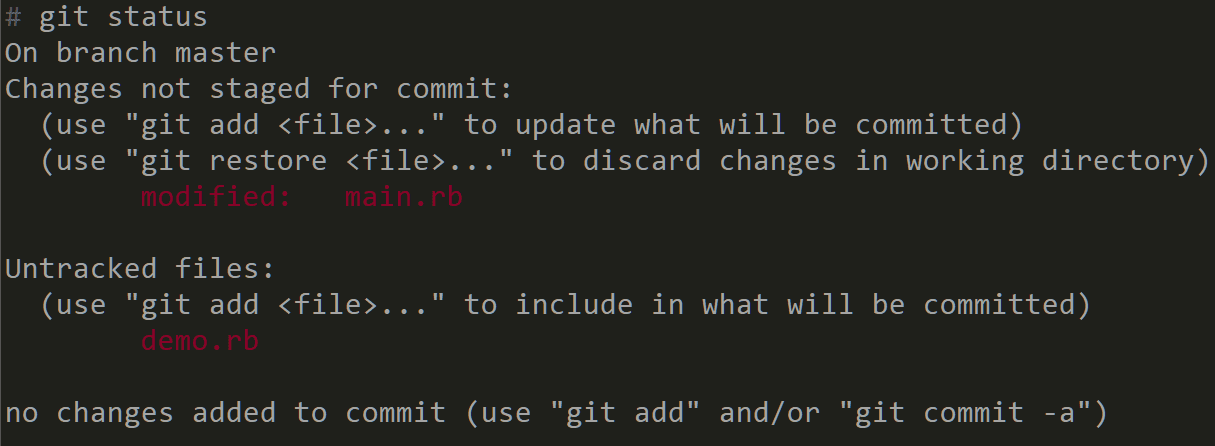
git status
statusshows, well, the status of your working tree. Specifically, you'll be able to see your current branch, tracked and untracked files, as well as staged and unstaged changes:
So, in the example above we can see that the current branch is master. The main.rb file is already tracked by Git and it has some changes that are not yet staged for commit (we will see how to achieve that a bit later).
Also, we can see that the demo.rb is not yet tracked by Git.
Here are some common options for the git status command:
-s — display output in short format.
-b — show the branch and tracking info in short format.
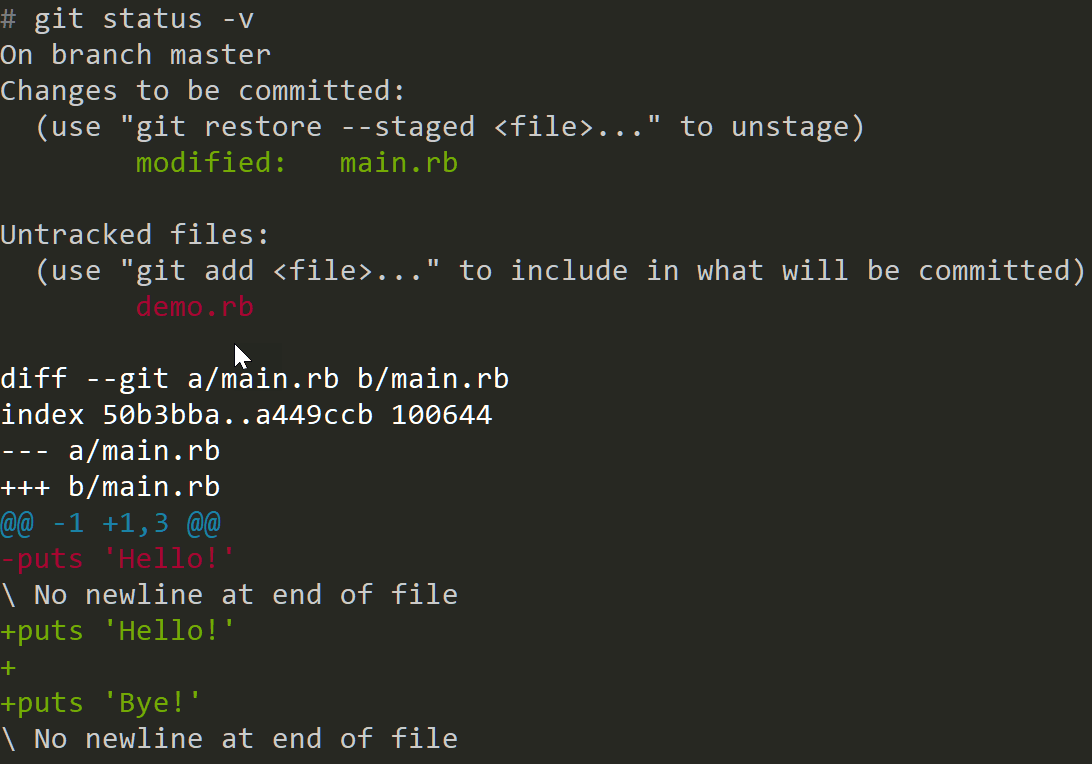
-v — show the textual changes that are staged to be committed. Here's an example verbose output:
Here you can see not only the filenames but also what exactly has changed in those files (new changes have green text color).
git add
addis probably one of the most common Git commands. So, what operation does it perform? Basically, it updates the index with the content found in your working tree thus making the content staged for the next commit. An index is like a snapshot of your working tree. When you perform a commit, this snapshot is utilized. Therefore, before doing a commit you should perform git add for any files that were modified or created.
In the simplest case you can say:
git add .
This dot .means "take all the files in the working tree" and add them to the index.
However, you can also add individual files and folders as well as use fileglobs:
So, to summarize: after you have performed some changes in your project, you will need to run git add before doing a commit.
This command accepts lots of different options which you can find in the official docs.
git commit
commitis one of the most important Git commands as it records the changes to the repository based on the current index (the snapshot that you've created). To perform a new commit and add a small informational message for it, run:
git commit -m "My first commit"
Now all the staged files will be commited and added to the project history. Also, you can use the -a option to automatically stage and then commit all the files that have been modified and deleted:
git commit -am "My first commit"
Unfortunately, this option will ignore untracked files, therefore you will still have to say git add . for these new files.
git push/pull
pushGit command allows you to send local changes to the remote repository which is usually hosted on services like GitHub, Bitbucket, GitLab, or Azure DevOps repos.
First of all, you will need to actually add information about this remote repository by running something like:
Usually this command will be supplied to you by the service you're using. What it does? It creates something like a "pointer" to a remote repository that is stored on github.com. This remote repository has an alias originbut you can call it anything you'd like (for example, just github).
Now, when the remote repository is provided, you can push your local changes:
git push origin master
In this example we're taking the contents of the masterbranch and push it to the remote repository which has an alias origin.
You can also set originas "upstream" by saying:
git push -u origin master
Now you don't need to provide originanymore. Just say:
git push
However, please note that it will work only for the masterbranch which was mentioned when creating an upstream — for all other branches you will still have to say:
git push origin another_branch
To grab changes from the remote repository and apply them locally, use:
git pull origin master
This command works in the same way as git push. If you have specified an upstream, you can simply say:
git pull
Please note that merge conflicts might occur and you will need to resolve them manually (check the next section about the git merge command to learn about conflicts).
git stash
stashcommand saves all your modifications since the last commit, stores them away and returns to a clean working directory. In other words, if you have performed some modifications since the last commit but then decided that these modifications are not relevant anymore, you can run:
git stash
Now all the changes you've made will be stored separately, and the state of the project will be reverted to the last commit. You can create as many stashes as needed, and to view them run:
git stash list
Here's the output:
Two stashes were created in this example (stash@{1} was created before stash@{0}, in other words the first entry is the latest one).
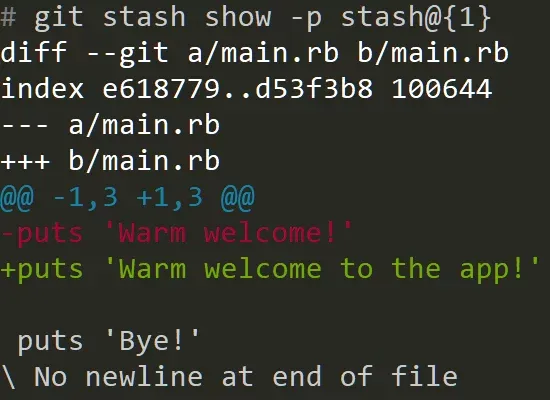
You can also view the contents of each stash:
git stash show -p stash@{1}
So, you can see what exactly was changed in this stash. If you decide to fetch your changes from a stash and apply them to the current version of the project again, run:
git stash apply stash@{1}
Now the changes will become visible in the current version of the project once again.
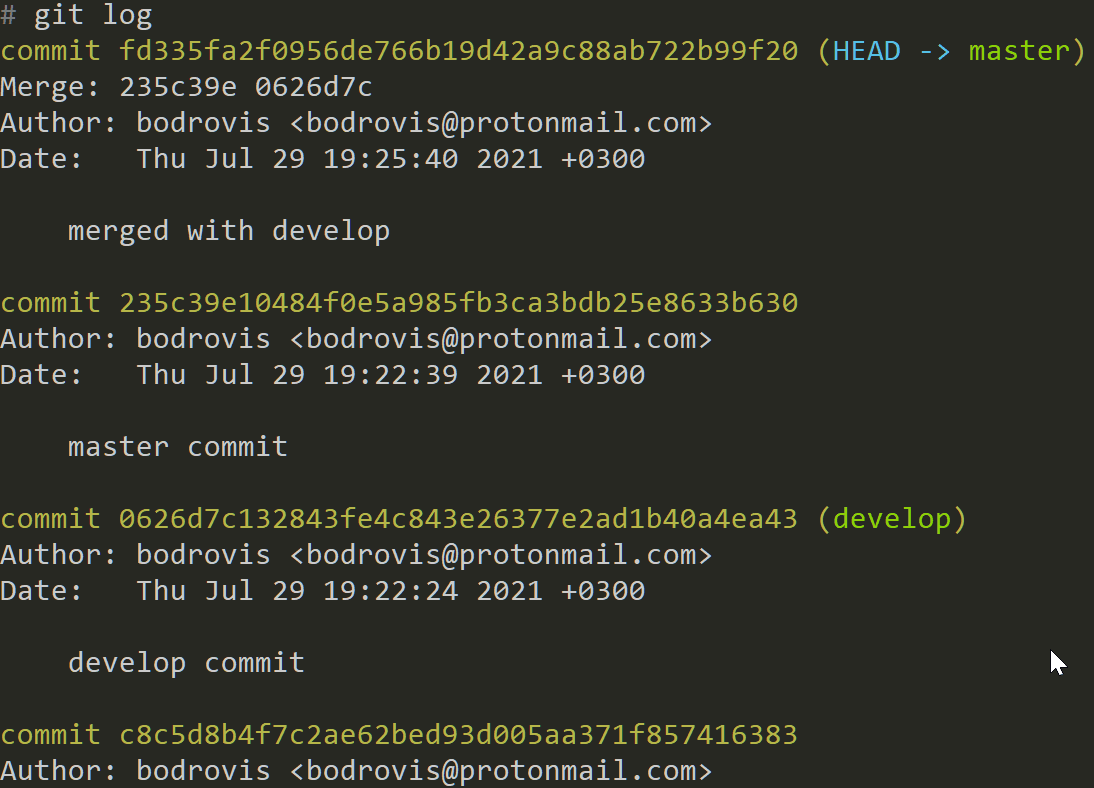
git log
logGit command displays commit logs and allows you to see what changes were made, when, and by whom:
git log
For each commit, you can see:
Its checksum (that long alphanumeric string)
Author
Date
Commit message
The HEAD -> master means that the commit was performed on the masterbranch and this is the current version that we're browsing at the moment.
developmeans that the commit was performed on the developbranch.
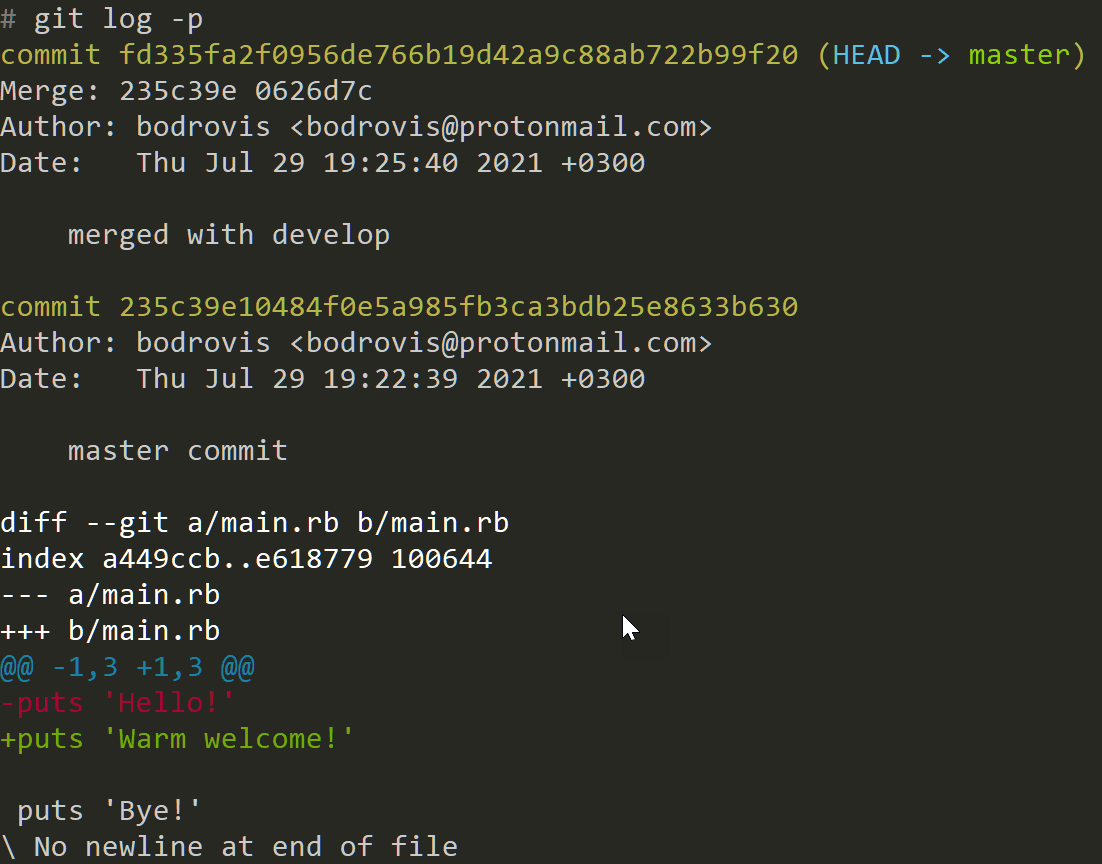
Provide the -p flag to view more detailed information:
In this case you can see what exactly was changed in each commit (the first commit doesn't show anything because we performed a merge).
On top of that, you can provide a number in the following way:
git log -p -2
In this case 2means "show me only the last two commits".
git branch
branchis a Git command that enables you to manage project branches. A branch is basically a separate version of your project, and ability to work with different branches is one of most powerful features of Git. As already mentioned above, initially you are going to have only one "primary" branch but it's possible to create as many branches as needed. Usually developers tend to create separate branches when implementing new features or introducing bug fixes — this is very convenient because this way they don't mess with the main version of the application. To view all branches in your project, run:
git branch
Here's the output:
We can see that the project has two branches:
masterwhich is the currently chosen branch.
develop— we can switch to this branch as needed.
To create a new branch, run:
git branch YOUR_BRANCH_NAME
The new branch will be created based on the current version of your working tree. If you would like to create a branch based on some other version, you'll have to provide the existing branch name and the new name:
git branch NEW_BRANCH_NAME EXISTING_BRANCH_NAME
In this case the new branch will be created based on the existing branch that you have provided. To rename a local branch, run:
git branch -m OLD_NAME NEW_NAME
Alternatively, you can rename the current branch by running:
git branch -m NEW_NAME
To delete a local branch, run:
git branch -d BRANCH_NAME
Please note that in order to delete a remote branch, you'll have to be a bit more verbose:
git push origin --delete REMOTE_BRANCH_NAME
git checkout
checkoutGit command allows you to switch between branches. In the simplest case you can say:
git checkout BRANCH_NAME
You will switch to a different branch and the corresponding version of the project will be loaded automatically for you. Also you can create a new branch based on the current one and switch to it in a single command:
git checkout -b NEW_BRANCH_NAME
In this case you'll create a new branch based on the currently chosen one and also switch to it. Convenient, eh? On top of that, checkouthas advanced usage which allows to travel back in history and even restore old versions of your files.
git merge
mergeGit command joins development histories together. In other words, it allows you to take changes from one branch and incorporate it into another branch. For example, if you were implementing a new feature in the developbranch and want to incorporate these changes into the master, then you would run the following commands:
git checkout mastergit merge develop
After running these commands, all changes from the developwill be incorporated into master. However, if you modify the same lines in the sames files in both branches, then you would see a merge conflict:
In this example there's a merge conflict in the main.rb file. Here's the output from the Visual Code editor:
This conflict appeared because we've modified the same line in masterand developbranches. Therefore, you have to pick one of the versions, delete the other version from your text file, and then commit the result:
git commit -am "merged develop with master"
Now the conflict is resolved and the merge operation is performed successfully.
Conclusion
So, in this article we've discussed some common Git commands and their usage. If you would like to learn more about Git version control system and see other use cases, I would really recommend checking out Pro Git book which can be read online for free. Also, make sure to check out other tutorials in our blog — for example, you might be interested in a list of dev blogs to read in 2023.
And that's it for today, folks. I thank you for staying with me, and until the next time!
Ilya is the lead for content, documentation, and onboarding at Lokalise, where he focuses on helping engineering teams build reliable internationalization workflows. With a background at Microsoft and Cisco, he combines practical development experience with a deep understanding of global product delivery, localization systems, and developer education.
He specializes in i18n architectures across modern frameworks — including Vue, Angular, Rails, and custom localization pipelines — and has hands-on experience with Ruby, JavaScript, Python, Elixir, Go, Rust, and Solidity. His work often centers on improving translation workflows, automation, and cross-team collaboration between engineering, product, and localization teams.
Beyond his role at Lokalise, Ilya is an IT educator and author who publishes technical guides, best-practice breakdowns, and hands-on tutorials. He regularly contributes to open-source projects and maintains a long-standing passion for teaching, making complex internationalization topics accessible to developers of all backgrounds.
Outside of work, he keeps learning new technologies, writes educational content, stays active through sports, and plays music. His goal is simple: help developers ship globally-ready software without unnecessary complexity.
XLIFF files translation with Lokalise online editor
In this tutorial, we are going to cover the XLIFF file format that is utilized to store translations for various systems and technologies, an essential aspect of translation management system. We will learn how XLIFF files are structured, which is vital for software in