Internationalization can sometimes feel like a massive headache. Juggling multiple JSON files, keeping translations in sync, and redeploying every time you tweak a string… What if you could offload most of that grunt work to a modern toolchain and let your CI/CD do the heavy lifting?
In this guide, we’ll wire up a Next.js 15 project hosted on Vercel. It will load translation files on demand from Supabase, format them in your components with intl-messageformat, and automate the entire upload/download cycle via Lokalise webhooks and Vercel serverless functions. We’ll cover:
Bootstrapping a TypeScript Next app with localized routes
Storing and serving JSON translations from Supabase Storage
Fetching and formatting messages at runtime through a React context
Uploading base language files to Lokalise with an API route
Listening for Lokalise “task closed” webhooks, pulling down updated translations, pushing them back to Supabase, and triggering ISR so your live site updates instantly
No more manual downloads or CLI gymnastics! Once it’s set up, you can fire off translation tasks in Lokalise (even via AI) and watch your site pick up the changes without breaking a sweat. Let’s dive in.
In this tutorial, we’ll put together an end-to-end, fully automated translation pipeline for a Next.js app:
Next.js project with localized routes A TypeScript-powered App Router setup where every page lives under a /[lang] segment.
Dynamic translation loading JSON files stored in Supabase Storage, fetched on demand at runtime via a simple loader.
React translation context A lightweight provider and t() helper (powered by intl-messageformat) so components can render translated strings and handle plurals or variable interpolation.
Language switcher A small client component to swap the current locale in the URL without losing your place in the app.
Serverless uploads and webhooks
An API route to push your base English files from the repo to Lokalise.
A webhook listener that reacts to “task closed” events in Lokalise, downloads the updated translations, writes them back to Supabase, and triggers Next.js Incremental Static Regeneration so your live site updates automatically.
Prerequisites
Before we dive into the fun stuff, make sure you’ve got these lined up:
Node.js installed locally: you’ll need it to run some scripts and install dependencies.
“Web and mobile” Lokalise project: this is the type of project that gives you downloadable JSON files (perfect for Next apps).
You’ll need to choose base and target languages when creating a new project. For the purposes of this tutorial I’ll use English (en) as base, plus French and Spanish as targets but of course you can pick any other locales.
Lokalise API token: you’ll need this to talk to the Lokalise API. Proceed to your personal profile, open the API tokens tab, and generate one with read/write access.
Supabase project with a public storage bucket: we’ll store the translations here so they can be served to your app.
Vercel account: we’ll deploy our Next project here.
Setting up a Next.js app with TypeScript
If you don’t already have a Next.js app, let’s spin one up from scratch with TypeScript. Well, because we like types, and we like catching dumb mistakes before they go live.
@lokalise/node-api – This is the official Lokalise Node.js SDK. We’ll use it to fetch metadata (like task info and supported languages) via our REST API.
lokalise-file-exchange – A lightweight utility that I’ve created a few months ago to handle uploading/downloading translation files. It wraps around ZIPs, extraction, polling, etc., so you don’t have to reinvent the wheel.
@supabase/supabase-js – The official Supabase client library. We’ll use it to read/write translation files to Supabase Storage and later fetch them from the frontend.
intl-messageformat – A battle-tested library from FormatJS that lets us interpolate dynamic values in translated strings ({username} has {count} new messages) in a way that respects plural rules and locales. Think ICU formatting without the full i18next kitchen sink.
Nice!
Initial preparations
Note on Supabase setup
Before we can store and serve translations from Supabase, we need to make sure our bucket and access policies are properly configured.
Make sure your bucket is public
Go to the Supabase dashboard.
Open your project, proceed to Storage, and choose a bucket (I’ve called mine i18ndemo). Make sure it says “public” next to its name.
Alternatively, create a new public bucket in a region of your choice.
This allows anonymous clients (your users) to fetch translations directly from the bucket without authentication.
Add an anonymous SELECT policy
To be extra careful, you can allow anonymous users to read file in your bucket.
Open Supabase and proceed to Storage > Policies.
Under Storage policies click New policy (choose “full customization”):
Name: Allow anon read
Allowed operation: SELECT
Target roles: anon
Where to find your Anon key
Go to Project settings > API keys inside your Supabase project.
Find the anon public key.
Take a note of this key as we’ll need it in a moment.
Add a SERVICE_ROLE policy for writing files
Your API route (running on Vercel) will use the Service Role key to write new translations into Supabase. To allow this, create another policy:
Name: Allow service role write
Allowed operation: INSERT and UPDATE
Target roles: service_role
Where to find your Service Role key
Go to Project settings > API keys inside your Supabase project.
Find the service_role key and hit Reveal.
Take a note of this key as we’ll need it in a moment.
Important: Never expose the Service Role key to the client (browser). It’s powerful and bypasses RLS.
Where to find your Supabase project ID
Go to Project settings > General inside your Supabase project.
Find the project ID field.
Take a note of this ID.
Adding environment variables
Okay, at this point, we need to define several environment variables in an .env file. Later, you’ll also configure these variables in your Vercel project.
Most of these values have been explained earlier. If you’re unsure about Lokalise project ID, open your project in Lokalise (make sure it’s of type Web and mobile), then go to More > Settings. The project ID will be displayed there.
As for LOKALISE_WEBHOOK_SECRET, you can leave it empty or use any placeholder for now; we’ll return to it when working with webhooks.
We’re using English (en) as the default language, and supporting French (fr) and Spanish (es). Just make sure your Lokalise project includes these languages.
Creating translation files
Next, let’s prepare some initial translation files. We’ll use JSON format, which is common in Next.js projects, but Lokalise supports many other formats if needed.
Even though your application will eventually load translations from Supabase, it’s useful to keep local source files for uploading to Lokalise. Later in this guide, we’ll add a script to handle that. (You can also upload to Supabase, and we’ll cover that too.)
Start by creating a locales folder inside the app directory. To make translation management more scalable, we’ll use namespaces. Instead of storing all strings in a single file per language, we’ll divide them into logical groups like ui, meta, or admin. This makes it easier to organize and lazily load only what you need: for example, the admin dashboard translations can be excluded for regular users.
Translation files will follow this structure: locales/<lang>/<namespace>.json.
Let’s add two example files:
app/locales/en/meta.json
{ "metaTitle": "Hello from Lokalise", "metaDescription": "This is a localized meta description"}
app/locales/en/ui.json
{ "title": "Hello from {name}", "subtitle": "This is a translation loaded from Supabase", "button": "Click me", "counter": "You clicked {count, plural, one {# time} other {# times}}"}
You can expand these files as needed. However, be mindful of key collisions. If multiple namespaces contain the same top-level keys (e.g. "title"), you may accidentally overwrite data. To avoid this:
Use nested keys (e.g. "ui.title") for better namespacing inside your files.
Or configure Lokalise to treat each file as a distinct namespace using the distinguish_by_file setting (we’ll briefly cover this later).
At this point, you can upload these English translation files to your Supabase storage bucket. Just make sure to preserve the folder structure exactly as it is: YOUR_BUCKET/locales/<locale_code>/<namespace>.json.
Vercel serverless function to upload base translations to Lokalise
While you could upload your base language files to Lokalise manually, let’s make the process smoother (and a bit more interesting!) by setting up a serverless function that does it for you. In this setup, the function is publicly callable, but you can (and probably should) protect it with an auth mechanism if needed.
Start by creating a new API route: app/api/upload-to-lokalise/route.ts. Here’s the code:
It grabs your Lokalise credentials from environment variables.
It finds all .json translation files under app/locales/en, traversing subfolders if needed.
It infers the language from the folder name (e.g. en from locales/en/ui.json).
It cleans up the filename path so Lokalise preserves your folder structure (locales/en/ui.json, without the app part).
It tags each upload with the current date, which makes it easier to track in Lokalise.
You can also add the distinguish_by_file: true option for the uploadFileParams if would like to make sure duplicating keys are not automatically merged.
It pushes the files to Lokalise and returns the result.
Deploying to Vercel and running the serverless function
You can deploy your Next.js app to Vercel in several ways. The most straightforward one is to push your code to GitHub (or another supported Git provider) and connect your repository to Vercel. That’s exactly what I did.
Once your project is linked, don’t forget to add the environment variables we mentioned earlier (things like Lokalise API key, Supabase URL, and service keys). You can manage these through the Settings > Environment Variables section of your Vercel project.
After deployment, your serverless API routes will be available as regular HTTP endpoints. Call these endpoints using curl or Postman, for instance:
curl -X POST https://my-lokalise-demo.vercel.app/api/upload-to-lokalise
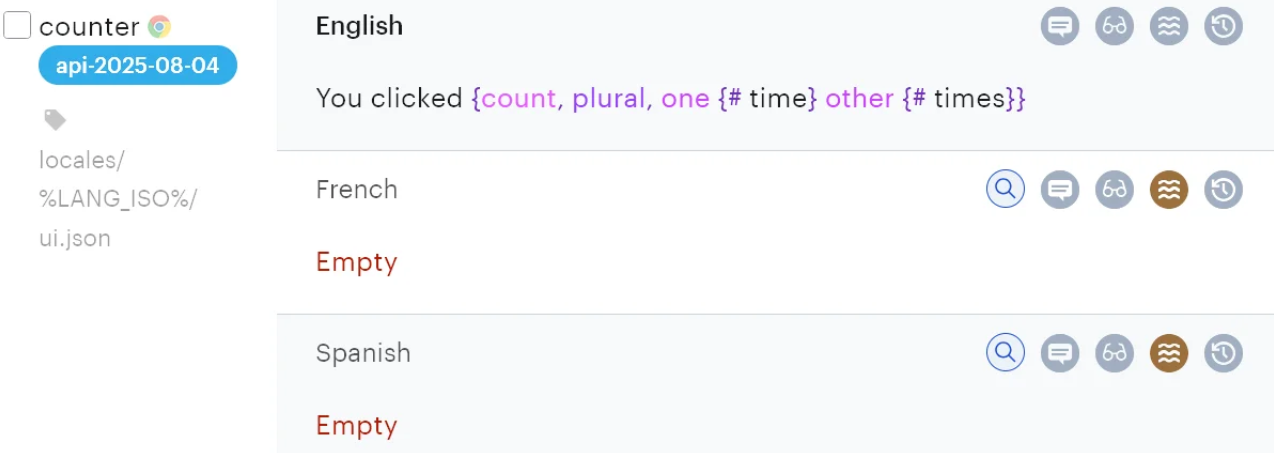
If everything is wired up correctly, the function will upload your base translation files to Lokalise, and you’ll see the result in your project editor:
In the example above:
The counter key has the base language value
It is tagged properly
The filename locales/%LANG_ISO%/ui.json is the correct one
The key belongs to the Web platform (a small Chrome icon)
Implementing Next.js i18n
Internationalizing a Next.js app can be done in a variety of ways, depending on how dynamic or static your content is. While this blog post doesn’t aim to be a full guide to i18n in Next, here’s one simple and quite flexible approach: we’ll fetch translation files from Supabase dynamically and expose them through a custom hook or context.
Let’s start with the core building block: a translation loader function that fetches JSON files from Supabase based on the current language and namespace.
Creating translations loader
As already discussed, we’ll store our translations in a Supabase storage bucket, organized like this:
locales/
  en/
    ui.json
    meta.json
  fr/
    ...
Now, let’s create a function that loads a file from Supabase and parses it into JSON.
Supabase client setup: It lazily initializes a Supabase client using environment variables. The same client is reused between calls.
Translation file lookup: Based on the current locale and namespace (e.g. en and ui), it constructs the file path in the bucket: locales/en/ui.json.
Download and parse: It fetches the file from Supabase Storage and attempts to parse it as JSON. If the file doesn’t exist or contains invalid content, it returns an empty object.
Error handling: It logs any unexpected issues to the console, but never throws so your app won’t crash if a translation is missing.
Creating the i18n config
Now that we have a way to load translation files from Supabase, let’s define which languages our app supports. This config file will serve as a central place for defining the default language and the list of supported languages, and will expose a few helper functions for convenience.
Create a new file at lib/i18n-config.ts:
const DEFAULT_LANG = (process.env.NEXT_PUBLIC_DEFAULT_LANG || 'en').toLowerCase();const SUPPORTED_LANGS: readonly string[] = process.env.NEXT_PUBLIC_SUPPORTED_LANGS ? process.env.NEXT_PUBLIC_SUPPORTED_LANGS .split(',') .map((l) => l.trim().toLowerCase()) .filter(Boolean) : ['en'];if (!SUPPORTED_LANGS.includes(DEFAULT_LANG)) { throw new Error( `DEFAULT_LANG "${DEFAULT_LANG}" must be one of [${SUPPORTED_LANGS.join(', ')}]` );}export function getDefaultLang(): string { return DEFAULT_LANG;}export function getSupportedLangs(): readonly string[] { return SUPPORTED_LANGS;}export function isLangSupported(lang: string): boolean { return SUPPORTED_LANGS.includes(lang.toLowerCase());}
What this code does:
Reads from environment variables: It pulls in NEXT_PUBLIC_DEFAULT_LANG and NEXT_PUBLIC_SUPPORTED_LANGS from your .env file. If not set, it falls back to 'en'.
Normalizes the values: It trims and lowercases each language code, so that En, FR , es becomes ['en', 'fr', 'es'].
Validates the config: It throws an error if the default language isn’t listed in the supported languages. This ensures consistent behavior at runtime.
Exports a few helpers:
getDefaultLang() returns the default locale (used for fallback).
getSupportedLangs() gives you the full list of available locales.
isLangSupported(lang) checks whether a given language is allowed, case-insensitively.
Creating a message formatter
Let’s now create a utility to handle message formatting. This function will take raw translation messages (loaded from Supabase), compile them with intl-messageformat, and return a t() function to use in your components.
This setup gives us pluralization, variable interpolation, and locale-aware formatting without pulling in any heavy i18n frameworks.
Create the file lib/i18n.ts:
import IntlMessageFormat from 'intl-messageformat';export type Messages = Record<string, string>;export type Values = Record<string, string | number>;export type Translator = (key: string, values?: Values) => string;export function createTranslator(locale: string, messages: Messages): Translator { // Pre-compile all formatters up front const formatters: Record<string, IntlMessageFormat> = {}; for (const [key, msg] of Object.entries(messages)) { try { formatters[key] = new IntlMessageFormat(msg, locale); } catch (err) { console.warn( `[i18n] Invalid message format for key "${key}" (${locale}):`, err ); // leave key out of formatters so a missing-format fallbacks later } } return function t(key: string, values: Values = {}): string { const formatter = formatters[key]; if (!formatter) { console.warn(`[i18n] Missing translation for key "${key}" (${locale})`); return key; } try { // .format() can return string or array for plural/select patterns; coerce to string const result = formatter.format(values); return Array.isArray(result) ? result.join('') : String(result); } catch (err) { console.error( `[i18n] Error formatting "${key}" with values`, values, err ); return key; } };}
What this code does:
createTranslator(locale, messages) This function takes a locale (like en) and a flat object of translation messages (e.g. { title: "Hello {name}" }). It pre-compiles each message string into an IntlMessageFormat instance, which makes runtime lookups faster and safer.
Returns a t(key, values?) function This function looks up the translation for the given key and formats it with optional values. If formatting fails or a key is missing, it logs a warning and returns the key itself as a fallback.
Supports ICU syntax Thanks to intl-messageformat, you can use placeholders and plural rules like: { "greeting": "Hi {name}", "clicks": "You clicked {count, plural, one {# time} other {# times}}" }.
Setting up the translation context
To make translations accessible throughout your app, let’s introduce a simple translation context using React’s Context API. This way, you can wrap parts of your app with a TranslationProvider and use the t() function wherever needed via the useTranslation() hook.
TranslationContext is a React context that holds the current language and the t() translator function.
useTranslation() is a simple hook to access lang and t() anywhere inside components wrapped by the provider.
TranslationProvider takes lang and messages (translation JSON), builds a memoized translator, and provides it to the rest of the tree.
Creating a top-level layout and root page
Now let’s get our top-level layout and entry point in place. These will stay minimal because we’re going to handle routing, translations, and actual markup in language-specific routes like /en, /fr, etc.
app/layout.tsx
This is the global layout file that wraps the entire app. Right now, it doesn’t need to do much.
This file acts as the root route (i.e., /). Since our content is organized by locale, we want to immediately redirect users to the default language version of the site:
'use server';import { redirect } from 'next/navigation';import { getDefaultLang } from '@/lib/i18n-config';export default async function RootPage(): Promise<never> { const lang = getDefaultLang(); redirect(`/${lang}`);}
This ensures that when someone lands on /, they’ll be taken to /en, /fr, or whatever your default language is. We’ll set up the localized route handling next.
Creating a simple language switcher
To let users switch between languages, we’ll add a small component that rewrites the current path with a new language prefix. For example, if the user is on /en/about, they can jump to /fr/about by clicking the French language option.
This is what the LanguageSwitcher component does:
// components/LanguageSwitcher.tsx'use client';import Link from 'next/link';import { usePathname, useParams } from 'next/navigation';import { getSupportedLangs } from '@/lib/i18n-config';export default function LanguageSwitcher() { const pathname = usePathname() ?? '/'; const { lang: currentLang } = useParams() as { lang?: string }; // Remove the current language prefix from the path const basePath = currentLang ? pathname.replace(new RegExp(`^/${currentLang}`), '') || '/' : pathname; return ( <ul style={{ display: 'flex', gap: '1rem', listStyle: 'none', padding: 0 }}> {getSupportedLangs().map((lang) => { const href = `/${lang}${basePath}`; const isActive = lang === currentLang; return ( <li key={lang}> <Link href={href} style={{ textDecoration: isActive ? 'underline' : 'none', fontWeight: isActive ? 'bold' : 'normal', }} > {lang.toUpperCase()} </Link> </li> ); })} </ul> );}
What this does:
Uses Next.js usePathname() to get the current path.
Uses useParams() to extract the active lang segment from the URL.
Strips the current language prefix (like /en) so we can replace it with another one.
Loops over all supported languages (defined in lib/i18n-config.ts) and creates a <Link> to the same page in another language.
The currently active language is visually highlighted using underline and bold styles. You can of course replace this with more sophisticated styling or dropdowns later.
Creating a localized layout for language routes
Next.js allows us to define layouts scoped to a specific route segment. Since we’re building a multilingual app, we want a layout that handles everything under a catch-all language segment like /en, /fr, etc. That’s exactly what app/[lang]/layout.tsx is for.
This layout will:
Check if the requested language is supported.
Load translations for the UI and meta tags.
Provide a translation context to all child components.
Set up metadata (title, description) from translations.
Show a simple language switcher.
Here’s the full implementation:
// app/[lang]/layout.tsximport { notFound } from 'next/navigation';import { Metadata } from 'next';import { getTranslations } from '@/lib/get-translations';import { TranslationProvider } from '@/lib/translation-context';import { isLangSupported } from '@/lib/i18n-config';import LanguageSwitcher from '@/components/LanguageSwitcher';export async function generateMetadata({ params,}: { params: Promise<{ lang: string }>;}): Promise<Metadata> { const { lang } = await params; if (!isLangSupported(lang)) { return { title: 'Language not supported', description: '', }; } const meta = await getTranslations<{ metaTitle?: string; metaDescription?: string }>( lang, 'meta' ); return { title: meta.metaTitle ?? 'Default title', description: meta.metaDescription ?? 'Default description', };}
In generateMetadata, we fetch the meta namespace for the current locale and use its values to populate the page’s title and description. If the language is unsupported, we fall back to a generic message.
We check again if the language is supported, and if not — trigger a 404 via notFound(). Then we load the UI namespace translations for that language and wrap all children in a <TranslationProvider>.
From here on, any page under /[lang]/ can access translations via the useTranslation() hook.
Localized page with static generation and caching
Next up, we define the main localized page component. This is the page that users land on after being redirected from /, and it lives at /[lang] (for example, /en, /fr, /es).
// app/[lang]/page.tsxexport const dynamic = 'force-static';export const revalidate = 3600;import { notFound } from 'next/navigation';import { isLangSupported, getSupportedLangs } from '@/lib/i18n-config';import LangPageContent from './LangPageContent';export async function generateStaticParams() { return getSupportedLangs().map((lang) => ({ lang }));}export default async function LangPage(props: { params: Promise<{ lang: string }>}) { const { lang } = await props.params; if (!isLangSupported(lang)) notFound(); return <LangPageContent />;}
Let’s break it down:
generateStaticParams() tells Next.js which language versions to statically generate at build time. It pulls supported languages from your config and returns them as [{ lang: 'en' }, { lang: 'fr' }, ...].
dynamic = 'force-static' ensures that the page is statically generated.
revalidate = 3600 enables ISR (Incremental Static Regeneration), meaning the page will be regenerated in the background every hour if it’s been requested. This is useful if translations are updated in Supabase or Lokalise and you want those changes to eventually appear without redeploying. In fact, we’ll see how to revalidate programmatically later.
Inside the page function, we validate the language param using isLangSupported. If someone manually hits /de and your app doesn’t support German, we return a 404 via notFound().
Rendering localized content with LangPageContent
The LangPageContent.tsx component is a simple client component that renders a localized interface using our translation context. It lives under the [lang] route and receives its translations through context, which we previously set up in the layout.
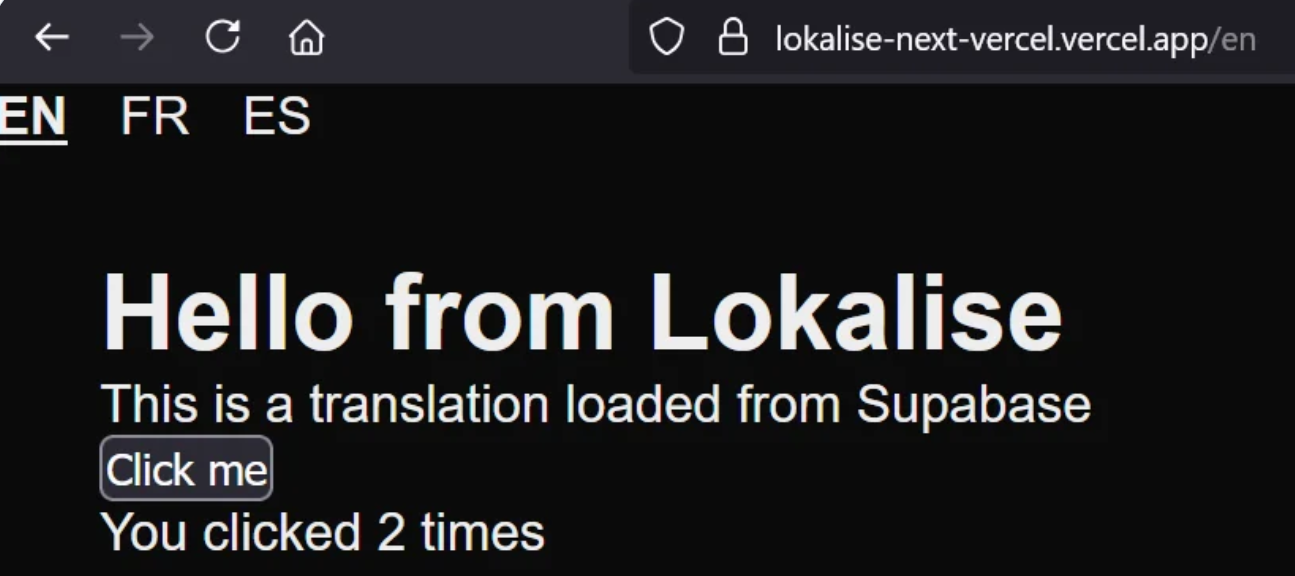
// app/[lang]/LangPageContent.tsx'use client';import { useCallback } from 'react';import { useTranslation } from '@/lib/translation-context';import ClickCounter from './ClickCounter';export default function LangPageContent() { const { t } = useTranslation(); // memoize so we don’t re-create this on every render const pluralText = useCallback( (count: number) => t('counter', { count }), [t] ); return ( <main style={{ padding: '2rem' }}> <h1>{t('title', { name: 'Lokalise' })}</h1> <p>{t('subtitle')}</p> <ClickCounter buttonText={t('button')} pluralText={pluralText} /> </main> );}
Key things happening here:
We use the useTranslation() hook to get access to the translator function t.
t takes a translation key and an optional object of values (for interpolation).
We memoize pluralText using useCallback() to avoid recalculating the formatter on every render. This function calls the counter key with a varying count value — useful for pluralization (e.g., “1 time” vs “5 times”).
The translated strings are used directly inside JSX to render the title, subtitle, and button text.
We delegate interaction logic (like counting clicks) to a separate ClickCounter component to keep this component clean.
Interactive translation: The ClickCounter component
To wrap things up, let’s take a look at ClickCounter.tsx, a small client-side component that demonstrates how to handle interactive, stateful UI with localization support.
This is a client component, and it manages state using useState and responds to user interaction.
It takes two props:
buttonText: a localized label for the button.
pluralText(count): a function that returns a localized string depending on the click count.
On each click, the internal state is incremented, and the updated message is rendered live.
We use aria-live="polite" on the <p> element so screen readers will announce count changes in a non-intrusive way.
The button’s aria-label provides helpful screen reader context, which includes the click count.
This component keeps your translation logic decoupled from behavior. You generate localized messages outside (in LangPageContent), pass them in, and keep this component purely interactive.
Testing it out
Believe it or not, this is it — we’ve just rolled our custom i18n solution.
You can now run your app locally using:
npm run dev
Or push to your GitHub repo and deploy to Vercel if you haven’t done so yet.
Just keep in mind: we only uploaded English (en) translations to Lokalise and Supabase. The fr and es versions technically exist in your app, but since there are no translations available yet, they’ll display missing keys or fallback placeholders (depending on your setup). That’s expected for now; we’ll deal with full translations in the next steps.
Use serverless function to listen to Lokalise webhook notifications
We’ve covered a lot of ground, but this isn’t the end: some of the most interesting bits are still ahead.
Here’s what we’re going to do next. We’ll set up a webhook in Lokalise that will notify our app when a translation task is complete. On the Vercel side, we’ll create a serverless function that listens for these notifications.
Once a task is marked as done, this function will download the updated translation files from Lokalise and upload them to Supabase, preserving the same folder structure we’ve used throughout the project.
Creating initial webhook listener
There are a few moving parts to this, so let’s start with the bare minimum: a simple webhook listener function that handles Lokalise’s ping notifications. Why do this first? Well, because Lokalise expects this endpoint to exist! When you add a webhook to your project, it will send a ping request to verify the integration. If your app doesn’t respond correctly, the webhook setup will fail.
We’ll write a new serverless function at app/api/lokalise-webhooks/route.ts. Later on we’ll expand this to process real task notifications and trigger file updates, but for now, let’s just pass Lokalise’s verification step.
Imports and env variables
Let’s add all the necessary imports:
import { NextRequest, NextResponse } from 'next/server';import { LokaliseDownload } from 'lokalise-file-exchange';import type { WebhookProjectTaskClosed } from '@lokalise/node-api';import { revalidatePath } from 'next/cache';import { LokaliseApi } from '@lokalise/node-api';import fs from 'fs/promises';import path from 'path';import { createClient } from '@supabase/supabase-js';
Also read and validate environment variables:
const { LOKALISE_PROJECT_ID, LOKALISE_WEBHOOK_SECRET, LOKALISE_API_KEY, NEXT_PUBLIC_SUPABASE_URL, SUPABASE_SERVICE_KEY,} = process.env;if (!LOKALISE_PROJECT_ID) { throw new Error('Missing env var LOKALISE_PROJECT_ID');}if (!LOKALISE_WEBHOOK_SECRET) { throw new Error('Missing env var LOKALISE_WEBHOOK_SECRET');}if (!LOKALISE_API_KEY) { throw new Error('Missing env var LOKALISE_API_KEY');}if (!NEXT_PUBLIC_SUPABASE_URL) { throw new Error('Missing env var NEXT_PUBLIC_SUPABASE_URL');}if (!SUPABASE_SERVICE_KEY) { throw new Error('Missing env var SUPABASE_SERVICE_KEY');}
This code is pretty self-explanatory; just make sure you have these variables in place (except for the webhook secret that will be added shortly).
Checking the webhook secret
Now let’s start writing the actual function (we’re still in the app/api/lokalise-webhooks/route.ts file):
This is required to make sure the request comes from the trusted source. Yeah, I know we still don’t have the actual secret but bear with me for a moment.
Responding to ping
Alright, next let’s respond to a ping request from Lokalise and say that we’re good:
export async function POST(req: NextRequest) { // ... check secret ... let body: unknown; try { body = await req.json(); } catch { return NextResponse.json({ error: 'Invalid JSON' }, { status: 400 }); } if (Array.isArray(body) && body[0] === 'ping') { return NextResponse.json({ status: 'success' }); } // ... other logic should be added here ... return NextResponse.json({ error: 'Unhandled payload' }, { status: 400 });}
Lokalise expects us to respond with a success status code. Also we add a fallback response just to be on a safe side.
At this point make sure to push your changes to Vercel and redeploy the app.
Creating a new webhook on Lokalise
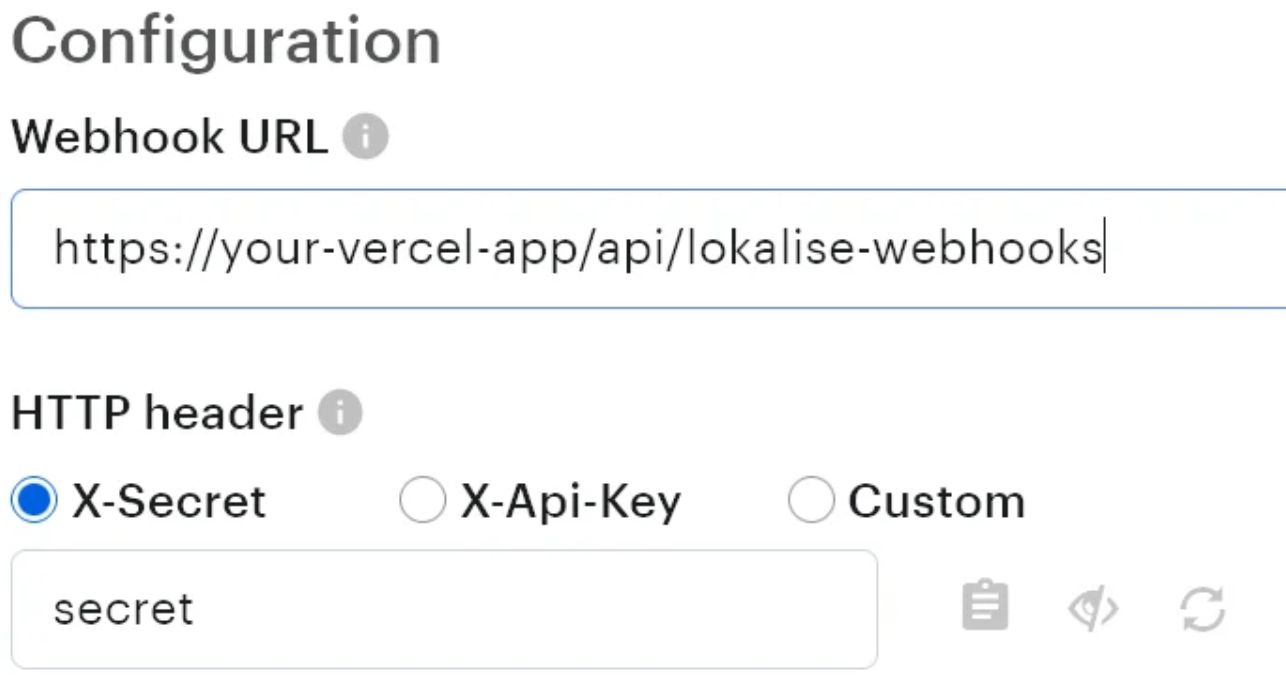
Okay, now that you’ve deployed the initial webhook listener to Vercel, proceed to your Lokalise project and open the Apps page. Here, search for Webhooks app, click on it, and then press Install. You’ll see the following screen:
Make sure to enter a proper URL to your deployed app with the correct api path.
Also copy the X-Secret header and paste it as an environment variable to Vercel before saving any changes on Lokalise (otherwise it’ll immediately try to send a ping request which will fail).
LOKALISE_WEBHOOK_SECRET=YOUR_X_SECRET
Alternatively, you can use the API key as the secret or even provide a custom header.
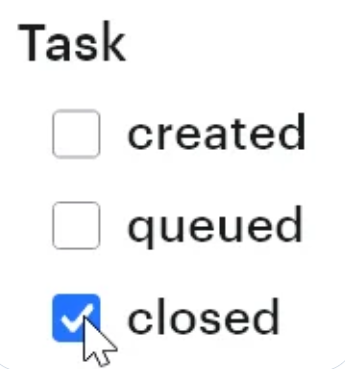
Once you do that and redeploy the Vercel app, tick the Task closed event and only then save the changes:
If everything was done correctly, the webhook will be saved, and you’ll see a ping notification in Vercel logs. If Lokalise reports an error, typically it means you’ve provided an incorrect path to the webhook listener, or your secret is invalid or missing.
Listening to the project.task.closed event
Alright, so now that we’ve wired up the webhook, every time a task is marked as completed in your Lokalise project, Vercel will receive a notification. Let’s handle that next (still inside the same route.ts file):
export async function POST(req: NextRequest) { // ... check secret, handle ping ... if ( typeof body === 'object' && body !== null && (body as any).event === 'project.task.closed' && (body as any).project?.id === LOKALISE_PROJECT_ID ) { const payload = body as WebhookProjectTaskClosed; console.log( `🟢 Task "${payload.task.title}" (${payload.task.id}) closed in "${payload.project.name}"` ); // other logic goes here... } // fallback return NextResponse.json({ error: 'Unhandled payload' }, { status: 400 });}
Nothing too crazy here. We just verify that:
The event type is project.task.closed.
The project ID matches the one we expect (just in case you have multiple Lokalise projects).
If everything checks out, we log some info about the task and the project for debugging or audit purposes.
From this point onward, you’re free to hook in any logic you need:
Download updated translations from Lokalise
Email your team
Trigger an internal build
Or whatever else fits your setup
In this tutorial, we’ll go a step further and actually:
Download the updated language files for the task
Push those files to Supabase
Revalidate the localized pages on Vercel
Yes, it might sound like overkill at first glance but this flow shows just how flexible and powerful the integration can get once everything is talking to each other.
Downloading translation files and pushing changes to Supabase
Alright, the plan is set: once Lokalise tells us that a task has been completed, we’ll download the translated files for all the languages included in that task. Since Lokalise gives us a .zip archive, we’ll need to extract it, then upload each file to Supabase while preserving the folder structure (e.g. locales/es/ui.json should remain exactly that). And finally, we’ll trigger revalidation so the updated content gets reflected on the site.
Sounds simple? Well… yeah, but as always, the devil’s in the details. Let’s go step by step.
The general file exchange logic
Let’s now finalize the webhook handler and plug in the logic for processing the completed task. We’ll break it down into a few clear steps, but for now we’ll just sketch the skeleton of what’s happening. Later on, we’ll dive into each individual function and explain what it does.
Here’s how our webhook route evolves:
export async function POST(req: NextRequest) { const receivedSecret = req.headers.get('x-secret'); if (receivedSecret !== LOKALISE_WEBHOOK_SECRET) { return NextResponse.json({ error: 'Forbidden' }, { status: 403 }); } let body: unknown; try { body = await req.json(); } catch { return NextResponse.json({ error: 'Invalid JSON' }, { status: 400 }); } if (Array.isArray(body) && body[0] === 'ping') { return NextResponse.json({ status: 'success' }); } if ( typeof body === 'object' && body !== null && (body as any).event === 'project.task.closed' && (body as any).project?.id === LOKALISE_PROJECT_ID ) { const payload = body as WebhookProjectTaskClosed; console.log( `🟢 Task "${payload.task.title}" (${payload.task.id}) closed in "${payload.project.name}"` ); try { // a) find all target languages included in the task const langs = await getTaskTargetLanguages(payload.task.id); // b) clear any previously downloaded files from temp dir await clearTmpDir('/tmp/locales'); // c) download fresh translations from Lokalise for these languages await downloadFromLokalise(langs); // d) upload them to Supabase, keeping directory structure await uploadFromTmpToSupabase(); // e) revalidate corresponding language pages on the site for (const lang of langs) { revalidatePath(`/${lang}`); } return NextResponse.json({ status: 'task processed' }); } catch (err) { console.error('❌ Error processing task:', err); return NextResponse.json({ error: 'Processing failed' }, { status: 500 }); } } return NextResponse.json({ error: 'Unhandled payload' }, { status: 400 });}
So what exactly happens when Lokalise notifies us that a task has been completed?
Verify that the request contains the correct webhook secret.
Parse the request body and ensure the event type is project.task.closed.
Determine the list of languages that were included in the closed task.
Clean up the temporary directory to remove any previously downloaded files.
Download the latest translation files from Lokalise for each target language.
Upload these files to Supabase, preserving the expected directory structure.
Revalidate the localized pages (e.g. /en, /fr, etc.) so that the new translations are immediately reflected on the site.
In the next few sections, we’ll go over each of these function calls in detail.
Getting the target languages from Lokalise
The first step in our automation logic is to determine which languages were part of the task that just got closed. We need this because we only want to download updated translations for those specific languages, not the entire project.
To do that, we use Lokalise’s API and fetch the task details, including its associated languages:
async function getTaskTargetLanguages(taskId: number): Promise<string[]> { const api = new LokaliseApi({ apiKey: LOKALISE_API_KEY! }); const task = await api.tasks().get(taskId, { project_id: LOKALISE_PROJECT_ID!, }); return task.languages.map((l) => l.language_iso);}
This function does a few simple things:
Instantiates the Lokalise API client with your API key.
Calls get() on the tasks resource, passing both the task ID and project ID.
Extracts and returns the list of language codes (language_iso) associated with the task.
These codes (like fr, es, etc.) are what we’ll use for downloading the corresponding translation files later on.
Downloading translation files to a temporary directory
Now that we know which languages we need, the next step is to download the corresponding translation files from Lokalise. Before we do that, we also want to make sure the temporary directory we’re using is clean.
We use two helper functions to handle this part. First:
This function does exactly what it sounds like: it wipes out the given directory (in our case, /tmp/locales) and recreates it from scratch. This ensures there are no stale or leftover files from previous runs that could mess up the logic or uploads. In fact, this is a bit of an overkill because Vercel does not store any downloaded files on a permanent basis but still I wanted to show this piece as well.
We create a LokaliseDownload client using the API key and project ID.
Then we call downloadTranslations() with a few key options:
The format is set to json.
original_filenames: true ensures that filenames match what you have in Lokalise.
We only want already translated strings (filter_data: ['translated']).
filter_langs restricts the download to only the languages from the task.
Files are automatically extracted to /tmp.
Logging directory structure for debugging
After downloading and extracting translation files, it’s helpful to confirm that the files are in the right place and structured as expected. To do that, we use a small utility function that recursively logs the contents of a directory:
async function logDirRecursive(dir: string, indent = ''): Promise<void> { const entries = await fs.readdir(dir, { withFileTypes: true }); for (const entry of entries) { const symbol = entry.isDirectory() ? '📁' : '📄'; console.log(`${indent}${symbol} ${entry.name}`); if (entry.isDirectory()) { await logDirRecursive(path.join(dir, entry.name), indent + ' '); } }}
This function is purely for debugging and developer sanity. It:
Lists all files and folders inside a directory (starting with /tmp).
Uses indentation to visualize folder depth.
Prints a 📁 for folders and 📄 for files to make it easier to scan.
Preparing for Supabase upload
Now that we’ve downloaded the translation files and confirmed their structure, the next step is to push them to Supabase Storage. To do that, we need two things:
A Supabase client instance.
A helper function to recursively list all files in a directory tree.
Start by defining these constants at the top of the file (if you haven’t already):
Make sure both NEXT_PUBLIC_SUPABASE_URL and SUPABASE_SERVICE_KEY are available in your environment. You’ll be using the service key here because you’re writing to storage on the server side.
Next, let’s define a simple utility that walks a directory tree and collects full paths to all files inside:
async function walkDir(dir: string): Promise<string[]> { const results: string[] = []; for (const entry of await fs.readdir(dir, { withFileTypes: true })) { const full = path.join(dir, entry.name); if (entry.isDirectory()) { results.push(...(await walkDir(full))); } else { results.push(full); } } return results;}
This function will be used later to scan the extracted folder and identify which files should be uploaded to Supabase. It preserves the full relative structure, which is important because we want to keep the locales/lang/namespace.json format intact.
Uploading translation files to Supabase
With everything in place (translations downloaded and the folder structure validated) it’s time to upload the files to Supabase Storage.
We scan all files under /tmp/locales using the walkDir helper.
Each file path is converted into a relative path like locales/fr/ui.json, which becomes the storage key.
The file is read from disk and uploaded to the configured Supabase bucket.
The upsert: true option ensures existing files get overwritten with updated content.
We also set basic caching headers (public, max-age=3600) so the files are cacheable by CDNs and browsers.
This step finalizes the whole webhook flow: from receiving a notification to having updated translations available in Supabase for the frontend to consume.
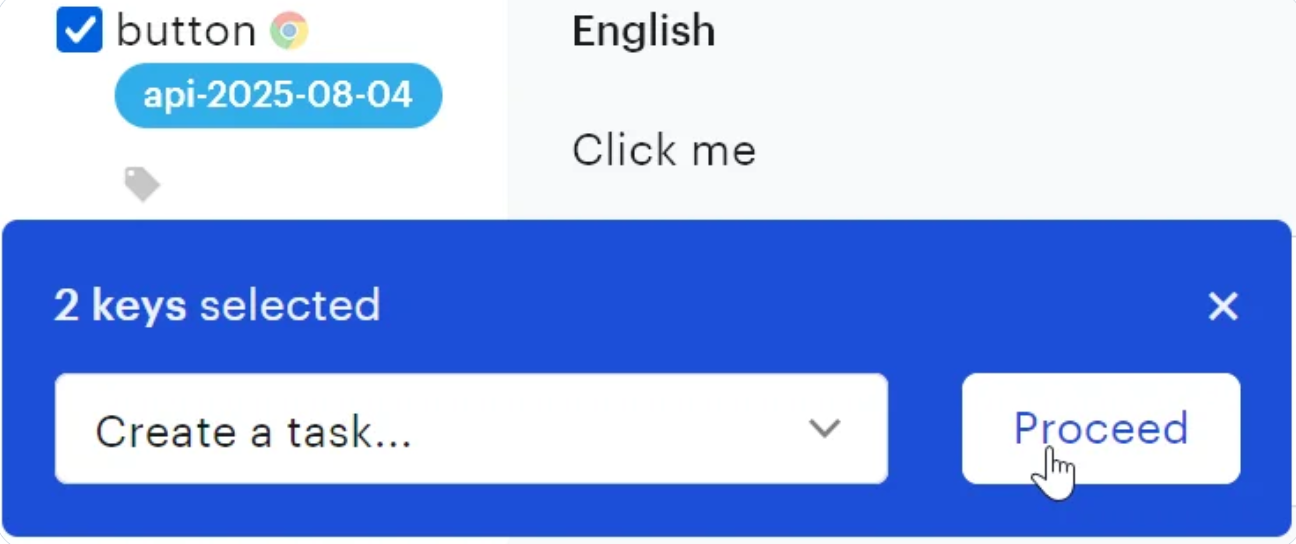
See it in action
And that’s it! Your workflow is live, so you can now redeploy your app to Vercel and head over to Lokalise.
From there:
Select the translation keys you want to work with.
Choose Create a task from the dropdown.
Pick Automatic translation as the task type (to leverage Lokalise AI).
Choose your target languages (for example, French and Spanish).
Once the task is complete, Lokalise will trigger your webhook. Your Vercel serverless function will respond, download the updated translation files, and upload them to Supabase.
Open your deployed Next.js app and visit a localized route — you should see your translations updated automatically, without redeploying the frontend.
Conclusion
We’ve built a streamlined, automated localization pipeline that takes you from raw JSON in your repo all the way to live, translated pages in production without manual downloads or rebuilds. Here’s what you now have:
A Next.js project with per-language routes and incremental static regeneration.
Translation files hosted in Supabase Storage and fetched on demand.
A simple React context and t() helper for rendering messages and handling pluralization.
Serverless API routes to push your base language to Lokalise and react to completed tasks.
A webhook listener that downloads updated translations, writes them back to Supabase, and revalidates pages so your site updates in real time.
With this foundation in place, you can:
Add new namespaces or languages by dropping in JSON files or updating your Lokalise project.
Hook into additional webhook events (like comment notifications or key deletions).
Extend the translation context with runtime fallbacks, loading indicators or offline support.
Experiment with advanced ICU syntax, date/time formatting, or custom interpolation functions.
I hope this gives you a solid starting point for scaling internationalization in your Next.js apps! Thank you for staying with me, and until next time.
Ilya is the lead for content, documentation, and onboarding at Lokalise, where he focuses on helping engineering teams build reliable internationalization workflows. With a background at Microsoft and Cisco, he combines practical development experience with a deep understanding of global product delivery, localization systems, and developer education.
He specializes in i18n architectures across modern frameworks — including Vue, Angular, Rails, and custom localization pipelines — and has hands-on experience with Ruby, JavaScript, Python, Elixir, Go, Rust, and Solidity. His work often centers on improving translation workflows, automation, and cross-team collaboration between engineering, product, and localization teams.
Beyond his role at Lokalise, Ilya is an IT educator and author who publishes technical guides, best-practice breakdowns, and hands-on tutorials. He regularly contributes to open-source projects and maintains a long-standing passion for teaching, making complex internationalization topics accessible to developers of all backgrounds.
Outside of work, he keeps learning new technologies, writes educational content, stays active through sports, and plays music. His goal is simple: help developers ship globally-ready software without unnecessary complexity.
Hands‑on guide to GitHub Actions for Lokalise translation sync: A deep dive
In this tutorial, we’ll set up GitHub Actions to manage translation files using Lokalise: no manual uploads or downloads, no reinventing a bicycle. Instead of relying on the Lokalise GitHub app, we’ll use open-source GitHub Actions. These let you push and pull translation files directly via the API in an automated way. You’ll learn how to: Push translation files from your repo to LokalisePull translated content back and open pull requests automaticallyWork w
Syncing Lokalise translations with GitLab pipelines
In this guide, we’ll walk through building a fully automated translation pipeline using GitLab CI/CD and Lokalise. From upload to download, with tagging, version control, and merge requests. Here’s the high-level flow: Upload your source language files (e.g. English JSON files) to Lokalise from GitLab using a CI pipeline.Tag each uploaded key with your Git branch name. This helps keep translations isolated per feature or pull request
Next.js localization: A step-by-step guide with examples
In this tutorial, you’ll learn how to implement Next.js i18n application using the next-globe-gen plugin. We’ll cover everything from managing translation files and handling pluralization to creating a language switcher and managing localized time, all with practical multi-language examples. Localization is a key step in the Next.js internat