Localization branch management helps software teams localize multiple features, releases, and hotfixes without pushing unfinished translations into production. Instead of editing one shared translation project directly, teams can use localization branching to isolate work, review changes, and merge completed translations when they are ready.
In Lokalise, project branching creates separate versions of a localization project. Each branch can contain its own source strings, translation updates, and review progress, while the main branch remains the production-ready version of the project. This guide explains how localization branching works in Lokalise today. You’ll learn how to create branches, merge translation branches, resolve merge conflicts in localization keys, and restore previous translation versions using project snapshots.
What is localization branching?
Localization branching is the practice of creating separate versions of a localization project so teams can work on translations for a feature, release, or hotfix without changing the main production-ready project.
In software development, teams often use branches to isolate code changes before merging them into the main codebase. Localization branching applies the same idea to translation work. Instead of sending every new source string directly into the main localization project, teams can create a branch, add or update strings there, complete translation and review, and merge the finished work back when it is ready.
In Lokalise, a branch is a separate version of a project. Each branch can have its own keys, source strings, translations, comments, and review progress. Changes made in one branch do not affect other branches until they are merged.
This makes localization branching useful for continuous localization workflows and software localization in general. Product teams can keep translating new features in parallel, while the main branch stays stable and ready for production releases.
How localization branching works in Lokalise
In Lokalise, branching works by creating separate versions of the same localization project. When branching is enabled, the current project becomes the master branch. From there, teams can create additional branches for features, releases, experiments, or hotfixes. Each branch can have its own keys, translations, languages, uploads, downloads, tasks, orders, statistics, activity, and translation history. This means translators and reviewers can work in one branch without changing the content in another branch.
For example, your master branch might contain the source string “Welcome to the app!” while a feature branch contains an updated version: “Welcome to our app.” The change in the feature branch does not affect master until you merge the branch.
When the branch is ready, you can merge it into another branch. Lokalise checks for conflicts before the merge and asks you to choose which version to keep when the same element was changed in both branches.
Some project elements in Lokalise are global and do not belong to a specific branch. Project settings, contributors, glossary, spelling exceptions, and some integrations are shared across branches. This is one of the main differences between Lokalise branching and Git-style version control: branches isolate translation work, but they do not create a fully independent copy of every project setting.
Branching in Lokalise vs. Git branching
Lokalise branching is similar to Git branching in concept, but it is not the same as Git version control.
The similarity is simple: both systems let teams work on separate versions before merging changes back into a main branch. This makes branching useful when product and localization teams work on multiple releases in parallel.
The difference is that Lokalise branches are project versions, not Git branches with commits, pull requests, rebases, or full version history. Merging in Lokalise means transferring localization changes from one branch to another through the merge flow. It is not the same as merging code in Git.
In other words, Git manages code history, while Lokalise branching manages isolated translation work.
Why duplicating localization projects is not recommended
Duplicating a localization project may look like a simple way to manage parallel translation work, but it usually creates more problems than it solves.
A duplicated Lokalise project is a fully separate project. It does not give you a clean merge path back into the original project. If translators update strings in both projects, someone has to compare the changes manually and decide what to copy back. That increases the risk of overwritten translations, missed keys, inconsistent terminology, and duplicated work.
Branching is usually the better option for feature releases, hotfixes, and continuous localization workflows because it keeps parallel work inside the same project structure. Teams can isolate changes in a branch, review them, resolve conflicts, and merge the finished work back into the main branch.
Project duplication only makes sense when the projects are meant to stay separate, such as a true product fork, a separate client-specific implementation, or a long-term project that will not need to merge back.
How to create and manage branches in Lokalise
Before you can create branches in Lokalise, project branching must be enabled for your project. Branching is available from the Advanced plan and above, and it is supported for Web and mobile projects.
Once branching is enabled, Lokalise creates a default master branch from the current version of your project. This branch usually acts as the main version of the localization project. From there, you can create additional branches for feature work, release preparation, experiments, or hotfixes. Every new branch in Lokalise is based on master. If you need a new branch to start from another non-master branch, you need to create the branch first, clear its content, and then copy the content from the branch you want to use as the base.
How to create a branch in the Lokalise UI
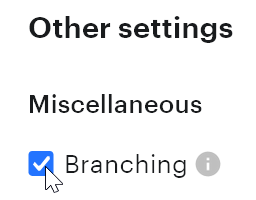
To enable branching, open your project and go to More > Settings. In the General tab, find the Miscellaneous section, select Branching and save your changes.
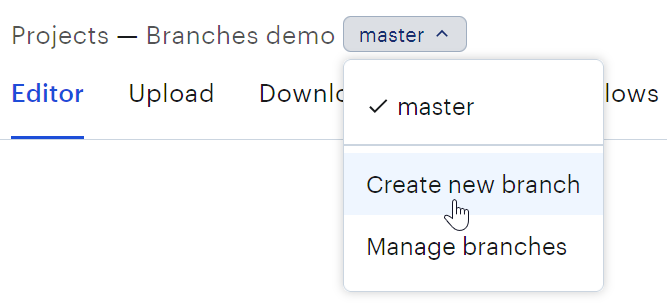
After branching is enabled, a Branches tab appears in the project settings. You can use this tab to create, delete, and merge branches.
You can also create a branch from the branch selection dropdown in the Editor or from the projects dashboard. This is useful when you are already working in the project and want to quickly start a new branch for a feature or release.
Naming branches
When naming branches, use clear names that match your development workflow. For example:
feature/new-checkout
release/2.4.0
hotfix/payment-error
experiment/onboarding-copy
Lokalise branch names must follow a few rules. They must start with a letter, number, or dot; end with a letter or number; and can contain letters, numbers, dots, hyphens, underscores, and slashes. Branch names must be between 2 and 100 characters long.
A simple naming convention helps developers, localization managers, translators, and reviewers understand what each branch is for. If your engineering team already uses branch names in GitHub, GitLab, or Bitbucket, mirroring those names in Lokalise can make the localization workflow easier to follow.
After the branch is created, switch to it before uploading new source strings, assigning tasks, reviewing translations, or downloading localized files. Work done in that branch stays isolated from other branches until you merge it.
How to work with branches using the Lokalise API, SDKs, and CLI
Lokalise also supports branch management through the API, official SDKs, and CLI. These options are useful when you want to connect localization branching to your development workflow, automate branch creation, or manage branches from scripts.
The force_conflict_resolve_using option tells Lokalise how to resolve conflicts automatically during the merge. Use this carefully. For important production branches, teams should usually review conflicts manually in the Lokalise UI before merging.
lokalise2 branch createlokalise2 branch deletelokalise2 branch list
This means the CLI is useful for basic branch setup and inspection, but not for every branch operation. If you need to merge branches programmatically, use the Lokalise API or an official SDK instead of expecting a CLI merge command.
How branching works with GitHub and GitLab integrations
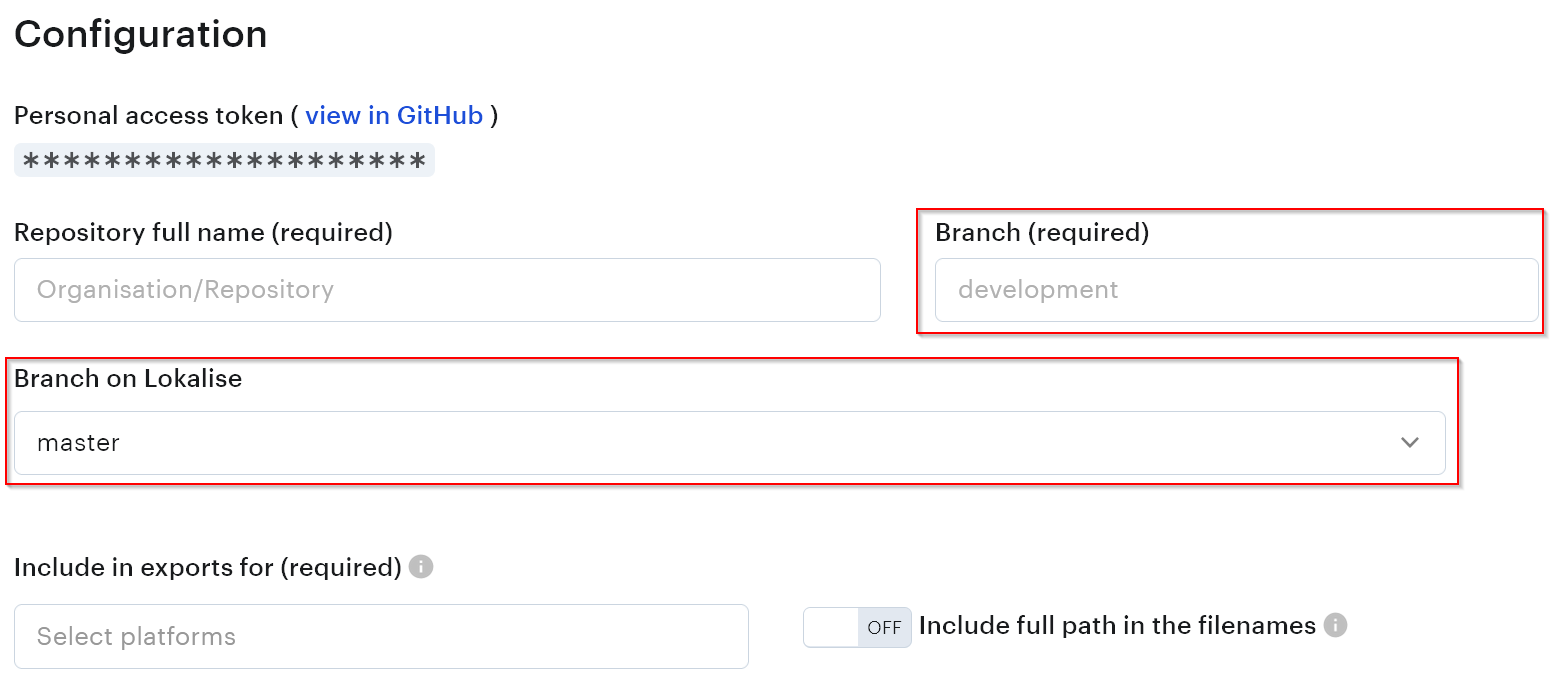
Lokalise integrations with GitHub, GitLab, Bitbucket, and Azure Repos let you exchange translation files between a Lokalise project and a repository. When project branching is enabled, the integration connects a specific Lokalise branch to a specific repository branch.
For example, when you configure the GitHub integration, you choose both:
the branch in Lokalise, such as master or develop
the branch in GitHub, such as main, master, develop, or a release branch
This means synchronization is branch-specific. Content moves between the Lokalise branch and the repository branch selected in the integration settings.
Advanced Git workflows with Lokalise branches
For most teams, the normal workflow is still to manage localization branches and merges inside Lokalise. You can create a branch for a feature or release, translate and review the content there, and then merge the branch back into your main Lokalise branch when it is ready. The repository integration is used to pull source files into Lokalise or push translated files back to the connected repository branch.
However, teams with more complex Git workflows can also configure multiple integrations in the same Lokalise project. For example, one integration can connect master in Lokalise to master in GitHub, while another connects develop in Lokalise to develop in GitHub. This setup can be useful when you want localization file synchronization to follow the same branch structure as your code repository. Translators still work in Lokalise, but each Lokalise branch can sync with the matching repository branch.
For more advanced cases, teams can also use Git as the final place where branch merges happen. In that workflow, Lokalise sends translated files from different Lokalise branches to matching repository branches, and developers handle the final merge in Git. This is not required for most teams, but it can help when the repository has complex release rules, custom review requirements, or a strict pull request process.
The important point is that Lokalise branching and Git branching are connected through integration settings, but they are not the same system. Lokalise manages translation work and branch merges inside the localization project. Git manages repository branches, pull requests, and code-level merges.
Automating localization with GitLab pipelines? You can use GitLab CI/CD to upload source files to Lokalise, tag keys by Git branch, translate them in Lokalise, and download the finished translations back into your repository. This is a practical option for teams that want a tag-based workflow tied to Git branches and merge requests. Learn how in Syncing Lokalise translations with GitLab pipelines.
How to merge translation branches in Lokalise
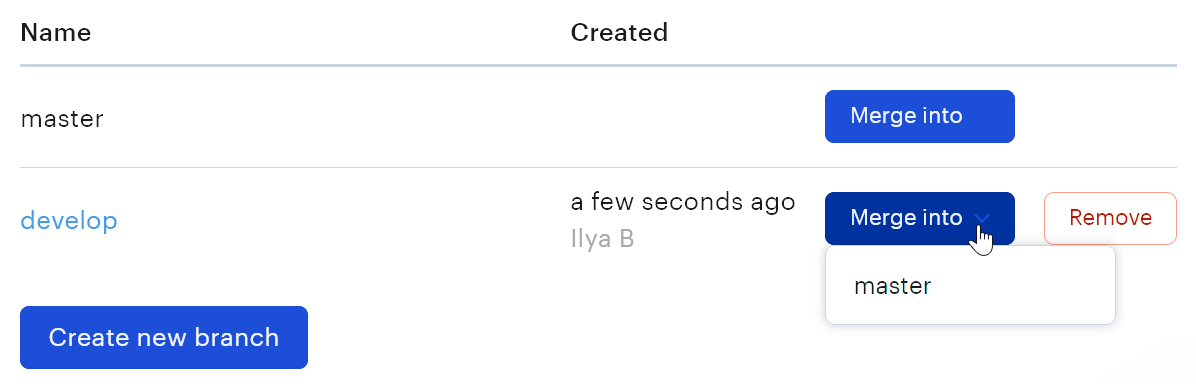
When a branch is ready, you can merge it into another branch from Settings > Branches. In most workflows, this means merging a feature, release, or hotfix branch back into master.
Merging in Lokalise incorporates changes from one branch into another. Before the merge is finalized, Lokalise checks the source and target branches for differences and conflicts. If there are active tasks or orders on the target branch, merging is not available. You also cannot delete a branch that has active tasks or orders.
It is important to review the merge carefully because a merge operation is irreversible. Once changes are merged into the target branch, Lokalise does not provide a simple “undo merge” button.
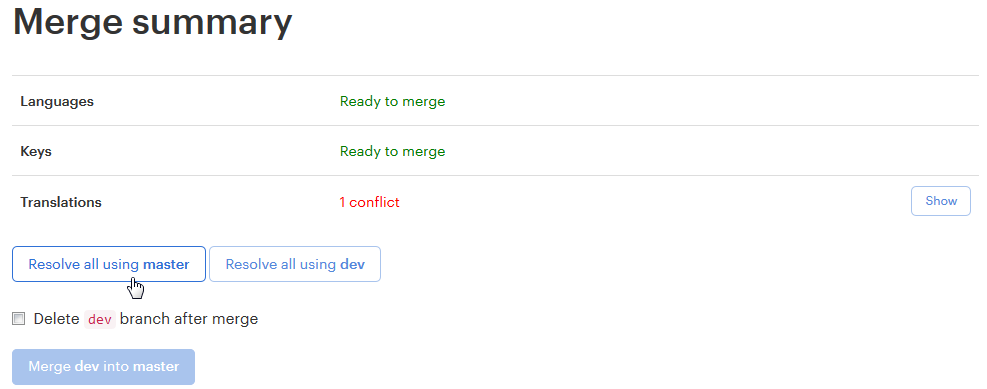
What the merge summary shows
The merge summary shows whether each branch-specific project area is ready to merge or needs attention. This can include languages, keys, and translations.
If there are no conflicts in an area, Lokalise marks it as ready to merge. If there are conflicts, the summary shows the number of conflicts and lets you open the conflict details. For example, the merge summary can show:
Languages: Ready to merge
Keys: Ready to merge
Translations: 1 conflict
From this screen, you can either resolve all conflicts using one branch or open the conflict details and review each conflict manually.
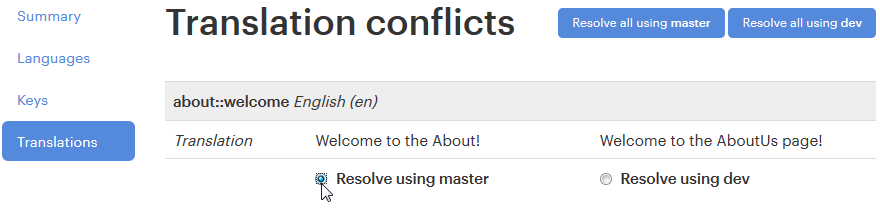
A conflict means that the same element was changed in both branches. For example, the same translation may have one value in master and a different value in a feature branch. Lokalise asks you to choose which version should be preserved before the merge can continue.
How to choose which changes to merge
When Lokalise detects a conflict, you can resolve it in two ways.
You can resolve all conflicts using one branch. This is faster, but it should only be used when you are sure that one branch should win for every conflicting item.
You can also open the conflict details and choose the version to keep for each item. This is safer for production branches because it lets you compare the source and target versions before deciding.
For translation conflicts, Lokalise shows the affected key and the competing translation values side by side. You can then choose to keep the version from the target branch, such as master, or the version from the source branch, such as dev.
Use manual review when conflicts affect production copy, legal text, onboarding flows, checkout flows, or any other high-impact content. The version you do not choose will be erased during the merge.
When to delete a branch after merging
Lokalise lets you delete the source branch after the merge. This is useful for feature branches, hotfix branches, and short-lived release branches that are no longer needed. Deleting merged branches keeps the project easier to manage. It also reduces the chance that translators or developers continue working in an outdated branch by mistake.
Do not delete a branch immediately if it still has active tasks, translation orders, unresolved review work, or content that your team may need to inspect after release. Branch activity is branch-specific and can be lost after the branch is deleted, so keep the branch until the release is complete and any post-release checks are finished.
A good rule is to delete short-lived branches after the merge has been verified in the target branch and the localized files have been successfully delivered to your app or repository.
How to resolve merge conflicts in localization keys
A localization merge conflict happens when the same branch-specific element is changed in both the source branch and the target branch before the merge. In Lokalise, conflicts can happen for languages, keys, and translations.
For example, if the welcome key has one English translation in master and a different English translation in develop, Lokalise cannot know which version should win automatically. Before the merge can continue, you need to choose which version to keep.
This is different from a normal one-way update. If a key, translation, or language was changed in only one branch, Lokalise can usually merge that change without asking for a manual decision.
What causes localization merge conflicts
Localization merge conflicts usually happen when the same key, translation, or language is changed in two branches before one branch is merged into the other.
Below are the most common merge scenarios.
Scenario 1: Only one branch changes a translation
This is the simplest merge case.
Suppose master and develop both start with the same key: welcome = “Welcome to the app!”
Then the translation is changed in develop: welcome = “Welcome to our application!”
If you merge develop into master, Lokalise applies the updated translation to master.
There is no conflict because only develop changed the translation. The same logic works in the other direction: if only master changes the translation and you merge master into develop, Lokalise applies the master version to develop.
Scenario 2: Both branches change the same translation differently
A conflict appears when both branches change the same translation in different ways.
For example:
master: welcome = “Welcome to our application!”
develop: welcome = “Welcome onboard!”
If you merge develop into master, Lokalise detects a conflict because both branches contain different updated versions of the same translation.
Before the merge can continue, you must choose which version to keep. The version you do not choose is erased during the merge.
Scenario 3: One branch deletes a key while another branch updates it
Conflicts can also happen when one branch deletes a key and another branch updates that same key.
For example:
master: the welcome key was deleted
develop: welcome = “Welcome to our application!”
If you merge develop into master, Lokalise shows a conflict because one branch removed the key while the other branch changed it.
If you merge master into develop, Lokalise does not automatically remove the key from develop. In this case, the updated key in develop stays intact.
This behavior matters because Lokalise does not treat every delete as a command to remove the key from every branch. The merge result depends on where the newer change exists and whether the same element was changed in both branches.
Scenario 4: An unchanged branch does not restore an older value
Branch merging should not be used as a rollback tool.
Suppose master still has the original value: welcome = “Welcome to the app!”
But develop changed the same translation: welcome = “Welcome to our application!”
If you merge master into develop, Lokalise does not restore the old master value. The newer develop value remains because master did not change after the branch was created.
If you need to recover an earlier project state, use project snapshots. If you need to restore a previous value for a specific translation, use translation history or update the affected string manually.
How Lokalise shows conflicted strings during merge
When you start a merge from Settings > Branches, Lokalise checks for conflicts before finalizing the merge. The merge summary groups the result by area, such as languages, keys, and translations. Areas without conflicts are marked as ready to merge. Areas with conflicts show the number of conflicts and a Show button.
For translation conflicts, Lokalise displays the affected key and the competing translation values from each branch. You can choose which version to preserve. For example, you may choose the version from master or the version from develop.
You can resolve conflicts in two ways:
Use Resolve all using master or Resolve all using develop when one branch should clearly win for every conflict.
Use Show and review conflicts one by one when different keys need different decisions.
Manual review is usually safer for production content. Use it for high-impact strings such as checkout copy, legal text, onboarding flows, pricing pages, error messages, and release-critical UI text.
When you resolve a conflict, the selected version is kept in the target branch after the merge. The other version is removed as part of the merge, so review carefully before continuing.
Best practices to prevent merge conflicts
Keep localization branches short-lived. The longer two branches exist independently, the more likely they are to modify the same keys, translations, or languages in different ways.
Sync branches frequently. If a feature branch lives for more than a few days, merge the latest changes from the main branch into it regularly. This helps surface conflicts earlier, while the context is still fresh.
Avoid editing the same keys in multiple active branches. If two teams need to update the same source strings, decide which branch owns the change before translators start working.
Use clear branch names. Names like feature/new-checkout, release/2.4.0, and hotfix/payment-error make it easier to understand why the branch exists and whether it should be merged, reviewed, or deleted.
Add new languages to the master branch first. We recommend adding languages to master before using Lokalise branches for translation work, because branch-only languages can cause inconsistent behavior in permissions, bulk actions, and some API responses.
Do not use branch merging as rollback. Merging an unchanged older branch into a newer branch does not necessarily restore old translation values. If you need recovery, use project snapshots or manually restore the affected strings.
Review conflicts manually before merging into production. Bulk conflict resolution is fast, but it can overwrite valid translations if both branches contain important changes. Use Resolve all only when you are sure one branch should win everywhere.
How to restore previous translation versions in Lokalise
Lokalise supports translation recovery through project snapshots, translation history, and bulk undo. These tools help you recover from bad uploads, incorrect bulk actions, accidental translation changes, or other project-wide mistakes.
A snapshot is the broadest recovery option. It captures a complete backup of the project at a specific point in time, including translation keys, values, contributors, settings, and other project data. If something goes wrong later, you can restore from that snapshot and return to the earlier project state.
However, snapshots should not be treated as a simple “undo merge” button. Restoring from a snapshot creates a copy of the project from that snapshot. It does not directly overwrite the current project, and the restored copy has a different project ID. That makes snapshots useful for recovery, but they are not the same as reverting a Git merge or rolling back one branch operation.
What project snapshots do
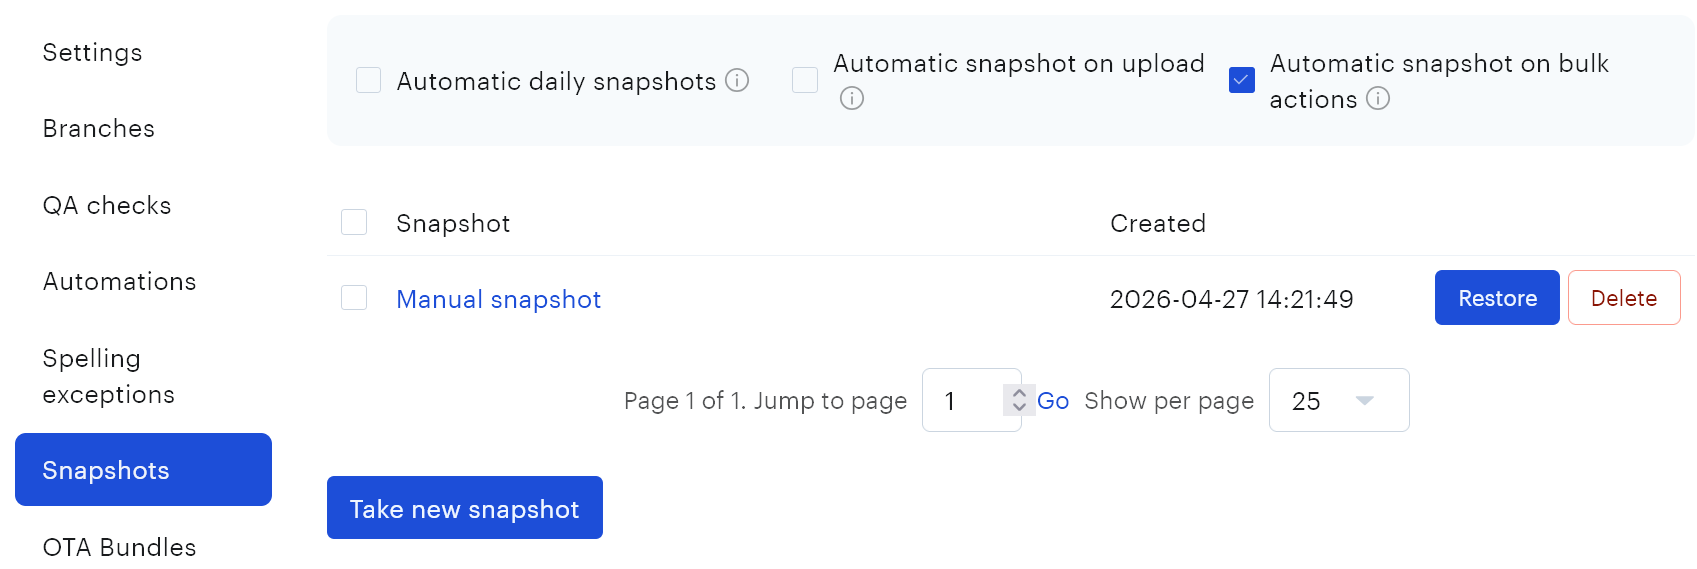
Project snapshots let you save the state of a Lokalise project before major changes. You can create a snapshot manually from More > Settings > Snapshots.
You can also use automatic snapshots. Lokalise can create snapshots during file uploads, after certain bulk actions, and on a daily schedule for users on supported plans.
Creating a snapshot before high-risk work is a good habit. For example, take a snapshot before:
uploading a large set of source files
importing translations from a vendor
running bulk actions
applying translation memory at scale
clearing or replacing translations
making major project configuration changes
merging important branch changes into master
If the change causes a problem, the snapshot gives you a recovery point. Snapshots are project-level backups, so they are best for large recovery scenarios. If only a few translations were changed incorrectly, translation history or bulk undo may be a better option.
Why snapshots are not the same as undoing a merge
A snapshot restore is not the same as undoing a branch merge. It is a project recovery tool, not a merge rollback tool. Here’s what to keep in mind:
Restoring a snapshot creates a new project copy. Lokalise does not overwrite your current project directly. Instead, it creates a separate project based on the saved snapshot.
The restored project has a different project ID. This matters if your setup depends on the original project ID. API scripts, repository integrations, CI/CD jobs, OTA workflows, and internal tools may need to be updated if you decide to use the restored project going forward.
Snapshots only include the master branch. Data from other branches is not included, so snapshots should not be treated as backups of your full branching structure.
Some project data is not restored. Project tasks, workflows, glossary tags, OTA tokens, and OTA bundles are not included in snapshot restores.
Translation history is no longer included in snapshots starting from October 2025. If you need to restore an older version of a specific translation, use translation history instead of relying on a snapshot.
Because of these limits, snapshots should not be described as branch rollback. A snapshot can help you recover a previous project state, but it does not reverse a specific merge inside the original project.
When to restore from a snapshot instead of re-translating
Restore from a snapshot when the problem is broad, hard to isolate, or risky to fix manually.
A snapshot restore can make sense when a large upload replaced many translations incorrectly, a bulk action affected too many keys, a bad import damaged multiple languages, or a production-ready project needs to be compared against a known clean state.
Do not restore from a snapshot for every small mistake. If only a few keys or translations are affected, use translation history instead. Translation history lets you restore selected translations to previously saved versions without creating a full project copy.
Bulk undo can also be a better fit when the problem came from a specific bulk action, such as applying translation memory, pseudolocalizing, clearing translations, or copying source text to target languages. In that case, undoing the specific bulk action is usually cleaner than restoring the whole project.
A practical recovery workflow is:
Check whether the issue affects a few translations, a bulk action, or the whole project.
Use translation history for targeted translation recovery.
Use bulk undo for supported bulk actions.
Use a snapshot restore only when the project needs to return to a broader saved state.
Before using the restored project in production, check integrations, project IDs, OTA setup, tasks, and branch-related data.
For branch-based workflows, the safest approach is prevention: keep unfinished work in feature or release branches, review conflicts before merging, and take a snapshot before major changes to master.
Localization branching best practices
Good localization branch management keeps translation work isolated without making the project hard to maintain. The goal is to use branches when they help your team ship safely, while avoiding too many long-running branches that drift away from master.
Use these best practices to keep branching clean and predictable:
Keep branches short-lived. Create branches for specific features, releases, experiments, or hotfixes, then merge and delete them when the work is complete. Long-lived branches are more likely to drift from master, create conflicts, and contain outdated translations.
Use clear branch names. A branch name should explain why the branch exists. Names like feature/new-checkout, release/2.4.0, and hotfix/payment-error are easier to understand than vague names like updates or new-copy. If your engineering team already uses a branch naming convention, reuse the same pattern in Lokalise where it makes sense.
Treat master as the production-ready branch. For most teams, master should contain the strings and translations that are safe to ship. Feature work, experimental copy, and incomplete translations should stay in separate branches until they have been translated, reviewed, and approved.
Limit who can contribute to master. In each Lokalise project, contributors have project-level permissions, including the Contribute to master branch permission. If this permission is enabled, the contributor can make changes in master. If it is disabled, they cannot contribute directly to master. This is the closest Lokalise pattern to protecting a production branch. It does not work like full Git branch protection: you cannot allow a contributor to edit one non-master branch while blocking them from another specific non-master branch. Branch-level access control is focused on master.
Sync active branches regularly. If a branch stays open for more than a few days, bring changes from master into that branch before the final merge. This helps teams find conflicts earlier and reduces the chance of a difficult merge right before release.
Review merge summaries before merging. The merge summary shows whether languages, keys, and translations are ready to merge or have conflicts. Do not treat merging as a blind final step. Check added, changed, deleted, and conflicted content before applying changes to the target branch.
Resolve important conflicts manually. Bulk conflict resolution is useful when one branch clearly owns the correct version, but it can overwrite useful work. For production copy, checkout flows, legal content, pricing, onboarding, and critical error messages, review conflicts one by one.
Take snapshots before high-risk changes. Before large uploads, bulk actions, major imports, or important merges into master, create a project snapshot. Snapshots are not the same as undoing a merge, but they give you a recovery point if a broad project-level issue appears later.
Do not use project duplication as a normal branching workflow. Duplicated projects are hard to merge back, easy to drift apart, and more likely to create inconsistent terminology. Use separate projects only when the products, teams, or clients are meant to stay separate long term.
Use repository integrations carefully. GitHub, GitLab, Bitbucket, and Azure Repos integrations can connect specific Lokalise branches to specific repository branches. This is useful when localization should follow your release structure, but remember that Lokalise branching and Git branching are not the same system. Use Lokalise for translation branch management and Git for repository-level pull requests and code merges.
Delete branches when they are no longer needed. After a branch has been merged, verified, and released, delete it unless your team has a reason to keep it. Cleaning up old branches helps translators and developers avoid working in the wrong place.
Using tags as a simple alternative to branches
If project branching is not available on your Lokalise plan, tags can be used as a lightweight alternative for organizing feature or release work.
Instead of creating a separate branch, you can tag related keys with a feature, release, or task name. For example, you might use tags like feature-new-checkout, release-2-4-0, or hotfix-payment-error. Then you can filter keys by tag in the editor, assign translation work for that tagged group, and export only the strings that belong to a specific tag.
This approach can work well for small teams, simple releases, or projects where you only need to group and filter translation keys. It is also useful when you want a quick way to separate new feature strings from the rest of the project.
However, tags are not the same as branches.
Tags do not create a separate version of the project.
They do not isolate translations from master, do not provide a merge workflow, and do not detect merge conflicts.
If the same key is edited for two releases, tags will not preserve separate versions of that key.
Use tags when you need simple organization and filtering. Use project branching when you need isolated translation work, branch merging, conflict resolution, or a workflow that follows multiple parallel releases.
Conclusion
Localization branching helps teams manage parallel translation work without putting unfinished strings into production. In Lokalise, branches let you isolate feature, release, and hotfix translations, review them safely, and merge completed work back into the main project when it is ready. The key is to treat branching as part of a broader localization branch management workflow. Keep branches short-lived, sync them regularly, review merge summaries carefully, and resolve localization merge conflicts before merging into master.
For recovery, use the right tool for the problem. Project snapshots can help restore a previous project state, while translation history is better for recovering an older version of a specific translation. Tags can also work as a lightweight alternative when you only need to group and filter keys, but they do not replace branch merging, conflict resolution, or version isolation.
Used well, Lokalise project branching gives software and localization teams a safer way to manage continuous localization across multiple features, releases, and repository workflows.
Frequently asked questions about localization branching
How do you resolve merge conflicts in localization keys?
A merge conflict in localization happens when the same branch-specific element is changed in both the source branch and the target branch before merging. In Lokalise, conflicts can happen for languages, keys, and translations.
Lokalise shows conflicts during the merge flow. You can either resolve all conflicts using one branch, or open the conflict details and choose which version to keep for each item. Manual review is safer when conflicts affect production copy, checkout flows, legal text, pricing, onboarding, or other high-impact content.
Can you roll back translations to a previous version in Lokalise?
You cannot directly undo a branch merge in Lokalise. Once a branch is merged, there is no simple “revert merge” action.
If you need to recover a broader previous project state, use project snapshots. A snapshot stores a backup of the project at a specific point in time and can be restored as a new project copy. This is useful after large uploads, bad imports, or project-wide mistakes.
If you only need to restore an older version of a specific translation, use translation history instead. Translation history lets you view previous versions of a translation and revert the selected value without restoring the whole project.
What is a protected branch in localization?
A protected branch is usually a production-ready branch that only certain users can edit directly. In Git-based workflows, protected branches often block direct commits and require pull requests or approvals before changes are merged.
In Lokalise, branch protection works differently. You can control whether contributors can make changes in master using the Contribute to master branch permission. If this permission is disabled, the contributor cannot edit master directly.
Lokalise does not provide full Git-style branch protection for every branch. You cannot allow a contributor to edit one non-master branch while blocking them from another specific non-master branch. The main protection pattern is to treat master as the controlled production branch and restrict who can contribute to it.
When should you use branching instead of separate projects for localization?
Use branching when your team needs to work on multiple features, releases, or hotfixes in parallel and later merge that work back into one main project. Branching keeps localization work isolated while still giving you a merge path.
Separate projects are usually not a good replacement for branches in Lokalise. A duplicated project does not provide a clean merge workflow back into the original project, so teams often end up copying changes manually. That increases the risk of missed keys, inconsistent translations, and duplicated work.
Use separate projects only when the projects are meant to stay separate long term, such as different products, independent client implementations, or product forks that will not merge back.
Does Lokalise support Git-style branching?
Lokalise supports project branching, but it is not the same as Git branching. A Lokalise branch is a separate version of a localization project, not a Git branch with commits, rebases, pull requests, or full version history.
The concept is similar: teams can work in isolated branches and merge changes later. But the implementation is different. Lokalise manages translation branches inside the localization project, while Git manages code branches inside your repository.
Can tags replace project branches in Lokalise?
Tags can replace branches only for simple organization and filtering. You can tag keys for a feature, release, or hotfix, then filter, assign, and export those tagged keys.
However, tags do not create separate project versions. They do not isolate changes, provide merge summaries, or detect conflicts. Tags are useful when you need lightweight grouping, but project branching is the better option for parallel releases, conflict handling, and controlled merges.
What is the safest workflow for production translations?
The safest workflow is to keep master production-ready, restrict who can contribute to master, and do feature or release work in separate branches. Before merging into master, review the merge summary, resolve conflicts manually when needed, and take a project snapshot before high-risk changes.
After the merge is verified and the localized files are delivered successfully, delete short-lived branches that are no longer needed.
Ilya is the lead for content, documentation, and onboarding at Lokalise, where he focuses on helping engineering teams build reliable internationalization workflows. With a background at Microsoft and Cisco, he combines practical development experience with a deep understanding of global product delivery, localization systems, and developer education.
He specializes in i18n architectures across modern frameworks — including Vue, Angular, Rails, and custom localization pipelines — and has hands-on experience with Ruby, JavaScript, Python, Elixir, Go, Rust, and Solidity. His work often centers on improving translation workflows, automation, and cross-team collaboration between engineering, product, and localization teams.
Beyond his role at Lokalise, Ilya is an IT educator and author who publishes technical guides, best-practice breakdowns, and hands-on tutorials. He regularly contributes to open-source projects and maintains a long-standing passion for teaching, making complex internationalization topics accessible to developers of all backgrounds.
Outside of work, he keeps learning new technologies, writes educational content, stays active through sports, and plays music. His goal is simple: help developers ship globally-ready software without unnecessary complexity.
Libraries and frameworks to translate JavaScript apps
In our previous discussions, we explored localization strategies for backend frameworks like Rails and Phoenix. Today, we shift our focus to the front-end and talk about JavaScript translation and localization. The landscape here is packed with options, which makes many developers a
Syncing Lokalise translations with GitLab pipelines
In this guide, we’ll walk through building a fully automated translation pipeline using GitLab CI/CD and Lokalise. From upload to download, with tagging, version control, and merge requests. Here’s the high-level flow: Upload your source language files (e.g. English JSON files) to Lokalise from GitLab using a CI pipeline.Tag each uploaded key with your Git branch name. This helps keep translations isolated per feature or pull request
Build a smooth translation pipeline with Lokalise and Vercel
Internationalization can sometimes feel like a massive headache. Juggling multiple JSON files, keeping translations in sync, and redeploying every time you tweak a string… What if you could offload most of that grunt work to a modern toolchain and let your CI/CD do the heavy lifting? In this guide, we’ll wire up a Next.js 15 project hosted on Vercel. It will load translation files on demand f