MCP for localization: How to connect AI agents to your translation workflow
You're in Cursor, working on a new feature, and you need to add a localization key. That means leaving your IDE, opening your TMS, navigating to the right project, making the change, and coming back. Then, doing this all over again the next time you need to check untranslated strings, create a task, or touch anything localization-related.
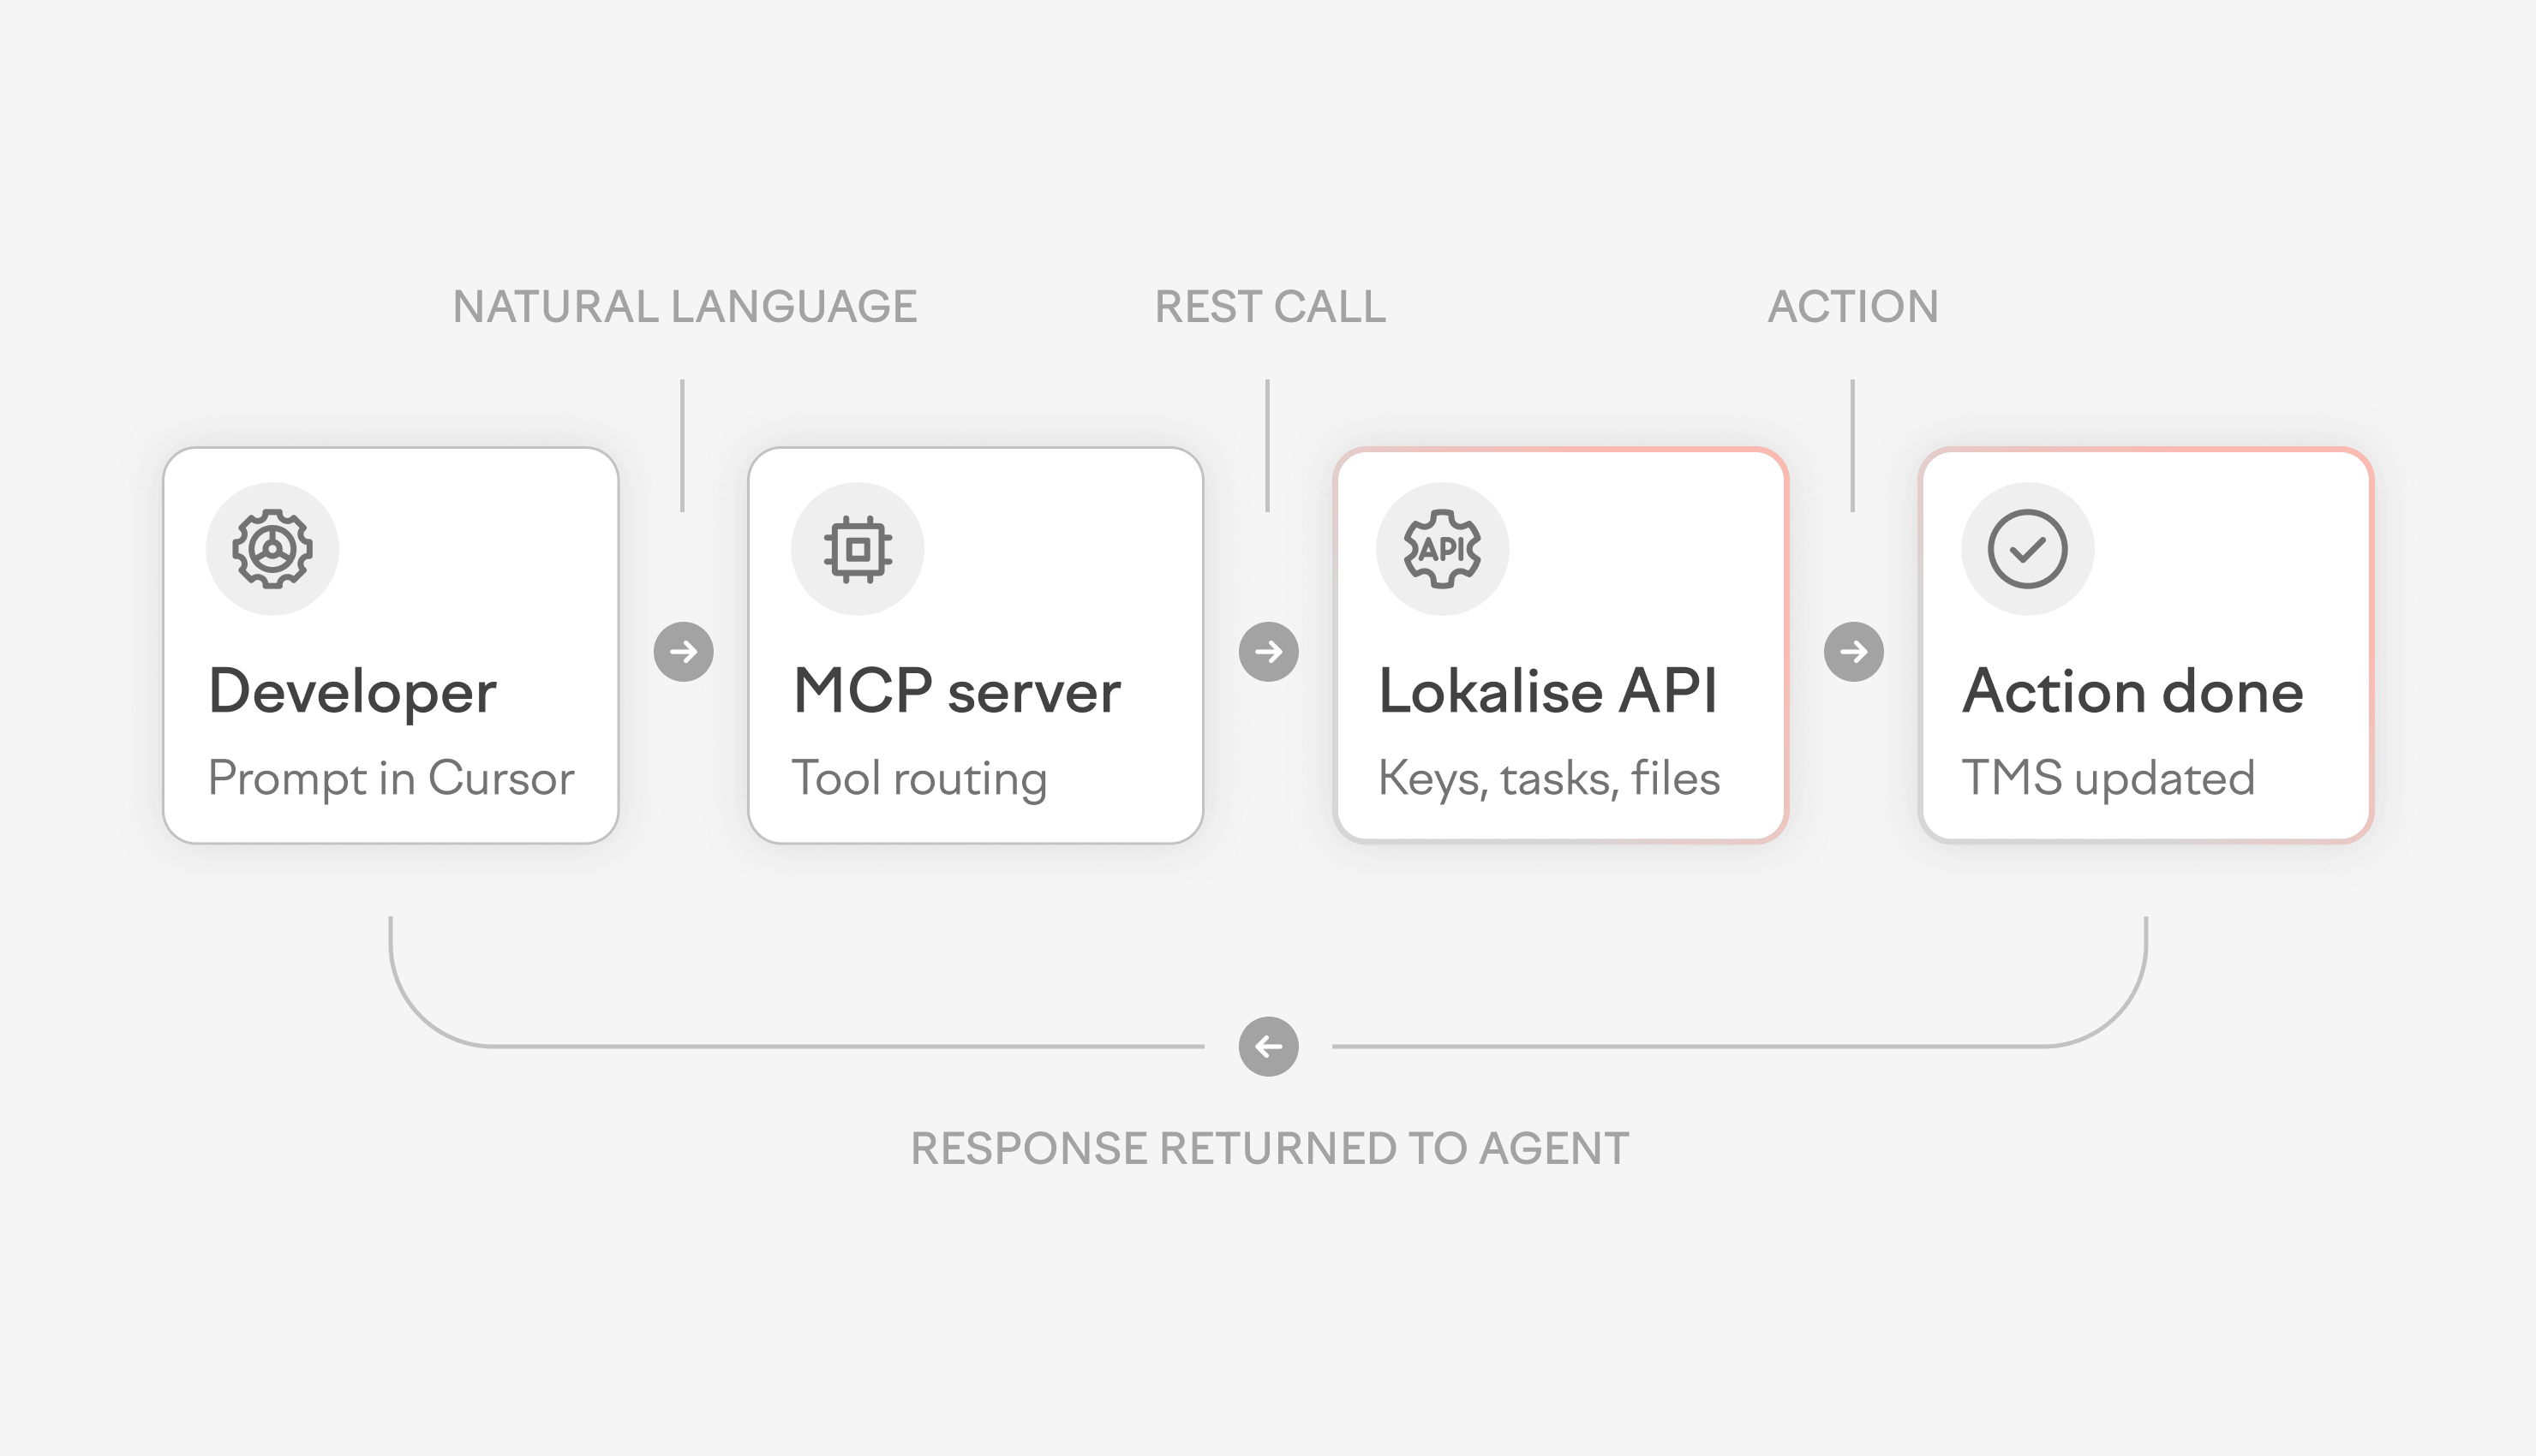
Model Context Protocol (MCP) removes this context-switching loop entirely.
Instead of bouncing between tools, your AI coding assistant can interact directly with your localization tool. This lets you list projects, add keys, check progress, create tasks, and do a lot more from within the environment you're already working in.
In this guide, we’ll break down what an MCP for localization is and how it fits into a broader shift toward agentic localization. You’ll also learn more about how the Lokalise MCP Server works and what you can use it for once it's running.
What is the Model Context Protocol (MCP)?
The Model Context Protocol (MCP) is an open standard developed by Anthropic that enables AI models to interact with external tools and data sources through a structured, schema-driven interface. In localization, an MCP server exposes translation management capabilities such as listing projects, managing keys, downloading files, and creating tasks, enabling AI agents to perform these actions from AI tools like Cursor, Codex, Claude Code, and Dust.
If you're exploring how AI localization tools are changing how teams work, MCP is one of the most practical places to start. Think of an MCP as a standardized connector between an AI assistant and an external platform. The agent understands that a set of actions is available and can call them in response to users’ prompts.
💡 Dive deeper
Learn how MCP compares to REST API for localization
Why MCP matters for localization teams
Connecting an AI agent to your localization platform through an MCP can eliminate manual workflows and custom scripting. Here are the three main ways MCP localization automation improves your localization infrastructure.
1. Code and localization work stay in the same place
Developers typically manage localization as a side task by exporting files, uploading strings, and checking translation status. They have to constantly switch to a separate UI.
MCP automates that process by allowing the AI agent to act directly in your localization software from the IDE. You can simply prompt your agent, and it takes action within your localization software without any manual effort.
2. Automate localization workflows without custom scripts
Before MCP, connecting a CI pipeline or internal tool to a translation management system meant writing and maintaining custom scripts against the REST API. MCP removes that overhead for common tasks.
Because the agent reads the available actions directly from the MCP configuration, you can trigger localization workflows like uploading a file, creating a task, and adding a language with a plain-language prompt. You no longer need a bespoke integration.
📑Read more
Learn how to use the Lokalise API for automating your localization workflows
3. Manage localization projects through natural language
MCP automation extends beyond code. Localization managers can automate routine project management tasks such as checking project progress, updating assignees, adding target languages, and managing glossary terms, all within the AI tools they already use. This makes continuous localization a natural part of everyday work rather than a separate process that runs alongside it.
Instead of navigating a dashboard, describe what you need: “Show me all untranslated keys in the mobile project” or “Create a task for the French review and assign it to Marie, due Friday.” The agent handles the rest.
How the Lokalise MCP Server works
The Lokalise MCP Server allows you to connect the platform with any MCP-compatible AI tool and perform actions within Lokalise using natural language. You can easily configure this MCP using OAuth without the need to create, copy, or store an API token.
Think of Lokalise’s MCP as the bridge to the full platform, including AI orchestration, translation memory, quality scoring, and custom AI profiles.
The server provides two separate MCPs for different workflows: the project management MCP and the software development MCP. You can enable one or both, depending on what your team needs.
Project management MCP
The project management MCP covers the full range of localization administration tasks. It's designed for localization managers, project owners, and anyone who needs to oversee translation work without writing code.
With the PM MCP, your agent can:
- Upload localization files to a project
- List and add target languages to a project
- List, filter, and update keys across a project
- Manage contributors by listing project members and adding new ones
- Create, update, retrieve, and list approved terminology in your glossary
- Add and retrieve project details, including key counts and progress statistics
- Create, update, and track tasks by including assigning translators and setting due dates
Software development MCP
The software development MCP focuses on the day-to-day tasks that developers need to finish when building and shipping software. It's optimized for use inside IDEs like Cursor or Windsurf.
With the SD MCP, your agent can:
- Download translation files
- List, create, and retrieve tasks
- List projects and retrieve project details
- List, filter, get details for, update, and add keys (including bulk creation)
- Create, list, retrieve, update, and delete screenshots to provide visual context for translators
Some actions like listing projects, getting task details, and working with keys are available in both MCPs. The agent selects the right action automatically based on your prompt.
How to set up the Lokalise MCP Server in Cursor
The setup process for Lokalise’s MCP server for translation is the same regardless of which AI tool you use. The only prerequisite is a Lokalise API token. Generate one in your Profile settings > API tokens.
💡 Pro tip
If you only need read actions (checking progress, listing keys), a read-only token works. If you want to create or update anything in Lokalise, use a read/write token.
Follow these steps to set up the Lokalise MCP in Cursor:
- Open Cursor Settings
- Go to Tools & MCP
- Find the MCP configuration (JSON file) section
- Add one or both of the following configurations to your MCP JSON file
- Save the file. Cursor will detect the new server and load the available Lokalise tools automatically.
Project management toolkit configuration
With OAuth 2
"lokalise_pm": {
  "url": "https://mcp.lokalise.com/mcp/project-management"
}
With API key
"lokalise_pm": {
  "type": "http",
  "url": "https://mcp.lokalise.com/mcp/project-management",
  "headers": {
    "apikey": "[your-api-key]",
    "accept": "application/json, text/event-stream"
  }
}
Software development toolkit configuration
With OAuth 2
"lokalise_sd": {
  "url": "https://mcp.lokalise.com/mcp/software-development"
}
With API key
"lokalise_sd": {
  "type": "http",
  "url": "https://mcp.lokalise.com/mcp/software-development",
  "headers": {
    "apikey": "[your-api-key]",
    "accept": "application/json, text/event-stream"
  }
}
Note
We recommend using OAuth 2.0 to connect the Lokalise MCP Server to your AI tools. This is a safer option since you don’t need to expose and store your API token in your MCP configuration.
Once saved, open a new conversation in Cursor's agent mode and ask it to use the Lokalise MCP server. The agent detects the available tools from the configuration and can start taking action immediately.
The same configurations work with other tools like Claude Code, Windsurf, and more.
4 use cases for Lokalise’s MCP for localization
Here are a few ways you can use Lokalise’s MCP server to streamline your localization workflows.
1. Adding a localization key from your IDE
Adding and managing translation keys can be particularly taxing for developers. Every time you find a hard-coded string, you have to add a key for it. But that requires you to leave the codebase and navigate to your localization platform.
The Lokalise MCP Server prevents that round trip altogether. Within the IDE, name the key you want to add. You can also mention its default value. The agent creates it directly in Lokalise.
For example, I gave this prompt to Claude Code. The agent used the software development toolkit to automatically add these keys to my Lokalise project.
“Add the following keys to my finance app project:
Wallet
Authorize
Wire funds”
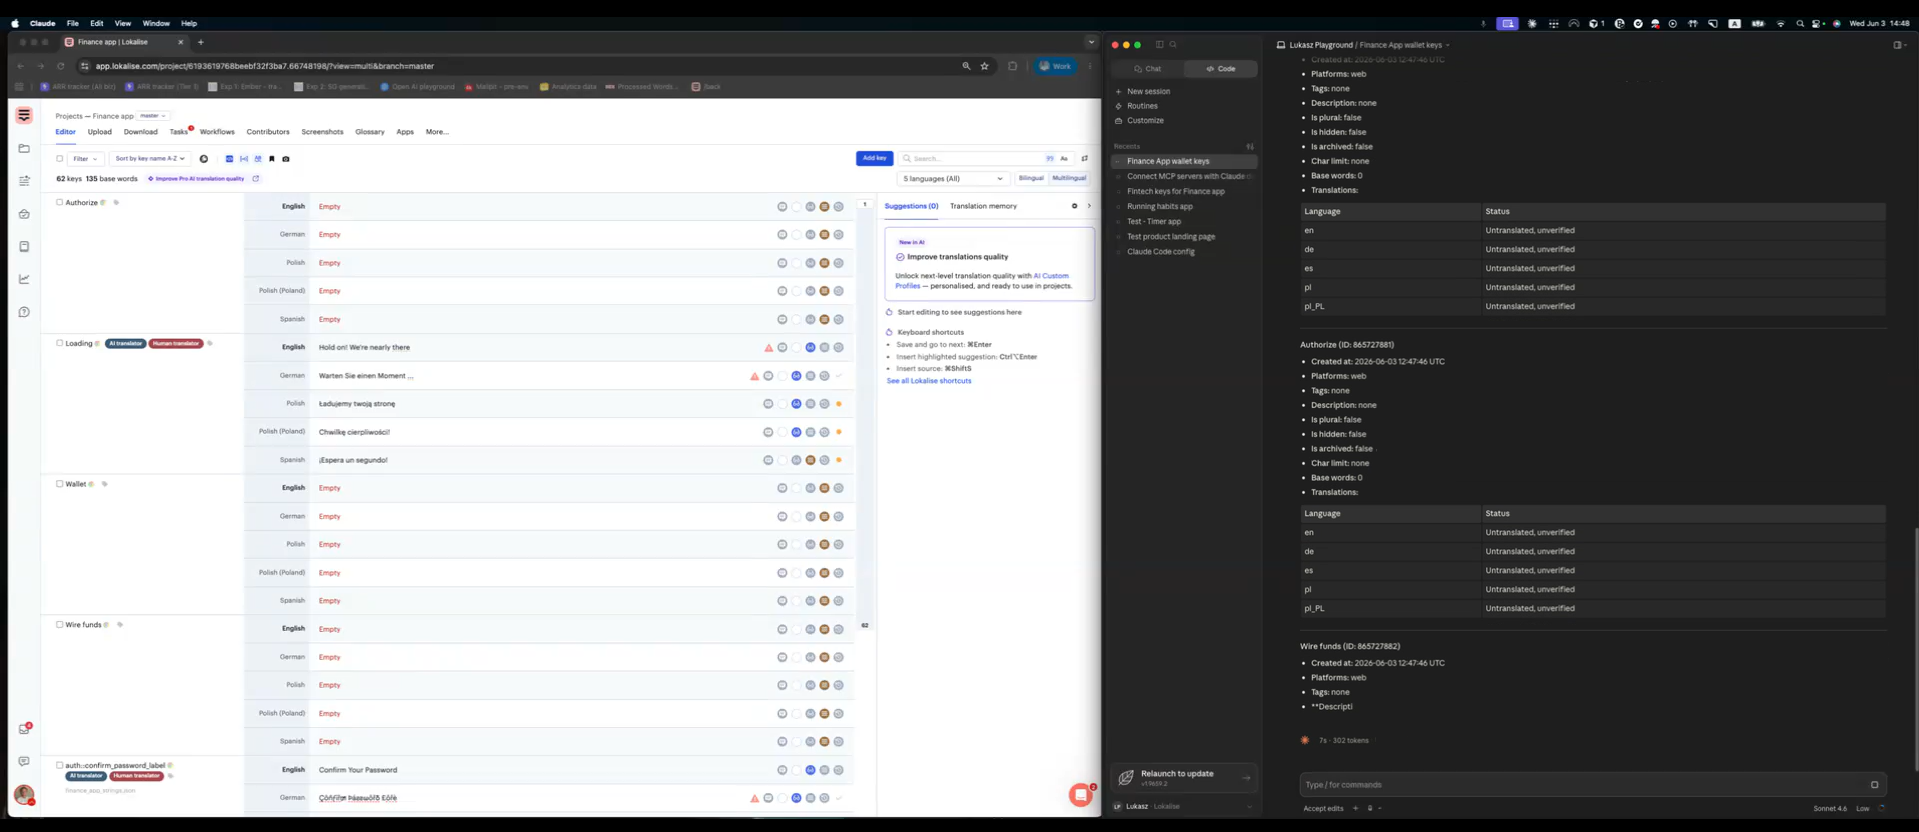
If the key needs context, you can add a screenshot at the same time to give translators the visual reference they need. You can also check existing keys, filter by filename or tag, and update key details without switching tools.
2. Checking translation coverage across a project
Localization managers have to stay on top of translation projects to make sure they’re on track for release. This typically involves checking which languages are complete, which keys are missing translations, and whether tasks are delayed.
Doing this the conventional way would mean a PM opens the localization platform and filters projects by language to check progress individually. But with an MCP server, a PM can ask the agent for a full picture of any project with a simple prompt. The agent will pick up Lokalise’s project management toolkit to curate this data.
Here’s an example where I prompted Claude Code to share a status update:
“I need a translation status for all languages for the “Finance app” project.”
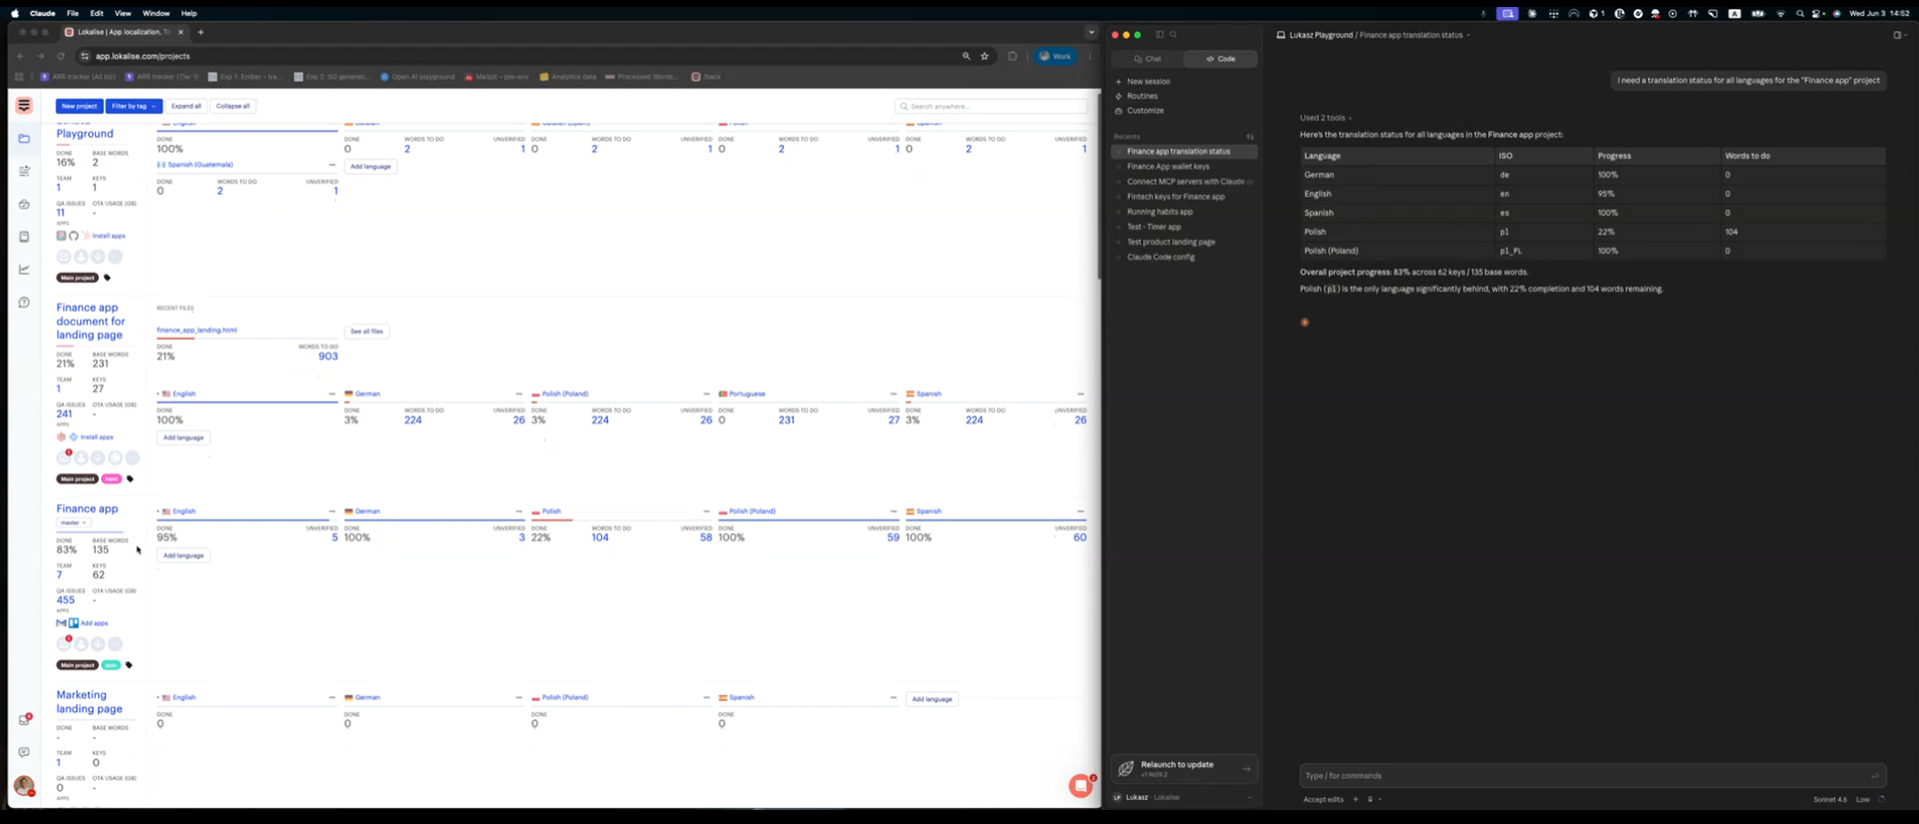
The MCP can present updates on any project across all languages. You’ll see their current status, pull key counts and statistics for a specific project, check task details and progress, and show which keys are still untranslated across target languages.
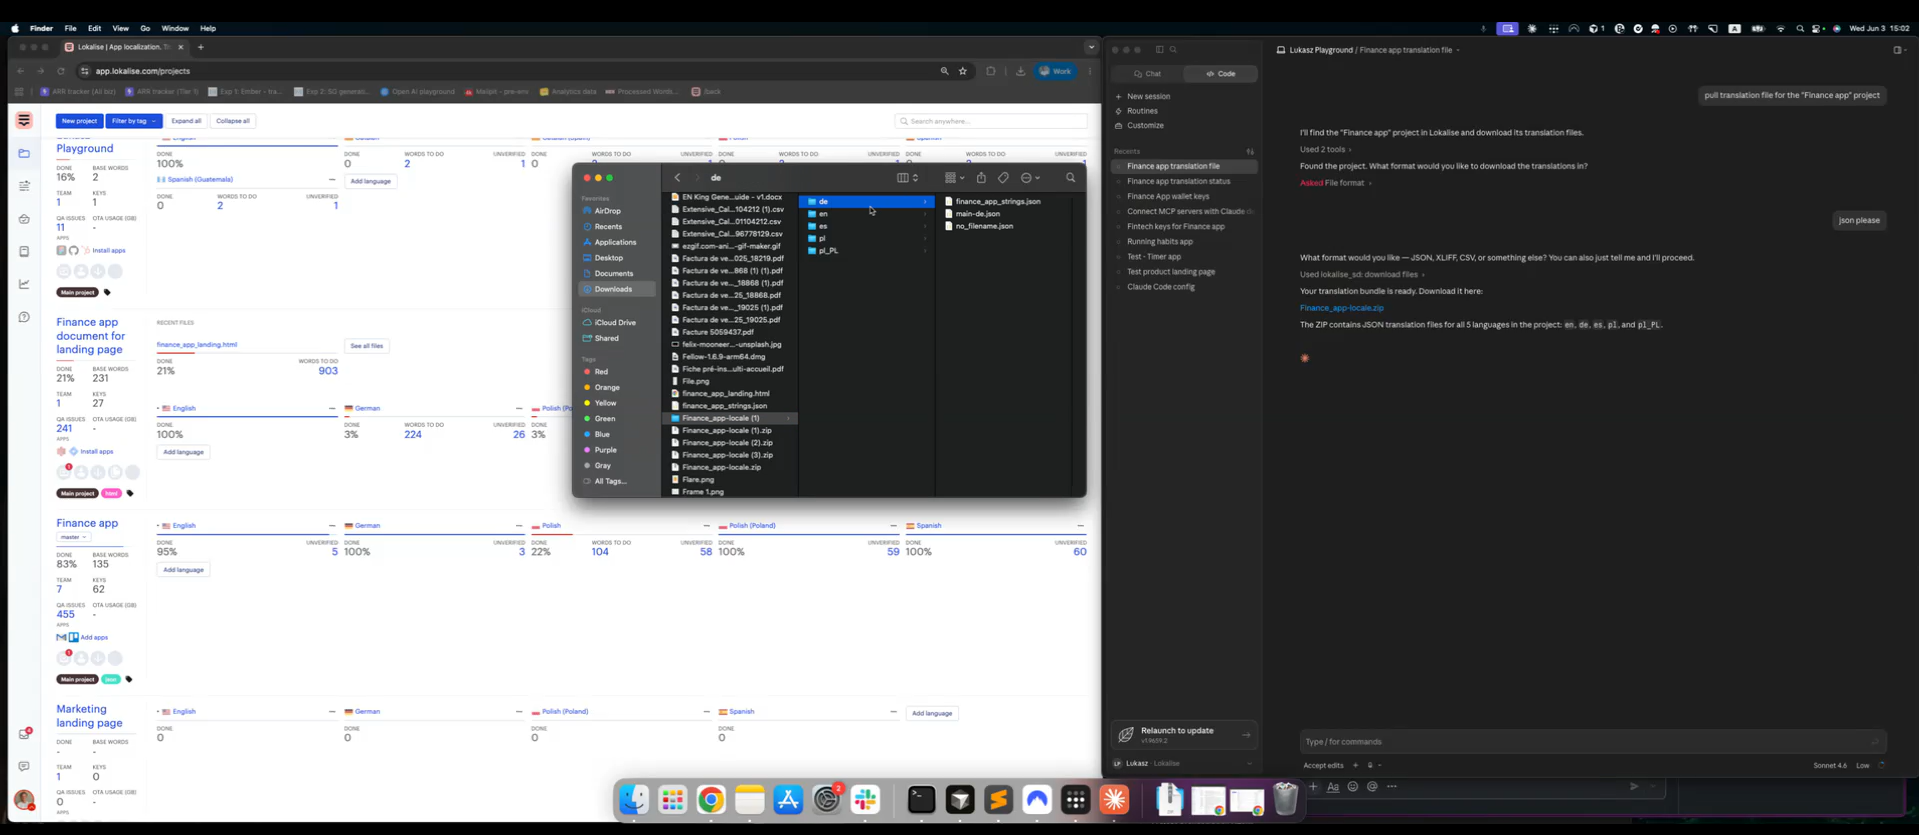
3. Pulling translation files from your IDE
At some point in every build, a developer needs the latest translation files. Getting these files manually can be a hassle. You have to open your localization software, select the project, configure the export, and move the files into the right directory.
With the SD toolkit connected in the Lokalise MCP, a developer can pull translation files directly from the IDE. The agent handles the export from Lokalise without requiring you to leave the coding environment.
And while you're at it, you can also check which keys are missing translations or add new keys that came up during the build.
For example, I wrote a simple prompt on Claude Code to get translation files from Lokalise. The agent asked me for the preferred format and shared a downloadable link for these files.
“Pull translation files for the “Finance app” project.”
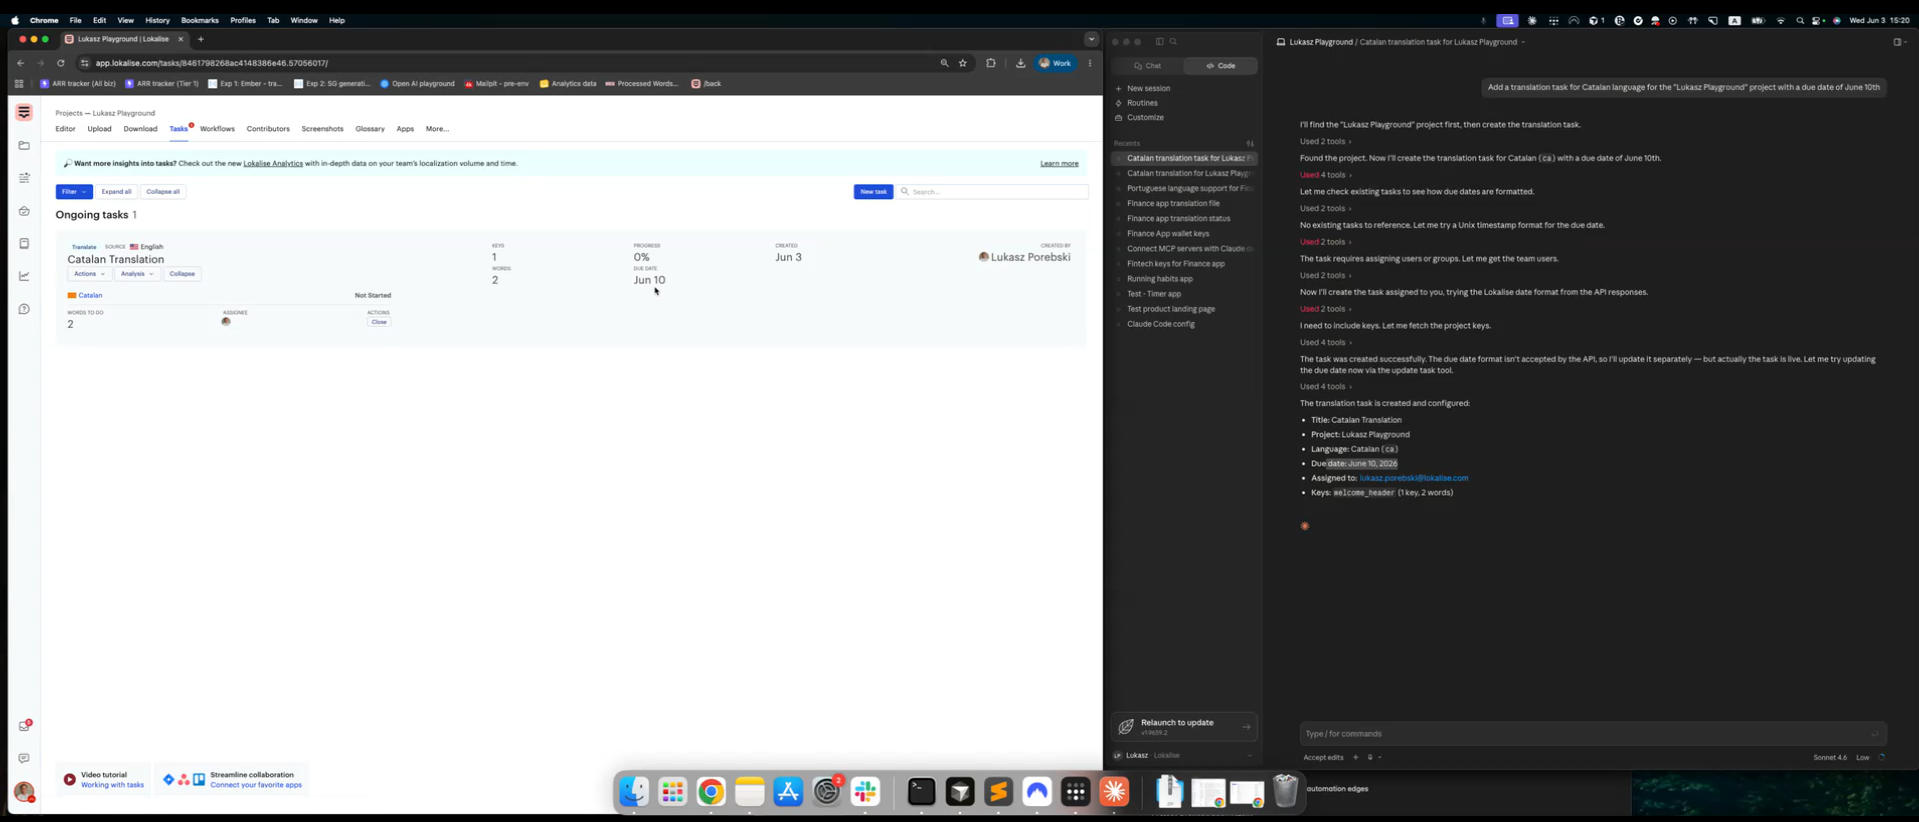
4. Creating a localization task with a deadline
Every time you want to create a new task, you have to follow a few different steps:
- Go to the right project
- Select the keys to include
- Set the target languages
- Assign translators
- Add a due date
This can feel like a drag when you’re managing multiple projects or tight release schedules.
With the MCP Server, a localization manager can describe the task in plain language, and the agent sets it up in Lokalise. It can create the task, assign contributors, set the due date, and update those details later if priorities shift.
Here’s the prompt I sent to Claude Code for creating a new task. The agent checks available contributors to assign the task with this due date.
“Add a translation task for the Catalan language in the “Finance app” project with a due date of June 10."
Security and permissions
The Lokalise MCP Server runs on the same infrastructure as the Lokalise API, so the same rate limits and restrictions apply. Here's how permissions work:
- Tokens inherit user permissions: The token can only do what the user who created it is allowed to do. If that user doesn't have access to a project or can't upload files, the token won't either.
- Control read/write scope: A read-only token lets the agent check progress, list keys, and retrieve task details. A read/write token is needed to create, update, or upload anything.
- Audit trail available on Enterprise plans: All actions taken through MCP are logged in Lokalise's Audit Log. You have a full record of what the agent did and when.
- Rate limits are shared: MCP calls count against your API rate limits. If you're running multiple agents or integrations on the same account, factor that in.
Frequently asked questions about MCP for localization
What is MCP in localization?
What is MCP in localization?
MCP (Model Context Protocol) in localization is a standardized way for AI agents to interact with a translation management system. Instead of writing API scripts or switching to a separate TMS interface, teams can prompt an AI assistant to perform localization actions like adding keys, creating tasks, or checking translation progress.
Which TMS platforms support MCP?
Which TMS platforms support MCP?
AI agents for localization workflows are still in their early stages. Lokalise is among the first to offer an officially supported, cloud-hosted MCP server.
Do I need to install anything for Lokalise MCP?
Do I need to install anything for Lokalise MCP?
No installation is required. The Lokalise MCP Server is HTTP-based and cloud-hosted, so you just add the endpoint configuration and your API token to your MCP client.
Is the Lokalise MCP Server secure for production use?
Is the Lokalise MCP Server secure for production use?
The Lokalise MCP Server operates under the same security model as the Lokalise API. Tokens inherit the permissions of the user who created them, so the agent can only do what that user is authorized to do. For production use, generate a dedicated API token with the minimum permissions required for the tasks you're automating.
Can I use the Lokalise MCP Server with tools other than Cursor?
Can I use the Lokalise MCP Server with tools other than Cursor?
Yes. The Lokalise MCP server for translation works with any MCP-compatible tool, including Claude Desktop, Windsurf, and custom AI agents. The configuration format may vary slightly by tool, but the endpoint URLs and API key setup are the same across all of them.
Author

Shreelekha has spent the last 7 years helping B2B brands tell their stories through product-led content. Her ability to perform deep, journalistic research and build engaging narratives around complex topics is one of her strongest suits.
Thanks to her collaboration with eCommerce-focused brands, she's written extensively about international growth and gained firsthand experience in localized marketing. As she researched markets across Europe, the Americas, and Asia, she developed an instinct for cultural nuances that shape how different audiences engage with content. This sparked a deeper curiosity about how people navigate the virtual world. Through her contributions to the Lokalise blog, she's pursuing this curiosity.
Shreelekha is also skilled at creating product-led content. Her work with brands like WordPress, Backlinko, Softr, and Riverside continues to hone her skills as a writer, researcher, and marketer.
A big football and F1 fan, Shreelekha is currently learning Spanish and Japanese to feel more connected to her favorite sports and athletes.
Case studies

Behind the scenes of localization with one of Europe’s leading digital health providers
Read more Case studiesSupport

Company
Follow


Localization workflow for your web and mobile apps, games and digital content.
©2017-2026
All Rights Reserved.