In one of the previous posts we have discussed how to store Rails translations inside the database with the help of Globalize gem. This feature can come in really handy when you would like to translate user-generated content: for example, blog posts or documentation articles. While Globalize is still a solid and battle-tested solution, it is not actively maintained anymore.
However, a new more advanced gem called Mobility has emerged, which shares many common concepts with Globalize. In this article I’m going to show you how to get started with Mobility, allow users to provide content in different languages, switch website and content locale, perform scoped queries, and more. By the end of reading this tutorial you’ll be ready to integrate Mobility Gem into your own application. So, let’s get started!
Start by creating a new Rails application without the default testing suite:
rails new MobilityDemo -T
In this demo I’ll be using Rails 6.1 but the explained concepts are valid for older versions as well. Please note that Mobility supports Rails 5.0 and above. Also note that this solution currently works only with ActiveRecord and Sequel, and can be extended to support localized time as needed.
Our application will be a superheroes database therefore we'll need to generate a new scaffold Superhero. Problem is, Rails will not pluralize this word properly by default. To fix this issue, add a new inflection rule inside the config/initializers/inflections.rb file:
ActiveSupport::Inflector.inflections(:en) do |inflect| inflect.plural /(hero)$/i, '\1es' inflect.singular /(hero)es/i, '\1'end
Now the words "hero" and "superhero" will be pluralized properly.
Next, generate a new scaffold and run the migration:
rails g scaffold Superhero name:string description:textrails db:migrate
Good stuff. The next step is to add support for multiple languages. I'll use English and Russian but of course you can pick any other languages as needed. Tweak the config/application.rb file by adding the following lines:
So, the default locale is English, and Russian language is supported as well.
Translating application interface
Before integrating Mobility into our application, I would like to localize the interface properly. All translations added in this section will live inside the plain old YAML files. If you'd like to learn more about this process, check out my Rails I18n post that explains all ins and outs.
Views
Start by adding a main menu to the layouts/application.html.erb file:
As for the superheroes_controller.rb, I would like to translate the flash messages for the create, update, and destroy actions using lazy loading in the following way:
We are done with localizing the interface elements. Here are the corresponding translations inside the en.yml file:
en:
  activerecord:
    attributes:
      superhero:
        name: Name
        description: Description
  main_menu:
    superheroes: All superheros
    add_superhero: Add superhero
  superheroes:
    create:
      success: Superhero was created!
    update:
      success: Superhero was updated!
    destroy:
      success: Superhero was removed!
    edit:
      title: Edit
    index:
      title: All heroes
      name: Name
      description: Description
      show: Show
      edit: Edit
      destroy: Remove
      new: Add new
    new:
      title: New superhero
    show:
      title: Edit
  global:
    actions:
      submit: Submit
And here's the contents of the ru.yml:
ru:
  activerecord:
    attributes:
      superhero:
        name: Имя
        description: Описание
  main_menu:
    superheroes: Все супергерои
    add_superhero: Добавить супергероя
  superheroes:
    create:
      success: Супергерой создан!
    update:
      success: Супергерой обновлён!
    destroy:
      success: Супергерой удалён!
    edit:
      title: Редактировать
    index:
      title: Все герои
      name: Имя
      description: Описание
      show: Показать
      edit: Редактировать
      destroy: Удалить
      new: Добавить нового
    new:
      title: Новый супергерой
    show:
      title: Редактировать
  global:
    actions:
      submit: Отправить
Adding locale switcher
Currently our users cannot choose a desired locale, therefore let's take care of this feature now. Add a locale switcher to the application.html.erb layout:
I would like to modify the routes to make the URLs look like example.com/en/superheroes or example.com/ru/superheroes. The locale part should be optional and we also have to check that the requested locale is actually supported by the app. Here's the contents of the config/routes.rbfile:
Rails.application.routes.draw do scope "(:locale)", locale: /#{I18n.available_locales.join("|")}/ do resources :superheroes root 'superheroes#index' endend
The last step is to process the :locale parameter and set the corresponding locale. Create a new concern inside the controllers/concerns/locale.rb file:
module Locale extend ActiveSupport::Concern private def extract_locale(attr = :locale) parsed_locale = params[attr] I18n.available_locales.map(&:to_s).include?(parsed_locale) ? parsed_locale : nil end included do before_action :set_locale def set_locale I18n.locale = extract_locale || I18n.default_locale end def default_url_options { locale: I18n.locale } end endend
Here we fetch the :locale parameter and check whether our application supports the requested language. If yes, we set it, otherwise utilize the default locale. Also note the default_url_options method that will automatically add the chosen locale to all links generated with helpers like link_to.
Finally, import this concern inside the application_controller.rb:
class ApplicationController < ActionController::Base include Localeend
Now let's proceed to integrating Mobility into our application!
Integrating Mobility gem into the Rails app
First of all, add a new gem into your Gemfile:
gem 'mobility', '~> 1.0.1'
Then run the following commands:
rails generate mobility:installrails db:migrate
It will generate a new initializer mobility.rb as well as two migrations. These migrations, in turn, create two tables: mobility_text_translations and mobility_string_translations. As you've probably guessed, all Mobility-related translations will live inside these tables which we are going to connect to our own tables using polymorphic associations. This is the default backend but Mobility supports other backends as well:
Table — this backend is very similar to the approach found in Globalize. Simply speaking, this backend stores translations as columns on a model-specific table. For example, for our superheroes table we would have created a separate table superheroes_translations and place all translated content inside.
Column — this backend stores translations inside the same table. For example, to translate a superhero's name we would have created name_en and name_ru columns inside the superheroes table.
Postgre-specific — as the name implies, this backend is supported only by PostgreSQL DBMS and implies creating additional columns in the same table with the :json, :jsonb, or :hstore type.
The default backend will work for us, but if you are willing to choose a different one, then provide --without-tables option when running the Mobility generator. Then follow instructions for setting up a specific backend.
Next, open your superhero.rb model and paste the following content:
By default, Mobility will use the same locales as you've listed for the available_locales option, but it's also possible to pass an array to locale_accessors directly:
locale_accessors %i[en ru ja de]
After adding this line, you can read and write values for any locale easily:
So, asI've explained in the previous section, the name and description accessors for our superheroes will just work out of the box, which means that the _form.html.erb partial does not require any modifications. However, in order to provide English and Russian content, you will need to switch the locales back and forth which is not very convenient. Why don't we provide text fields for both locales on the same page?
To achieve that, make sure to add locale_accessors to the mobility.rb initializer if you hadn't done so already. Next, modify the views/superheroes/_form.html.erb file in the following way:
<%= form_with(model: superhero) do |form| %> <% if superhero.errors.any? %> <div id="error_explanation"> <ul> <% superhero.errors.each do |error| %> <li><%= error.full_message %></li> <% end %> </ul> </div> <% end %> <% all_locales.each do |locale| %> <div class="field"> <% name = "name_#{Mobility.normalize_locale(locale)}" %> <%= form.label name %> <%= form.text_field name %> </div> <div class="field"> <% description = "description_#{Mobility.normalize_locale(locale)}" %> <%= form.label description %> <%= form.text_area description %> </div> <hr> <% end %> <div class="actions"> <%= form.submit t('global.actions.submit') %> </div><% end %>
For each supported locale we display two fields to modify the name and description respectively. normalize_locale method will properly convert the language name to a format that can be used with the form builder helpers.
all_locales is a helper method that you'll need to define inside the superheroes_helper.rb:
Next, make sure to mark the name_en, name_ru, description_en, and description_ru as permitted attributes inside the superheroes_controller.rb:
def superhero_params params.require(:superhero).permit(I18n.available_locales.map do |l| [:"name_#{Mobility.normalize_locale(l)}", :"description_#{Mobility.normalize_locale(l)}"] end.flatten)end
Finally, provide translations for the new attributes inside the en.yml:
en:
  activerecord:
    attributes:
      superhero:
        name_en: Name (Eng)
        description_eng: Description (Eng)
        name_ru: Name (Rus)
        description_ru: Description (Rus)
ru.yml:
ru:
  activerecord:
    attributes:
      superhero:
        name_en: Имя (Англ)
        description_eng: Описание (Англ)
        name_ru: Имя (Рус)
        description_ru: Описание (Рус)
At this point you can open the "New superhero" page and provide content for both locales in one go!
Choosing the content locale
Now we can provide names and descriptions for our superheroes in both languages, however there's a small problem. In order to actually view the translated content, our users will have to switch the website locale. This will result in translating both the superhero data and website interface (menus, forms, and other elements). While it might be okay, I don't think this is the best approach. Why don't we allow our users to set the content locale only? Luckily, Mobility has its own locale accessor that we are going to take advantage of.
First of all, add a new menu item to the application.html.erb layout:
Next let's process the content_locale parameter inside the locale.rb concern and set the Mobility locale accordingly:
module Locale extend ActiveSupport::Concern private def extract_locale(attr = :locale) parsed_locale = params[attr] I18n.available_locales.map(&:to_s).include?(parsed_locale) ? parsed_locale : nil end included do before_action :set_locale before_action :set_content_locale def set_locale I18n.locale = extract_locale || I18n.default_locale end def set_content_locale Mobility.locale = extract_locale(:content_locale) || I18n.locale end def default_url_options { locale: I18n.locale, content_locale: Mobility.locale } end endend
I've added a new method set_content_locale which modifies Mobility.locale only. Finally, don't forget to add content_locale parameter to the default_url_options.
Great, now the users can view the translated content without switching the language of the interface!
This form will send a GET request, therefore we have to add a content_locale hidden tag to preserve the currently chosen language.
Provide a new translation inside the en.yml file:
en:
  main_menu:
    search:
      name: Find by name
ru.yml:
ru:
  main_menu:
    search:
      name: Найти по имени
Now modify the index action inside the superheroes_controller.rb:
def index @superheroes = if params[:name_q] Superhero.search params[:name_q] else Superhero.all endend
Let's define the search method as a scope inside the superhero.rb model:
scope :search, ->(name_q) do i18n do name.lower.matches("%#{name_q.downcase}%") endend
i18n is a Mobility method which allows to perform scoped queries using the currently set locale. When you pass a block to this method, it is possible to construct complex Arel queries inside. Specifically, in this example we are performing a case-insensitive partial search against the name attribute. Nice!
Other Mobility features
Fallbacks and default values
To provide translation fallbacks, enable the corresponding plugin inside the mobility.rb accessor:
fallbacks
Now you may configure fallbacks inside your model in the following way:
To enable dirty tracking (which will allow you to check whether an attribute was changed), add a new plugin to the mobility.rb initializer:
dirty
Now dirty tracking works globally but you can disable it for the specific attributes:
translates :name, type: :string, dirty: false
At this point you can utilize dirty tracking as usual:
hero.name_washero.changedhero.previous_changes
Migrating from Globalize to Mobility
Migration from Globalize to Mobility is quite straightforward as these solutions share many common aspects. First of all, replace Globalize with Mobility in your Gemfile and then run:
While Mobility allows us to store user-generated data inside the database, you will still need to translate interface-related elements. These translations live inside YAML files and managing them may become quite tedious, especially if your translators are not tech-savvy people. Therefore, Lokalise is here to help you! We provide a very convenient user interface which allows to import/export translation files, manage translations, integrate with other services like Trello or Slack, and much, much more. To integrate your Rails application with Lokalise follow these simple steps:
Get a free 14-day trial. No credit card is required, and you can explore all key features before choosing a plan.
Create a new translation project with a base language set to English. Then simply add all other locales that your application supports.
On the project page click the “More” button and choose “Settings”. On this page you should see the project ID.
Open your personal profile page, navigate to the “API tokens” section, and generate a read/write token.
Export your YAML translation files to Lokalise by running rails lokalise_rails:export.
Proceed to Lokalise and perform translations as needed. You may add more languages, invite new collaborators, and perform other actions.
When you are ready, import translation files back to your Rails project by running rails lokalise_rails:import.
This is it!
Conclusion
So, in this post we have seen how to store user-generated content inside the database using Mobility gem. We have seen all the main features of this solution, and by now you are ready to apply the received knowledge into practice. To learn more about Rails internationalization in general, check out the following post.
And this is it for today, folks! Thank you for staying with me, and until the next time.
Ilya is the lead for content, documentation, and onboarding at Lokalise, where he focuses on helping engineering teams build reliable internationalization workflows. With a background at Microsoft and Cisco, he combines practical development experience with a deep understanding of global product delivery, localization systems, and developer education.
He specializes in i18n architectures across modern frameworks — including Vue, Angular, Rails, and custom localization pipelines — and has hands-on experience with Ruby, JavaScript, Python, Elixir, Go, Rust, and Solidity. His work often centers on improving translation workflows, automation, and cross-team collaboration between engineering, product, and localization teams.
Beyond his role at Lokalise, Ilya is an IT educator and author who publishes technical guides, best-practice breakdowns, and hands-on tutorials. He regularly contributes to open-source projects and maintains a long-standing passion for teaching, making complex internationalization topics accessible to developers of all backgrounds.
Outside of work, he keeps learning new technologies, writes educational content, stays active through sports, and plays music. His goal is simple: help developers ship globally-ready software without unnecessary complexity.
Build a smooth translation pipeline with Lokalise and Vercel
Internationalization can sometimes feel like a massive headache. Juggling multiple JSON files, keeping translations in sync, and redeploying every time you tweak a string… What if you could offload most of that grunt work to a modern toolchain and let your CI/CD do the heavy lifting? In this guide, we’ll wire up a Next.js 15 project hosted on Vercel. It will load translation files on demand f
Hands‑on guide to GitHub Actions for Lokalise translation sync: A deep dive
In this tutorial, we’ll set up GitHub Actions to manage translation files using Lokalise: no manual uploads or downloads, no reinventing a bicycle. Instead of relying on the Lokalise GitHub app, we’ll use open-source GitHub Actions. These let you push and pull translation files directly via the API in an automated way. You’ll learn how to: Push translation files from your repo to LokalisePull translated content back and open pull requests automaticallyWork w
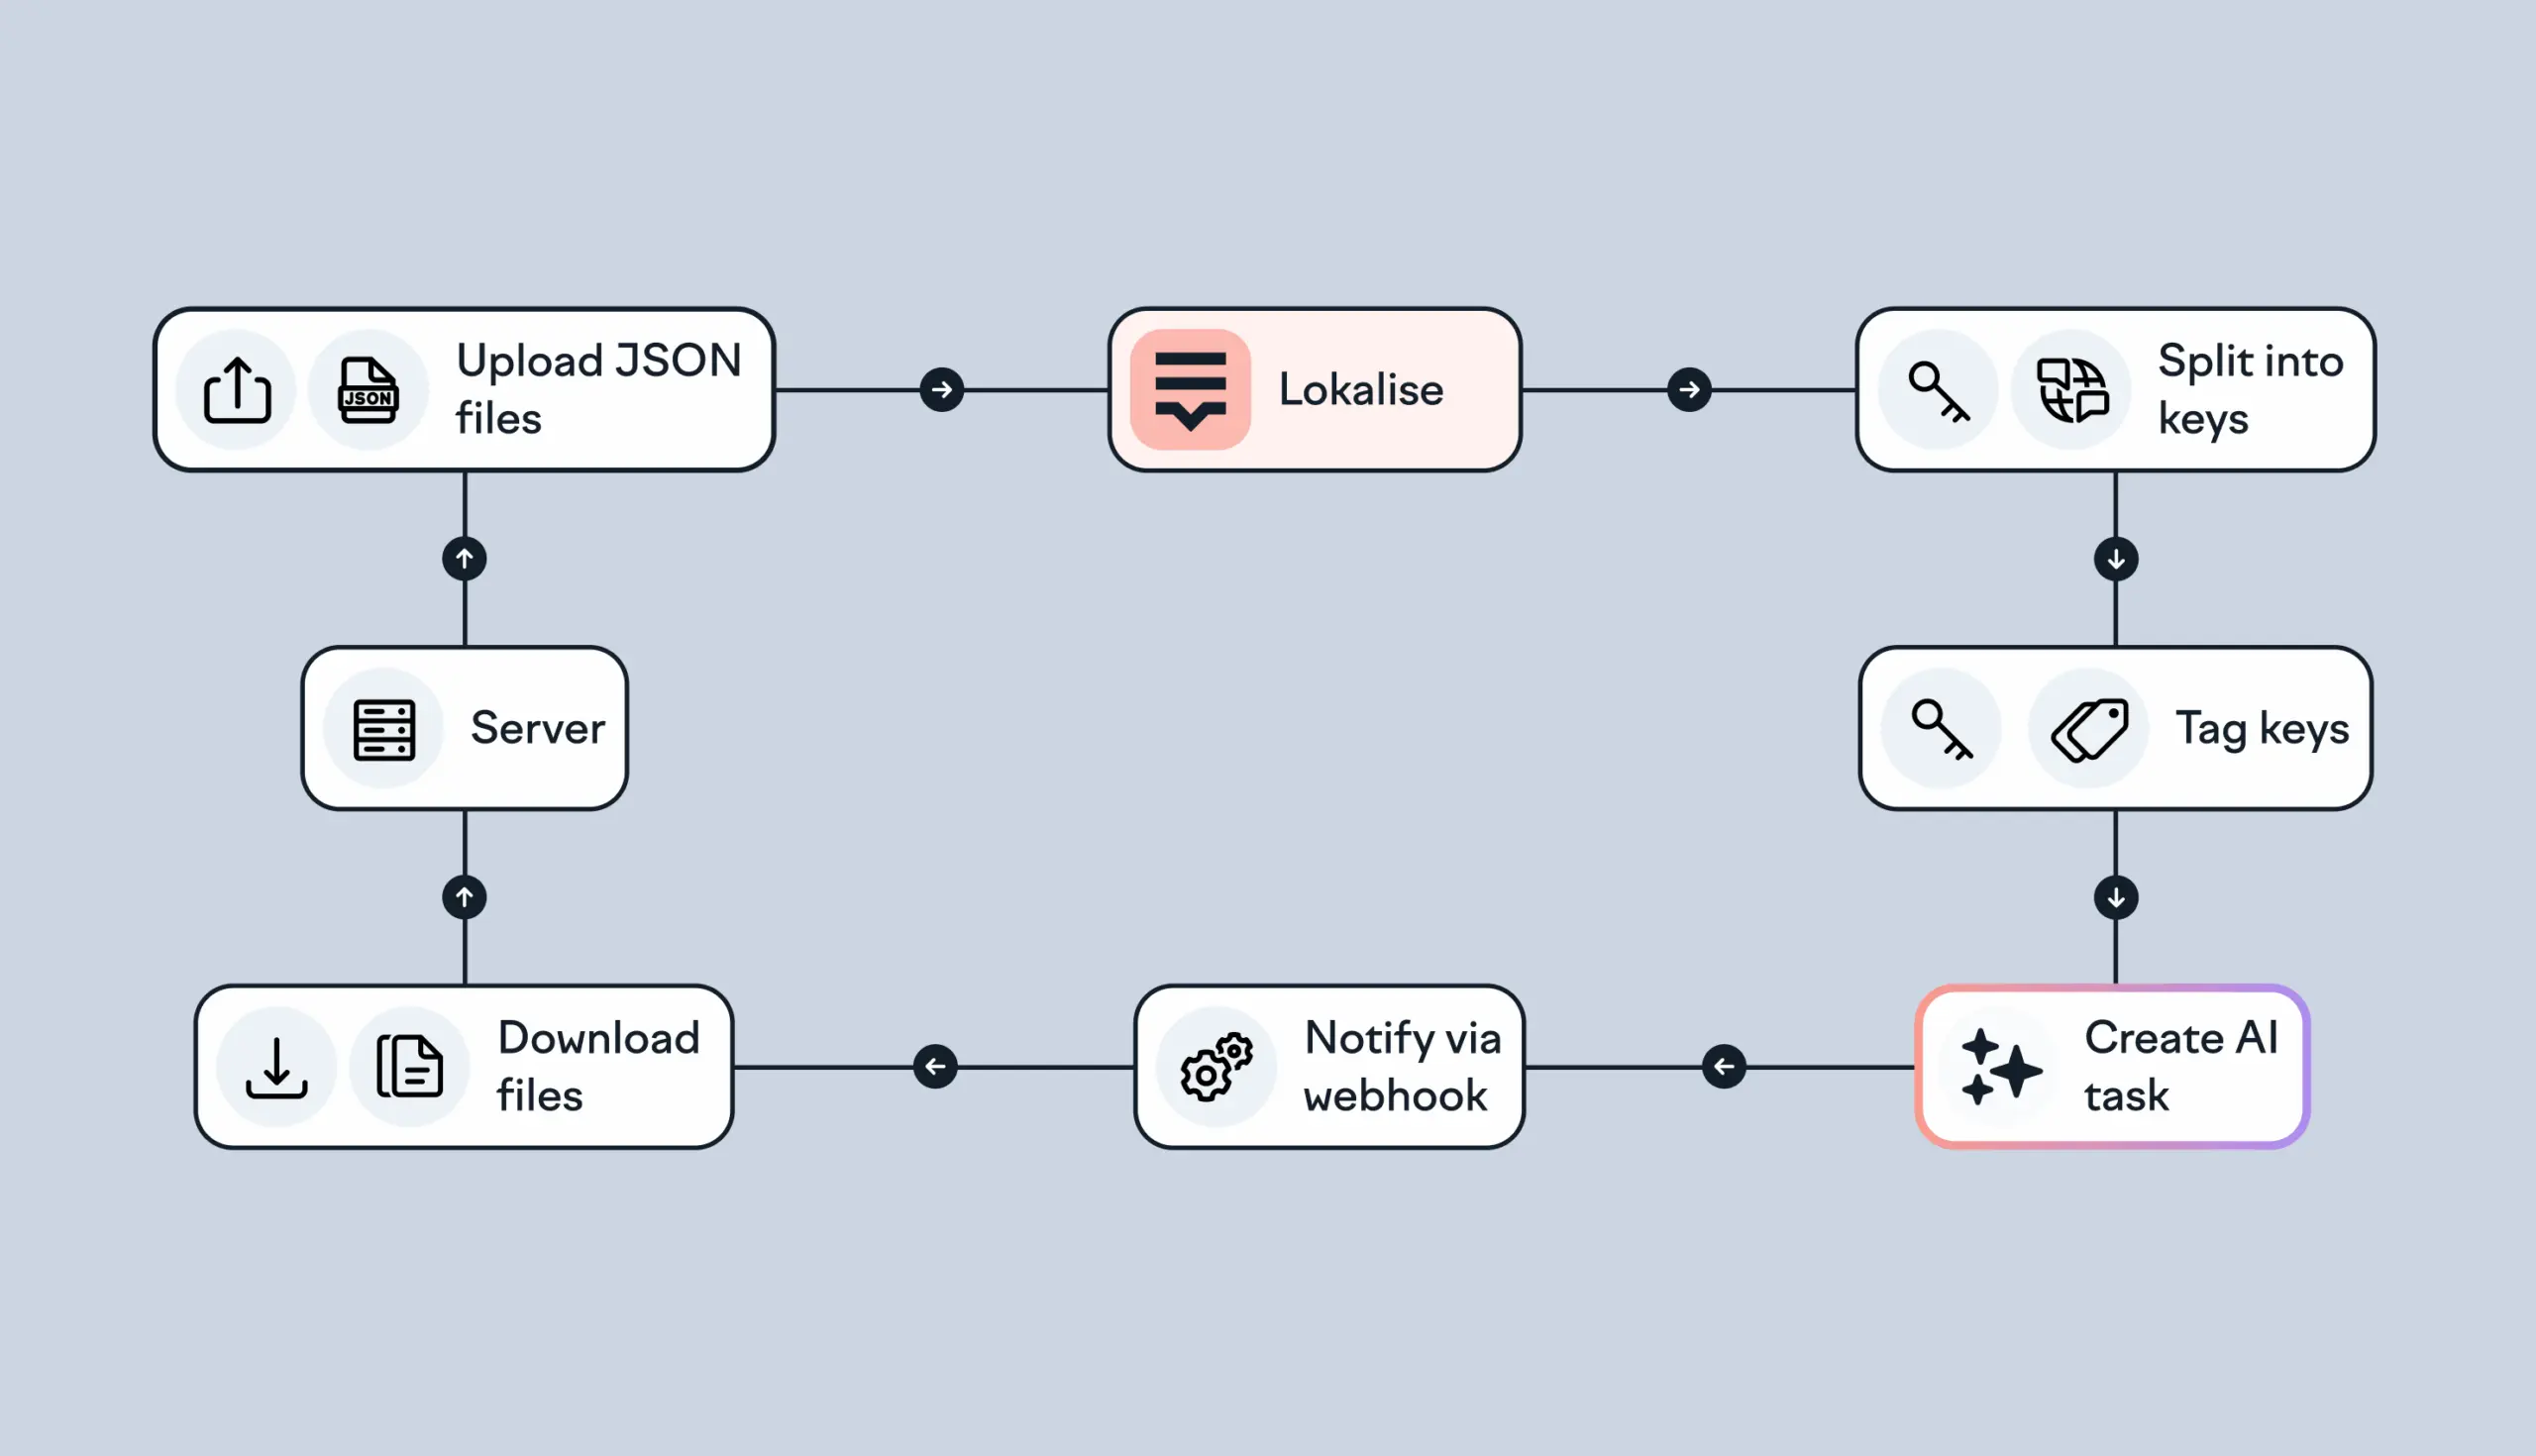
Building an AI-powered translation flow using Lokalise API and webhooks
Managing translations in a growing product can quickly become repetitive and error-prone, especially when dealing with frequent content updates or multiple languages. Lokalise helps automate this process, and with the right setup you can build a full AI-powered translation pipeline that runs with minimal manual input. In this guide, you’ll learn how to: Upload translation files to Lokalise automaticallyCreate AI-based translation tasksUse webhooks to downloa