Internationalization, i18nfor short, is the process of adapting your software to support various linguistic and cultural settings. This beginner's guide to Python i18n helps you get started with internationalization using the gettext tool and its related modules.
Internationalization is a continual process, which forms an integral part of software development. If your end users belong to a variety of cultures, you should incorporate i18n processes, like security and accessibility, in your software development life cycle. Emphasizing software internationalization ensures that your applications are adaptable for diverse markets and user needs. Here are the typical considerations of the Python i18n process:
Before you make your application ready for i18n (internationalization), there are a few important things to know. This is especially crucial if you're translating an existing app, but it's also useful for new projects that aim to follow i18n practices.
First, ensure that no text in your app is hard-coded. Instead, use a special function to handle all text outputs. This function will take care of any preprocessing and translation needed before showing the text. We’ll go over this process in more detail when we discuss the packages soon.
Next, you should enable Unicode in your application. This is done by default in Python 3, and here is a guide to working with UTF in Python 2. Unicode is a set of all the characters, numbers, currencies, and symbols in the world. It goes beyond the ASCII standard for character representation and is necessary to support different languages. Learn more about character encodings in our dedicated article.
Finally, the majority of tasks in this tutorial will be handled through the Python gettext module.
Import it in your Python script, like so:
import gettext
Now, let's begin with our basic gettext Python tutorial.
Note on installing gettext
Depending on your system setup, you might need to install gettext along with its tools, which we'll require later in this tutorial.
You can find a link to the latest gettext for *nix systems in the official docs.
To use various forms of the same string in your application, import the necessary function to wrap your string around from the gettext module. This is the special function that changes your text based on the currently set locale mentioned in the previous section:
# Import gettext moduleimport gettext# Set the local directoryappname = 'lokalise'localedir = './locales'# Set up Gettexten_i18n = gettext.translation(appname, localedir, fallback=True, languages=['en'])# Create the "magic" functionen_i18n.install()# Translate messageprint(_("Hello World"))
First, we specify where our translation files will be stored (the locales directory) and what the application is called.
Next, we set up the gettext itself by giving our application a name, passing the locale directory, setting fallback to True (more on this later), and specifying the language name (English in this case).
Then, we install the special function in the app. We can now use it to translate into English.
If you run this script now, the "Hello World" text will display. Why? Well, because we haven't provided any translations yet! And, because we have set the fallback option to True, Python simply outputs the text passed to the _. If you switch this option to False, you'll get an error saying that the corresponding translation cannot be found.
Managing translation files in Python i18n
Now we'll see how to add the actual translations to the app. To achieve this, create a new directory called en in the locales folder. This directory should be named after the language code specified in the previous section when setting up gettext. Inside, add another folder called LC_MESSAGES.
So, your directory structure should look like this:
locales
en
LC_MESSAGES
Adding a POT file
Automatically extracting translation keys
While we could create the translation file manually, it's not very convenient, is it? Instead, we can rely on the special extractor that comes packaged with gettext: It will scan the given files and automatically extract all text marked with the _ function for translation.
To run it, you would use the following command:
xgettext -d base -o locales/lokalise.pot demo.py
A few things to note here:
Please be sure to provide the proper name for your locales folder.
Replace lokalise with your appname as provided in the previous step.
What this command will do is extract all the translations from the Python script and add them to a POT file, which will serve as a template for the future translation files.
Some tutorials might suggest using a very similar tool called pygettext, which comes bundled with Python. However, there are some problems with this approach:
This extractor script has to be manually located. Usually, it can be found in the Python installation directory under Tools\i18n.
It does not work well with pluralized strings.
Therefore, I would really recommend sticking to xgettext instead.
Adjusting POT file
Here's how my POT file looks at this point:
# SOME DESCRIPTIVE TITLE.# Copyright (C) YEAR THE PACKAGE'S COPYRIGHT HOLDER# This file is distributed under the same license as the PACKAGE package.# FIRST AUTHOR <EMAIL@ADDRESS>, YEAR.##, fuzzymsgid ""msgstr """Project-Id-Version: PACKAGE VERSION\n""Report-Msgid-Bugs-To: \n""POT-Creation-Date: 2023-06-19 17:31+0300\n""PO-Revision-Date: YEAR-MO-DA HO:MI+ZONE\n""Last-Translator: FULL NAME <EMAIL@ADDRESS>\n""Language-Team: LANGUAGE <LL@li.org>\n""Language: \n""MIME-Version: 1.0\n""Content-Type: text/plain; charset=CHARSET\n""Content-Transfer-Encoding: 8bit\n"#: demo.py:12msgid "Hello World"msgstr ""
Feel free to adjust the preamble by providing your project name, translator and team names, and other attributes (though this is totally optional).
The most interesting part is this one:
#: demo.py:10msgid "Hello World"msgstr ""
The # character marks a comment. Inside this comment, we can see the file name and the line number where the translation was found.
The msgid is our initial text marked for translation. We can call it a translation keys. The msgstr is the corresponding translation value, which is currently empty. Please note that you are not usually expected to provide any translations within the POT files because these are just templates!
Adding a PO file
In order to translate something, you should copy-paste the POT file into the locales/LC_MESSAGES/en folder under the name lokalise.po (yes, it's po, not pot). PO is a portable object file that'll host the actual translations for the given language.
Now simply open the lokalise.po file and provide the value for the msgstr:
#: demo.py:10msgid "Hello World"msgstr "Hello and welcome to this tutorial on Lokalise!"
There are two more things I'd really recommend doing in this and any other PO files we are going to create later:
Check the Content-Type header and make sure that the charset is set to UTF-8 (otherwise you might have issues when displaying non-Latin characters). Here's an example: "Content-Type: text/plain; charset=UTF-8\n".
Adjust the Language header by passing the locale code. For English translations, you would use "Language: en\n".
Unfortunately, this is not all. While the PO file is ready, we have to convert it to a special MO format that can actually be understood by gettext.
Generating a MO file
The good news is that we are not expected to create the MO files manually. Instead, we can rely on the msgfmt tool that also comes packaged with gettext.
We are effectively saying "create a new MO file based on the PO file." To summarize, the PO files are meant to be edited by translators, whereas the MO files should never be manually created or adjusted.
Verify that the lokalise.mo has been created in the same folder as the lokalise.po file, and rerun your app script. You should see: "Hello and welcome to this tutorial on Lokalise!" printed to the terminal. Great job!
Adding more translations
Now, what if you'd like to add more translations to the app? Basically, you'll need to repeat the steps listed above.
First, add a new text to the script and be sure to wrap it with the _ function:
print(_("Learn Python i18n"))
Next, run the xgettext tool to generate a new version of the POT file:
xgettext -d base -o locales/lokalise.pot demo.py
Copy the newly generated key-value pair, paste it inside lokalise.po (remember not to modify the POT file directly), and provide your translation:
#: demo.py:12msgid "Learn Python i18n"msgstr "In this article you'll learn how to use Python i18n"
Now you have two pieces of text translated into English!
Translating into multiple languages
The next question on your mind is probably: How do I add support for multiple locales? It would seem the process is very similar to what we've already done.
To get started, let's modify our Python i18n app to ask the user what language they speak:
I'll add support for French and Latvian, but of course you can choose any other languages.
Please note that the strings passed to the _ function stay the same: we don't need to modify them!
Now you should create two new folders inside the locales directory: fr and lv. Within each folder, add LC_MESSAGES and copy-paste the lokalise.pot as lokalise.po inside.
Now let's add the French translations:
#: demo.py:10msgid "Hello World"msgstr "Bonjour et bienvenue dans ce tutoriel sur Lokalise !"#: demo.py:12msgid "Learn Python i18n"msgstr "Dans cet article, vous apprendrez à utiliser Python i18n"
Remember to ensure that the encoding is set to UTF-8 and the language has the fr value in the headers.
And Latvian the translations:
#: demo.py:10msgid "Hello World"msgstr "Labdien un laipni lūdzam šajā Lokalise apmācībā!"#: demo.py:12msgid "Learn Python i18n"msgstr "Šajā rakstā jūs uzzināsit, kā izmantot Python i18n"
As you might guess, the final step is running the msgfmt tool again. Just be sure to provide the proper directory names; for example:
At this point, you can run the app again and choose one of the locales. Nice!
Localizing time zones: Python l10n
The easiest way to localize time zones in Python is through the pytz package. At the same time, a web framework like Django may have a built-in time zone handler. To get started with pytz, install the package using a package installer.
pip install pytz
Once you have successfully installed the package, you can use it to convert datetime objects to various time zones:
from datetime import datetimefrom pytz import timezoneformat = "%Y-%m-%d %H:%M:%S %Z%z"timezones = ['America/Los_Angeles', 'Europe/Madrid', 'America/Puerto_Rico']for zone in timezones: now_time = datetime.now(timezone(zone)) print(now_time.strftime(format))
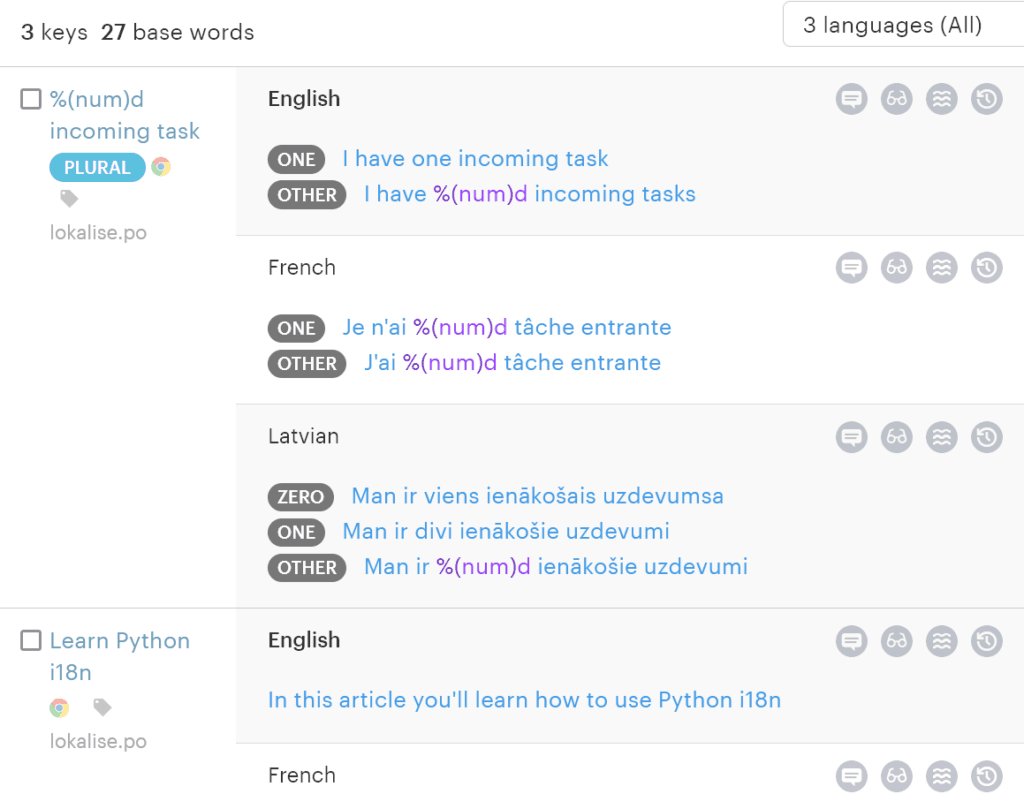
Now we'll discuss how to add pluralization to our app. For instance, let's suppose I'd like to translate the following phrase into multiple languages: "X incoming tasks". X here is the number and the word "tasks" should be pluralized accordingly ("1 task" but "5 tasks").
To get started, ask the user for the input and utilize the ngettext function inside your script:
tasks = int(input("How many incoming tasks are there?").strip())ngettext = translations.ngettextprint( ngettext("%(num)d incoming task", "%(num)d incoming tasks", tasks) % {'num': tasks})
In this case, we have to provide two versions of the text that are also known as forms: plural and singular.
Regenerate the POT file, open it, and copy the newly added lines. Let's take care of the English translations first:
#: demo.py:21#, python-formatmsgid "%(num)d incoming task"msgid_plural "%(num)d incoming tasks"msgstr[0] "I have one incoming task"msgstr[1] "I have %(num)d incoming tasks"
One important thing we have to do here is add a new header that contains information about all the supported plural forms:
nplurals=3 means that this language has three plural forms. Next, you can see these forms indexed. Specifically, index 0 is used when the number equals 1, index 1 is used when there are two items, and the plural form number 2 covers all other cases.
Provide the translations accordingly:
#: demo.py:21#, python-formatmsgid "%(num)d incoming task"msgid_plural "%(num)d incoming tasks"msgstr[0] "Man ir viens ienākošais uzdevumsa"msgstr[1] "Man ir divi ienākošie uzdevumi"msgstr[2] "Man ir %(num)d ienākošie uzdevumi"
Finally, let's take care of the French translations:
Finally, don't forget to regenerate the MO files, and then check that everything works properly!
Use Lokalise for Python i18n
While managing your Python i18n tasks completely from scratch is doable, it is advisable to use a translation management system. Lokalise allows you to manage your translations through a central dashboard.
Confirm your email and follow the wizard's instructions to create a new team and a project. A project is where your translations will be stored.
Be sure to choose the proper base and target languages for your project. The base language is like the main language of your app, therefore I'll set it to English. Target languages are the ones you'll be translating into (I'll choose Latvian and French). Also, when choosing these languages, make sure the locale codes match the Language header values provided in the PO files. Specifically, if your Language is set to en then choose English (en) as the base language.
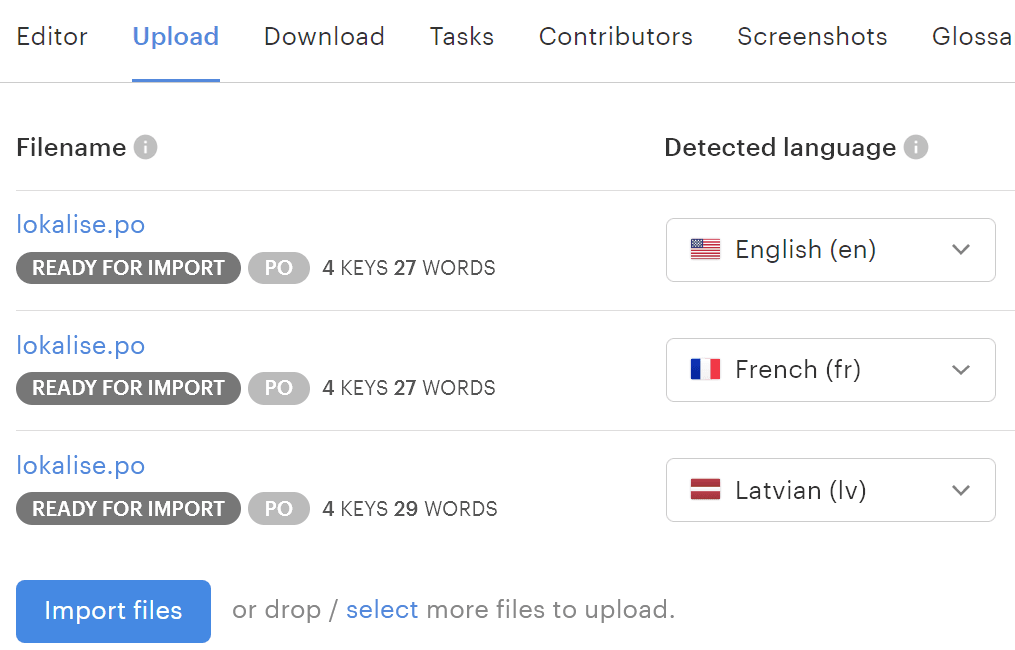
After creating the project proceed to the Upload page.
Choose your PO translation files from your PC (you don't need to upload the POT and MO files!). The languages should be detected automatically:
You can keep all options set to the default values and press Import files.
If you'd like to translate your texts into additional languages, you can hire a professional translator or use a neural network for the task. Just proceed to the Orders page and create a new order. You can learn more in our documentation.
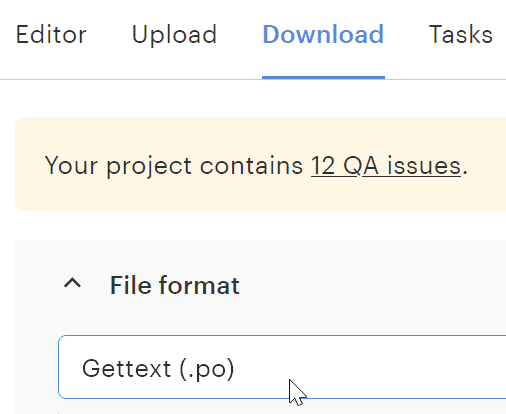
Downloading translation files on PO format
Once you are ready, you can download PO files back to your project. To achieve this, proceed to the Download page and choose Gettext (.po) from the File format dropdown:
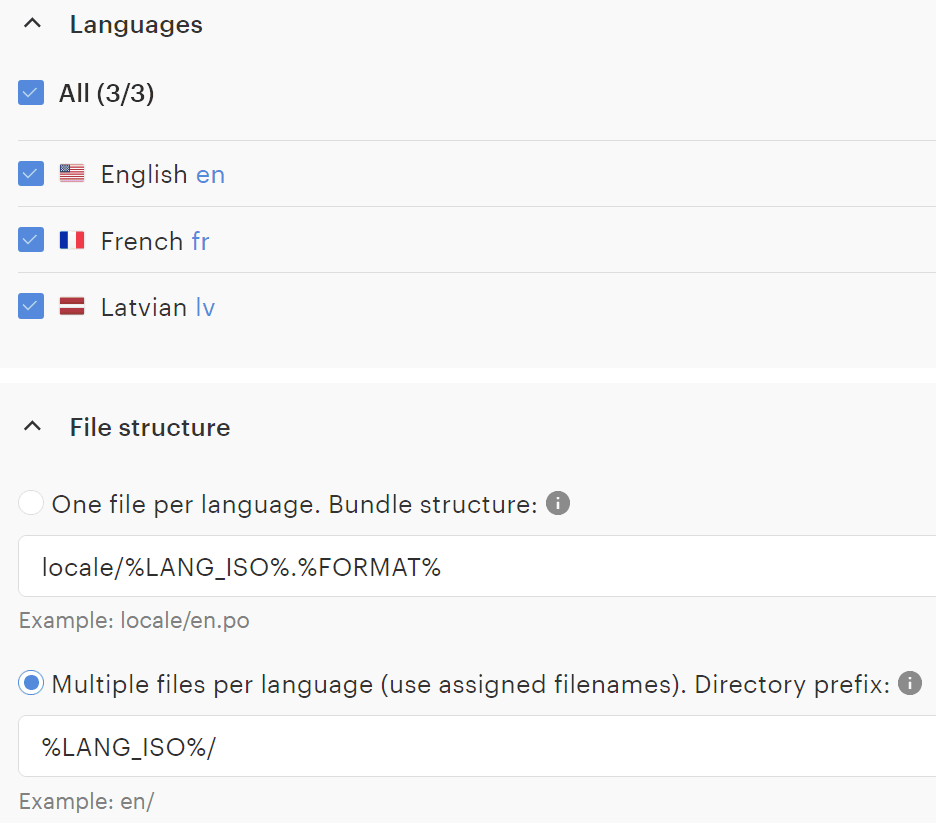
Choose the languages to download and then adjust the Bundle structure. If you haven't created any new translation keys in the editor, then you can choose Multiple files per language option. If you have modified your keys and created new entries, then One file per language would be the safest choice:
Finally, scroll to the bottom of the page and click Build and download. You'll get an archive with all your translation files. Alternatively, click Preview if you'd like to understand exactly how your translations will look.
While Lokalise allows you to manage your translations through a GUI, it has a CLI tool that you may use to automate your translation management process. On top of that, we offer a Python SDK that works easily with the Lokalise API.
Final thoughts on Python i18n
In this guide, we helped you get up to speed on Python i18n and explained how you can internationalize your Python application. We covered the built-in gettext Python module and explored the changes you would need to make to your application to adhere to i18n principles. Furthermore, we explored how to perform pluralization and localize time zones. We then concluded the tutorial with a discussion of the Lokalise translation management system.
That's it for today! Thanks for staying with me and until next time.
Ilya is the lead for content, documentation, and onboarding at Lokalise, where he focuses on helping engineering teams build reliable internationalization workflows. With a background at Microsoft and Cisco, he combines practical development experience with a deep understanding of global product delivery, localization systems, and developer education.
He specializes in i18n architectures across modern frameworks — including Vue, Angular, Rails, and custom localization pipelines — and has hands-on experience with Ruby, JavaScript, Python, Elixir, Go, Rust, and Solidity. His work often centers on improving translation workflows, automation, and cross-team collaboration between engineering, product, and localization teams.
Beyond his role at Lokalise, Ilya is an IT educator and author who publishes technical guides, best-practice breakdowns, and hands-on tutorials. He regularly contributes to open-source projects and maintains a long-standing passion for teaching, making complex internationalization topics accessible to developers of all backgrounds.
Outside of work, he keeps learning new technologies, writes educational content, stays active through sports, and plays music. His goal is simple: help developers ship globally-ready software without unnecessary complexity.
Libraries and frameworks to translate JavaScript apps
In our previous discussions, we explored localization strategies for backend frameworks like Rails and Phoenix. Today, we shift our focus to the front-end and talk about JavaScript translation and localization. The landscape here is packed with options, which makes many developers a
Character encoding: Types, UTF-8, Unicode, and more explained
In this article, we’ll explore various types of character encoding used in the world of information technology. We’ll break down why encoding matters, explain how they function, and highlight the key differences between ASCII, UTF-8, UTF-16, and the Unicode Standard. Understanding these differences is essential for correctly handling text in any software application, especially when working with localized time and date formats that rely on proper ch