In this tutorial, you'll learn how to translate text in Python using popular translation services. I'll show you how to work with the Google Translate and DeepL engines using Python, detect the source language automatically, and look at how to automate translation workflows with a translation management system (TMS).
We are going to discuss three Python translate libraries: Translators, googletrans, and deep-translator, and see them in action. These libraries can also be used in scenarios where handling localized time is important, such as translating date and time formats according to regional settings.
What is machine translation and which engine is the best one?
Machine translation (MT) is the automatic translation of text using software instead of a human translator. Modern MT systems are based on neural networks (you’ll often see the term Neural Machine Translation or NMT). They’re trained on massive bilingual datasets and learn patterns between languages.
Ten years ago, machine translation was often painful to read. Today, it’s surprisingly good, especially for common language pairs like English ↔ Spanish, English ↔ German, or English ↔ French. For successful software internationalization, MT can play a crucial role in quickly adapting content for global audiences.
That said, MT is not magic. It predicts text based on probability. It doesn’t "understand" meaning the way a human does. That’s why it can still struggle with:
idioms and slang
legal or medical terminology
brand voice and tone
context across long documents
So… which engine is the best? Short answer: it depends on your use case.
Here’s the practical breakdown:
Google Translate
Huge language coverage
Very good general-purpose translation
Fast and scalable
Great for quick scripts or high-volume content
DeepL
Fewer languages than Google
Often produces more natural phrasing for European languages
Strong reputation for quality in business contexts
If you're building:
a side project → either works
a production system → use official APIs
a customer-facing product → test both with your real content
There’s no universally “best” engine. DeepL often sounds more natural for certain languages. Google supports more languages and has broader ecosystem integration.
And no, human translators aren’t obsolete. In production localization pipelines, machine translation is usually combined with human review (MT + post-editing). That’s the sweet spot for many teams.
Localization trends data report
Which translation method increase by 533% last year? Discover the latest translation approaches and insights to inform your localization strategy.
There are several Python libraries that let you translate text using popular machine translation services. Most of them are wrappers around public or unofficial APIs. They don’t implement translation models themselves; they just connect you to external engines. Let’s look at some of the commonly used ones.
Translators
The translators package is a multi-engine wrapper. It connects to multiple translation providers behind the scenes and gives you a single interface to work with them.
Pros:
Actively maintained
Supports many translation engines (Google, Bing, DeepL, and others)
Simple API
Supports batch translation
Can translate HTML content
Good for quick scripts and testing multiple engines
Cons:
Limited control over engine-specific parameters
No standalone language detection API
Returns minimal metadata (usually just translated text)
Relies on unofficial endpoints for some providers
Translators is useful if you:
want to compare multiple engines quickly
don’t want to integrate official APIs separately
are building internal tools or prototypes
For production systems with strict reliability requirements, using official APIs (like Google Cloud Translation or DeepL API) is usually safer.
Deep-translator
Deep-translatoris another wrapper library that supports multiple translation providers through a single interface. It used to be quite popular because of its simplicity and wide engine support. However, development activity has slowed down significantly in recent years, which is something to keep in mind.
Pros:
Supports multiple translation APIs (Google, Microsoft, DeepL, Libre, and others)
Simple and beginner-friendly API
Supports batch translations
Can translate text directly from .txt files
Provides a basic CLI interface
Cons:
Some providers rely on unofficial endpoints
Google Translate support may break if Google changes its internal API
Language detection requires certain providers and may need an API key
Project maintenance has slowed down
deep-translator can still work well for:
small scripts
internal tools
quick experiments
If you're building something production-critical, test stability carefully or use official APIs directly.
Googletrans
Googletransis an unofficial Python client for Google Translate. It works by mimicking requests to Google’s web interface, not by using the official Google Cloud Translation API. That distinction matters. While it’s easy to use and requires no API key, it can break at any time if Google changes its internal endpoints.
Pros:
No configuration or authentication required
Very easy to get started
Supports automatic language detection
Returns additional metadata (when working correctly), such as confidence scores
Good for quick scripts or learning projects
Cons:
Unofficial API (not supported by Google)
Not actively maintained
Latest stable release has unresolved issues
Often requires installing a release candidate version
Can break without warning
Not suitable for production systems
Use googletrans if you:
need a fast prototype
are experimenting locally
don’t want to deal with API keys
Translate
Translateis a lightweight Python module that also provides a command-line interface. It allows you to perform translations using multiple providers through a simple API. Like googletrans, it focuses on ease of use rather than deep configuration or production-grade reliability.
Pros:
Available both as a Python module and a CLI tool
Simple interface
Supports multiple engines (Google, Microsoft, DeepL, and others)
Easy to integrate into small scripts
Cons:
Very limited configuration options
No built-in language detection
Minimal metadata in responses
Not actively maintained
Some open issues remain unresolved
translate can be useful if you:
need a quick CLI translation tool
are writing a small automation script
don’t need advanced features
Official APIs and self-hosted alternatives
Most community libraries are wrappers around public or unofficial endpoints. If you’re building something long-term or production-facing, you should also consider official or self-hosted solutions.
Extra features (glossaries, tone control, batch jobs)
Cons:
Require authentication setup
Paid services
Slightly more configuration effort
If reliability matters, this is usually the safest choice.
Self-hosted options
LibreTranslate is a popular open-source alternative. You can use a public instance or run your own server.
Pros:
Open source
Can be self-hosted
More control over data privacy
Cons:
Lower translation quality compared to Google/DeepL
Requires infrastructure if self-hosted
Fewer advanced features
That’s the trade-off:
Community wrappers → fast and simple
Official APIs → stable and production-ready
Self-hosted → privacy and control
Pick based on your actual use case, not just convenience.
Setting up a new Python translate project
Let’s set up a small Python project where we can test the translation libraries. We’ll use uv to manage dependencies and the virtual environment, so create a new project:
Feel free to remove the auto-generated main.py file in the project root. Also, create an empty .env file (we’ll use it later for API keys) and an src directory. Inside the src directory, let's add an i18n folder with an en.json file. The full path to this file is YOUR_PROJECT/src/i18n/en.json. Here are some sample contents:
{ "welcome": "Welcome to the tutorial, {username}!", "description": "This tutorial explains how to translate texts with Python."}
The first library that I wanted to show you has a very concise name: Translators. It supports numerous engines, including Google, DeepL, Baidu, and others.
Translate texts with DeepL
To get started, let's create a new src/translate-translators.py file:
import translators as ts
Then you will have to decide which translation engine to utilize. To use an engine, you simply need to pass it as an argument:
This method accept at least one argument: the text you would like to translate. Next, you can specify additional options, for example the source and the target language. By default the engine will try to "guess" the source language, and use English as the target.
Let's translate a simple Python string into French:
import translators as tsresult = ts.translate_text( "Welcome to our tutorial!", translator="deepl", from_language="auto", to_language="fr")print(result)
Here's the result:
Bienvenue à notre tutoriel !
What if we wanted to translate multiple items from a JSON file using a translate JSON approach? That’s not a problem either. We’ll use the same function but in a for loop:
import jsonfrom pathlib import Pathimport translators as tsbase = Path(__file__).parentfile_path = base / "i18n" / "en.json"with open(file_path, encoding="utf-8") as f: data = json.load(f)translated = {}for k, v in data.items(): translated[k] = ts.translate_text( v, translator="deepl", from_language="auto", to_language="fr", sleep_seconds=1 )print(translated)
In this case I've specified the sleep_seconds option to avoid sending too many requests.
Now you can run the script...
uv run python src\translate-translators.py
…and observe the results.
That was fast, eh?
Using Google Translate and the deep-translator package
Next, I'll show you how to get started with the deep-translator library, easily perform text language detection and carry out other operations.
Translate your texts
So, to see this library in action, let's create a new src/deep-translate.py file:
The results variable will contain an array with the translated texts:
['Bienvenue dans le didacticiel, {username}!', 'Ce tutoriel explique comment traduire des textes avec Python.']
Great!
Detect text language with Python
Deep-translator allows you to perform language detection, but unfortunately this does not work out of the box. To start using this feature, you have to register on the https://detectlanguage.com website and generate an API key.
The good news is that registration takes less than a minute and you won't have to pay anything: there's a free plan that allows you to send up to 1000 requests per day. So, after you've registered, proceed to your personal profile, and copy the API key.
Next, paste it in the .env file:
DETECTION_KEY=123abc
Create a new src/deep-detection.py file:
import osfrom dotenv import load_dotenvfrom deep_translator import single_detectionload_dotenv()API_KEY = os.getenv("DETECTION_KEY")if not API_KEY: raise RuntimeError("DETECTION_KEY is not set in the .env file")
And now simply use the single_detection method with the following arguments:
if __name__ == "__main__":
    text = "Ce tutoriel explique comment traduire des textes avec Python."

    lang = single_detection(text, api_key=API_KEY)
    print(f"Detected language: {lang}")
After running the script, you should see fr printed to the screen. Nice!
Using Google Translate and the googletrans library
In this section, I'm going to show you how to utilize the googletrans library and use Google Machine Translation (MT) with ease.
Performing text translations
To see the googletrans library in action, let's create a new src/google-translate.py file and create the translator object. Note that this package now uses asyncio so make sure to add it:
import asynciofrom googletrans import Translatorasync def main() -> None: async with Translator() as translator: # ...
To perform text translation, you should use a method called — guess what? — translate. Easy, huh? This method accepts at least one argument: that's your source text. By default the target language is English, but you can override it simply by passing a second argument:
result = await translator.translate("Welcome to our tutorial!", dest="fr")
The result variable will contain a special object responding to the following methods:
text — target translation value (in our case, it should return French text).
dest — returns a target (destination) language code. In our case, it'll be fr.
origin — the source text.
src — the source text language, which Google MT will detect automatically.
So, why don't we try to display this info? Modify your script:
import asynciofrom googletrans import Translatorasync def main() -> None: async with Translator(service_urls=["translate.googleapis.com"]) as translator: result = await translator.translate("Welcome to our tutorial!", dest="fr") print(f"Original text: {result.origin}") print(f"Detected source language: {result.src}") print(f"Translated text: {result.text}") print(f"Target language: {result.dest}")if __name__ == "__main__": asyncio.run(main())
Now run it:
uv run python src\google-translate.py
And here's your result:
Original text: Welcome to our tutorial!Detected source language: enTranslated text: Bienvenue sur notre tutoriel !Target language: fr
Great!
Of course, you can read the contents of our sample JSON file and Python translate those with ease:
import asyncioimport jsonfrom pathlib import Pathfrom googletrans import Translatorasync def main() -> None: file_path = Path(__file__).resolve().parent / "i18n" / "en.json" with open(file_path, encoding="utf-8") as f: data: dict[str, str] = json.load(f) keys = list(data.keys()) values = list(data.values()) async with Translator(service_urls=["translate.googleapis.com"]) as translator: results = await translator.translate(values, dest="fr") translated = {k: r.text for k, r in zip(keys, results)} print(translated)if __name__ == "__main__": asyncio.run(main())
Now rerun the script and make sure that the translations display properly. You might note, however, that the {username} placeholder is translated as well. Unfortunately, there's no simple way to prevent that: sometimes MT engines fail to recognize such elements. One solution is to split your text and translate it in parts, but in this case the result could be very far from ideal. Your translated parts might have no meaning when connected together. Nevertheless, later I'll show you another solution that can detect such placeholders for you.
Python language detection
Okay, so what if you need to perform language detection only? This can come in handy when you are not sure what the source language of your texts is. To achieve this, let's create another src/google-detection.py file with a translator object:
import asynciofrom googletrans import Translatorasync def main() -> None: async with Translator( service_urls=["translate.googleapis.com"] # optional but often more stable ) as translator:
To run language detection operation, we should use another method which is unsurprisingly called detect. The result object has a lang attribute which returns the detected code. Of course, you can provide more phrases in different languages:
import asynciofrom googletrans import Translatorasync def main() -> None: async with Translator( service_urls=["translate.googleapis.com"] # optional but often more stable ) as translator: result = await translator.detect("Welcome to our tutorial!") print(f"Detected language code: {result.lang}") result = await translator.detect("Добро пожаловать в нашу статью!") print(f"Detected language code: {result.lang}")if __name__ == "__main__": asyncio.run(main())
Nice!
How to automate translations in Python
So, as you can see, using a machine translation engine is not a complex task, and you can start working with it in a matter of minutes. However, while the approach explained above works well for translating smaller strings, it does not scale well and is not suitable for larger projects with more complex workflows.
Suppose you have a large website with hundreds or even thousands of texts stored across multiple translation files. How difficult would it be to translate this website into three languages? I'd say quite challenging, as you might face various unexpected issues.
As mentioned earlier, relying solely on an MT engine to translate complex texts is usually not enough. In most cases, you will need someone to review and post-edit the translations. Moreover, you’ll probably want a tool to better organize your content, provide screenshots to give translators context (which matters a lot), and maybe even automate exporting and importing translations to and from your GitHub repository.
There can be many additional requirements, and the simplest way to handle them is by using a dedicated translation management system.
In this section, you’ll be introduced to Lokalise — a TMS designed for agile teams. I’ll show you how to get started, how to automatically apply machine translation to uploaded content, and how to use the API to upload and download translation files in various formats.
Prepare a new Lokalise project for Python translate
To begin, grab your free trial at app.lokalise.com/signup (no credit card required!). After signing up, you can join an existing team, if your company is already using Lokalise, or create a new one. For the purposes of this demo, let's stick to the latter option and create a brand-new team. A team is basically a collection of users, groups, settings, and translation projects.
Once your team is created, you'll need to press Create a project. Next, give your project a name and choose base and target languages. The base language is the original language of your content, whereas the target is the language that you want to translate into (please note that it's possible to choose multiple targets):
That's pretty much it. Next we'll set up an automation and then upload our data via the API.
Setting up an automation rule
The next step is creating a special automation rule that will apply machine translation to the uploaded text. In fact, rules represent sequences of actions to carry out.
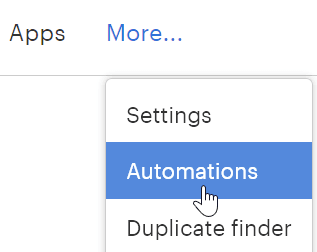
Choose More > Automations from the top menu:
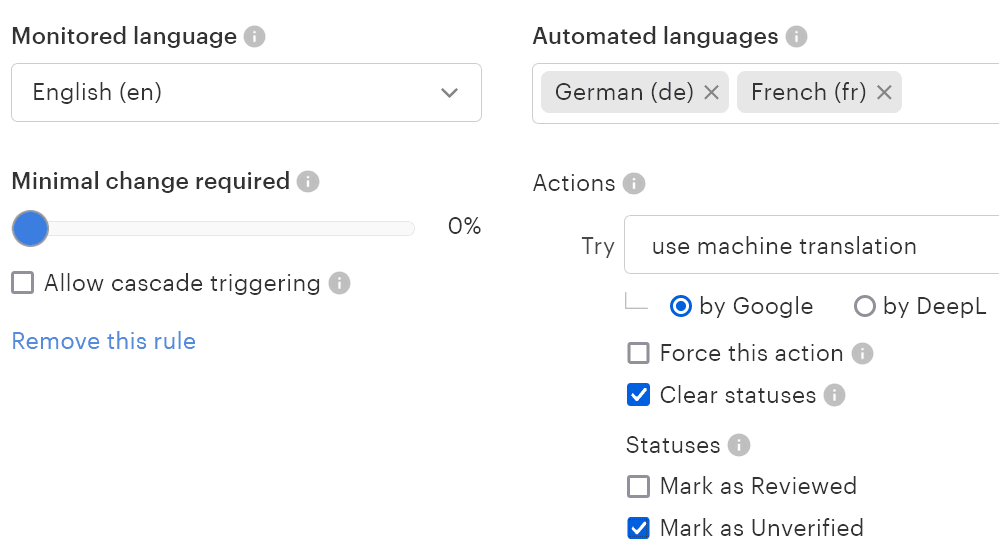
Then click Create automation rules and adjust the following options:
Monitored language: English (or your own base language)
Minimal change required: 0%
Automated languages: add any target languages of your choice
Actions:
Use machine translation – by Google
Clear statuses
Mark as unverified (actually, enabling the last two options is not mandatory but most likely you’ll want to double-check machine translations as they might not be perfect)
Basically, that's it! Once you are ready, hit Save changes and return to the project's main page (called the "project editor"). The next thing to do is generate a Lokalise API key.
Generating an API key
We are going to use the Lokalise API in order to upload and download our translations; therefore, we must generate an API token. To achieve this, find your avatar in the bottom left corner, click on it, and choose Profile settings:
Then, choose API tokens in the left menu, and click Generate new token. The following dialog will appear:
Choose Read and write access, and then click Generate. Copy the newly created token and paste it to your .env file:
Uploading a translation file and applying an automation
At this point we are ready to upload our translation file and use the automation rule to apply machine translation.
First of all, let's create a new src/upload.py file, load all the necessary dependencies, and read environment variables from the .env file:
import base64import osimport timefrom pathlib import Pathimport lokalisefrom dotenv import load_dotenvload_dotenv()API_KEY = os.getenv("API_KEY")if not API_KEY: raise RuntimeError("API_KEY is not set. Put it in your .env file (API_KEY=...).")
Next, we are going to initialize an API client and define some variables:
client = lokalise.Client(API_KEY)PROJECT_ID = os.getenv("LOKALISE_PROJECT_ID") or "YOUR_LOKALISE_PROJECT_ID"FILENAME = "en.json"FILEPATH = Path(__file__).resolve().parent / "i18n" / FILENAMEif not FILEPATH.exists(): raise FileNotFoundError(f"Translation file not found: {FILEPATH}")
We will be using an official SDK for Lokalise API to perform Python translate.
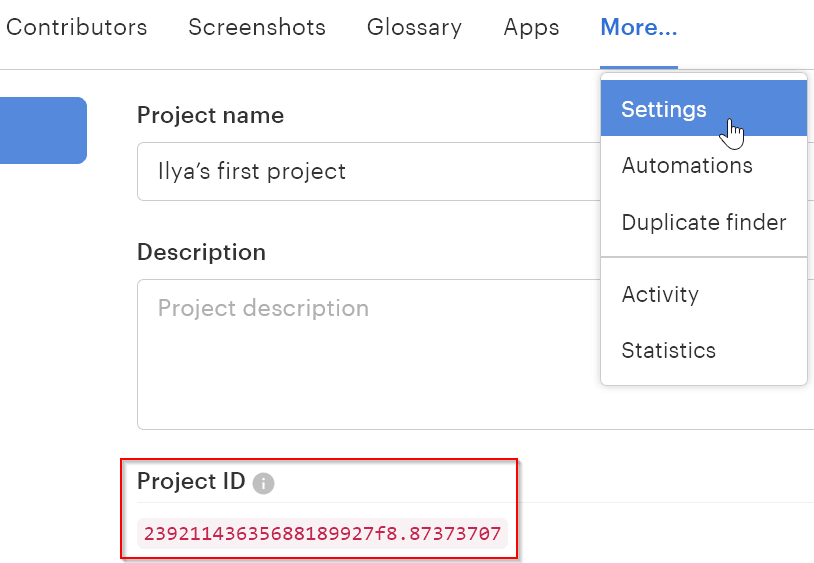
Please note that you'll need to specify a Lokalise project ID. You can find this ID by returning to your Lokalise project and clicking More > Settings in the top menu. You'll see your project ID under the corresponding section:
Now here's the main part of our uploading script:
file_bytes = FILEPATH.read_bytes()file_data = base64.b64encode(file_bytes).decode("ascii")bg_process = client.upload_file( PROJECT_ID, { "data": file_data, "filename": FILENAME, "lang_iso": "en", "use_automations": True, },)process_id = getattr(bg_process, "process_id", None)if not process_id: raise RuntimeError("Upload started, but no process_id returned by the API client.")ok = wait_for_process(client, PROJECT_ID, process_id, timeout_s=60, poll_interval_s=1.0)if not ok: raise RuntimeError("Upload process did not finish successfully (timeout or failed status).")print("✅ File uploaded successfully.")
Here:
The imported content must be encoded with Base64.
We are providing our content under the data field.
Be sure to specify a language ISO code for your translation data. My base language is English, therefore I'm providing en. Please note that this language code has to be present in the chosen Lokalise project otherwise you'll get an error.
Be sure to set use_automations to True so that our rule kicks in when the translations are uploaded.
While the uploading process happens in the background on Lokalise, we'll have to wait a few moments and make sure our data is properly imported. The scheduled background process is represented by the bg_process object.
Now let's code the wait_for_process function:
def wait_for_process( api_client: lokalise.Client, project_id: str, process_id: str, *, timeout_s: int = 30, poll_interval_s: float = 1.0,) -> bool: """ Poll Lokalise queued process until it's finished or timeout is reached. Returns True if finished successfully, False otherwise. """ deadline = time.time() + timeout_s last_status = None while time.time() < deadline: process = api_client.queued_process(project_id, process_id) status = getattr(process, "status", None) if status != last_status: print(f"Upload status: {status}") last_status = status if status == "finished": return True # Lokalise sometimes returns other terminal-ish statuses depending on API/client version. if status in {"failed", "canceled", "cancelled", "error"}: return False time.sleep(poll_interval_s) return False
We are requesting the status of the background process with a delay. If the status has changed to finished, it means that everything is good and our data was properly processed. Please note that you might need to adjust these numbers depending on how large your translation file is.
And so this is it: your uploading script is ready!
Checking the file uploading feature
So, let's execute our script by running:
pipenv run python src\upload.py
Once the operation is completed, return to your Lokalise project and open the editor:
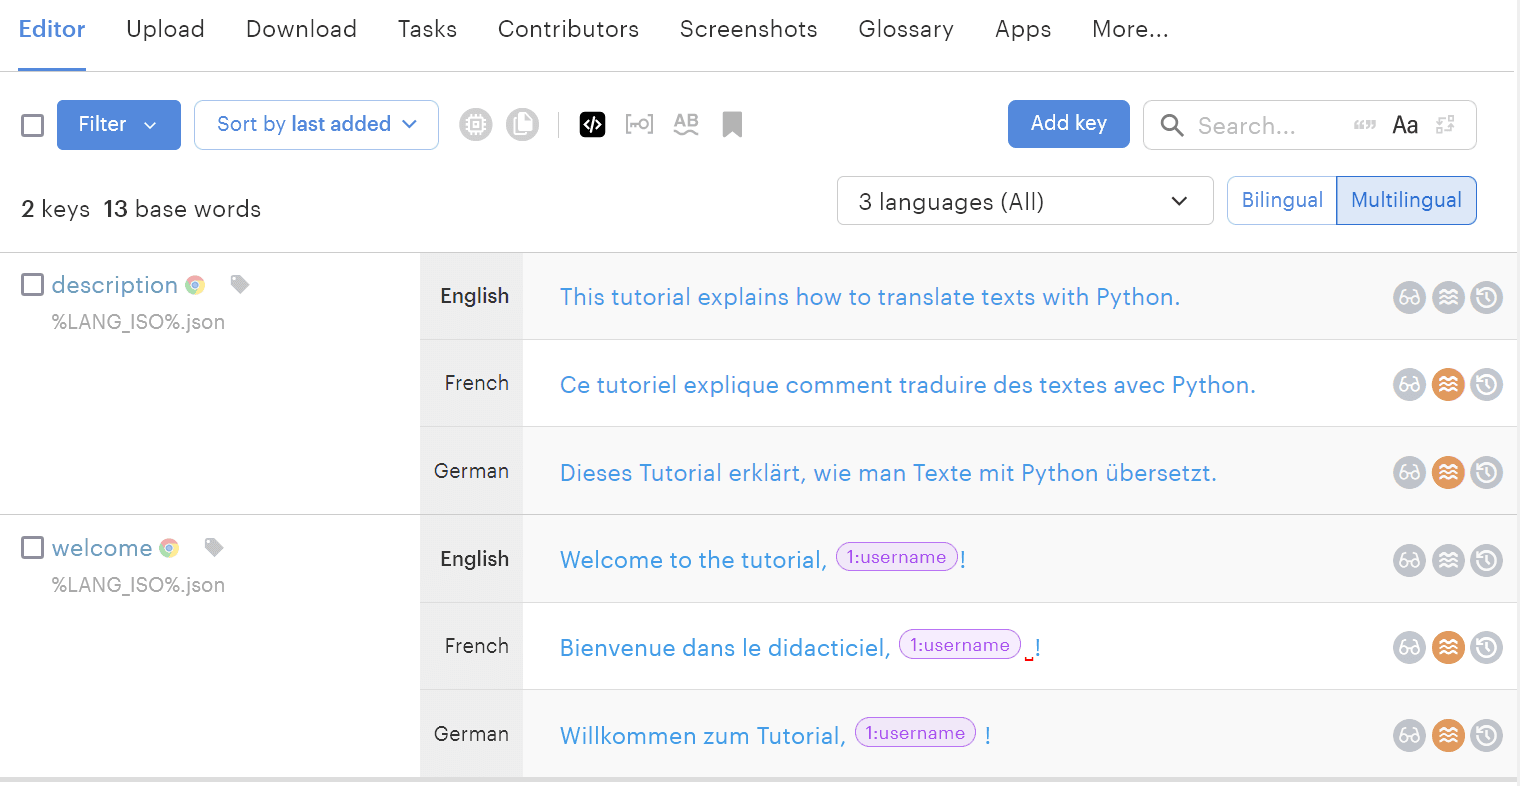
Wow, take a look at that! The French and German translations were provided for us automatically; we didn't have to lift a finger. Moreover, the {username} part was properly recognized as a placeholder and now has a special formatting as placeholders should not be translated or modified.
These orange circles next to the translations mean that these values are unverified. You can filter only the unverified texts (by using the Filter dropdown) and double-check the result delivered by the MT.
Awesome!
Downloading translated content from Lokalise to your project
Now that our translations are done, we can download them back to the project. To do this, let's create a new download.py file:
import ioimport osimport zipfilefrom pathlib import Pathimport lokaliseimport requestsfrom dotenv import load_dotenvload_dotenv()API_KEY = os.getenv("API_KEY")if not API_KEY: raise RuntimeError("API_KEY is not set. Put it in your .env file (API_KEY=...).")
Next, instantiate a client and add a list of the language ISO codes that you'd like to download:
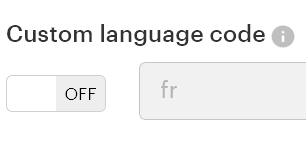
You can find a language code by opening your Lokalise project, clicking on the languages dropdown, and then pressing More > Settings next to the language name:
You'll see a dialog with the following information:
That's your language code. If needed, you can actually toggle the switch to On and enter any other code.
format — the desired format for your translation files. Lokalise supports more than two dozens file formats.
filter_langs — only the chosen languages should be included in the download bundle.
original_filenames — we would like to preserve the original names for our files.
directory_prefix — translation files should not be further grouped into nested folders.
indentation — two spaces should be used for indentation.
placeholder_format — our placeholder format is ICU, but you can choose other options depending on the file format (Symfony, iOS, .NET, raw, and so on).
Finally, we should extract the archive to the src/i18n folder (note that initially content is just a sequence of bytes):
bundle_url = response.get("bundle_url") if isinstance(response, dict) else getattr(response, "bundle_url", None)if not bundle_url: raise RuntimeError("No bundle_url returned by Lokalise download_files().")print(f"Downloading bundle: {bundle_url}")r = requests.get(bundle_url, timeout=30)r.raise_for_status()data = io.BytesIO(r.content)with zipfile.ZipFile(data) as archive: # Helpful for debugging if paths differ from what we expect members = set(archive.namelist()) for iso in TARGET_ISOS: # Lokalise typically returns files like "fr.json", but sometimes nested paths are possible. # We'll try the simple form first. candidate_names = [f"{iso}.json"] # If not found, fallback: find any file ending with "/{iso}.json" if candidate_names[0] not in members: for name in members: if name.endswith(f"/{iso}.json"): candidate_names.append(name) break chosen = next((n for n in candidate_names if n in members), None) if not chosen: raise FileNotFoundError(f"Could not find {iso}.json in the downloaded bundle. Available: {sorted(members)[:10]} ...") out_path = OUT_DIR / f"{iso}.json" with archive.open(chosen) as src, open(out_path, "wb") as dst: dst.write(src.read()) print(f"✅ Saved: {out_path}")
Please keep in mind that any duplicate files in that directory will be overwritten so be careful!
And, that's pretty much it. Now you can run the download.py script and make sure that two new files, namely de.json and fr.json, were created in the i18n directory. Great job!
What about human-generated translations?
As you already know, while MT is a great tool it does have its limitations. Is there an easy way to hire a professional translators without needing to find a candidate all by yourself? But of course!
Lokalise allows you to take advantage of professional translation services with just a few clicks. First, choose Order from the left menu and then click New order:
Then you'll just need to select a translation provider (Lokalise or Gengo), choose the project, and adjust the other options:
Once you are ready, simply enter your credit card details and wait until the order is completed. If you choose the Gengo provider, you'll also be able to attach a plain text file instead of choosing a translation project.
And this concludes our tutorial on Python translate. Actually, we've only scratched the surface, as you can build much more complex flows with Lokalise. Here are some suggestions for further research:
And finally, you might be interested in taking our free course, "Lokalise for Developers", which covers the useful apps Lokalise has to offer and explains how to work with the API, webhooks, custom processors, custom placeholders, and more
I thank you for staying with me, and until next time.
Ilya is the lead for content, documentation, and onboarding at Lokalise, where he focuses on helping engineering teams build reliable internationalization workflows. With a background at Microsoft and Cisco, he combines practical development experience with a deep understanding of global product delivery, localization systems, and developer education.
He specializes in i18n architectures across modern frameworks — including Vue, Angular, Rails, and custom localization pipelines — and has hands-on experience with Ruby, JavaScript, Python, Elixir, Go, Rust, and Solidity. His work often centers on improving translation workflows, automation, and cross-team collaboration between engineering, product, and localization teams.
Beyond his role at Lokalise, Ilya is an IT educator and author who publishes technical guides, best-practice breakdowns, and hands-on tutorials. He regularly contributes to open-source projects and maintains a long-standing passion for teaching, making complex internationalization topics accessible to developers of all backgrounds.
Outside of work, he keeps learning new technologies, writes educational content, stays active through sports, and plays music. His goal is simple: help developers ship globally-ready software without unnecessary complexity.
Libraries and frameworks to translate JavaScript apps
In our previous discussions, we explored localization strategies for backend frameworks like Rails and Phoenix. Today, we shift our focus to the front-end and talk about JavaScript translation and localization. The landscape here is packed with options, which makes many developers a
Syncing Lokalise translations with GitLab pipelines
In this guide, we’ll walk through building a fully automated translation pipeline using GitLab CI/CD and Lokalise. From upload to download, with tagging, version control, and merge requests. Here’s the high-level flow: Upload your source language files (e.g. English JSON files) to Lokalise from GitLab using a CI pipeline.Tag each uploaded key with your Git branch name. This helps keep translations isolated per feature or pull request
Build a smooth translation pipeline with Lokalise and Vercel
Internationalization can sometimes feel like a massive headache. Juggling multiple JSON files, keeping translations in sync, and redeploying every time you tweak a string… What if you could offload most of that grunt work to a modern toolchain and let your CI/CD do the heavy lifting? In this guide, we’ll wire up a Next.js 15 project hosted on Vercel. It will load translation files on demand f