In this article, we are going to discuss Symfony translation and localization and learn how to translate Symfony apps into multiple languages. We will cover all the important concepts and discuss various examples to help you get started with Symfony i18n.
Let's get started by creating a new Symfony application called blog:
symfony new blog --webapp
You can run it using the following command:
symfony serve
Then, navigate to localhost:8000 and make sure everything is running smoothly.
Performing translations in Twig templates
Now we'll create a homepage for our website and see how to translate plain text in Symfony:
symfony console make:controller Homepage
Open the src/Controller/HomepageController.php file and replace the /homepage route with just /:
#[Route('/', name: 'app_homepage')]
Next, let's see how to translate the text inside Twig templates. Open the src/templates/homepage/index.html.twig file and replace the block body with the following:
<h1> {{ "Welcome to the app!"|trans }}</h1>
trans is a special filter that will search for the corresponding key in your translation files. Currently, the "Welcome to the app!" string acts as a translation key but it might not be desirable, especially if you are using a format like YAML to store translations.
Thus, you can utilize a shorter and more concise version of the key:
<h1> {{ "homepage_welcome"|trans }}</h1>
Please note that by default all translated text is escaped. Therefore, if you would like to output HTML markup, you'll need to provide the raw filter in the following way:
<h1> {{ "homepage_welcome"|trans|raw }}</h1>
However, if you run the app now, you'll get a warning saying that the key does not have a corresponding translation:
Well, this is expected, so let's proceed to the next section and see how to solve this problem!
Extracting translations in Symfony
So, at this point our Twig template contains the homepage_welcome key but there's no corresponding message. These messages should be stored in separate translation files that by default are hosted in the translations folder. You can control this behavior by opening the config/packages/translation.yaml file and tweaking the following line:
default_path: '%kernel.project_dir%/translations'
While you could create a translation file manually and extract all the relevant content inside, it's a very tedious task, especially for larger projects. Luckily for us, Symfony comes with a special extractor tool. For example, if you would like to scan your project for all translations that could potentially be extracted for the English locale (en), run:
php bin/console translation:extract --dump-messages en --domain messages
en is the language code and messages is the default domain that acts as a namespace for your translations.
The translation:extract command will search for any missing translations inside your templates and PHP files found in the src directory.
You'll get the following output:
Messages extracted for domain "messages" (1 message)---------------------------------------------------- * homepage_welcome
Cool, right? Of course, this command can create translation files for you, but first of all we should decide which file format to utilize.
In this tutorial, I'll stick to the YAML format but you can find more information on the XLIFF files and translate JSON file format in our blog as well.
The default format used by the extractor is XLIFF, so you'll need to override it when running the translation:extract command. Also, you'll need to provide the target locale and the domain:
php bin/console translation:extract --force en --domain messages --format yaml
After running this command, you'll find a new .en.yaml file inside the translations directory. The homepage_welcome will contain placeholder text, so let's provide the actual translation now:
homepage_welcome: "Welcome to the app!"
Reload your app and make sure the warning message is now gone and the welcome text is displaying properly. Great job!
Adding support for multiple locales in Symfony
Currently our app only supports the English locale, but you'll probably want to translate your website into multiple languages. Let's see how to achieve this.
First, it's important to mention that the default locale is always set to en, but you can modify this behavior by opening the config/packages/translation.yaml file and modifying this line:
default_locale: en
Next, we will need to modify our homepage route to include the desired locale. Open the src/Controller/HomepageController.php file and modify the route in the following way:
The _locale parameter gets special treatment in Symfony as it is automatically passed to the translator object, so we don’t need to do anything else than to add it in the URL. It has the default value 'en', so we can still visit the homepage without having to specify /en in the URL.
If we want to always have the locale in the URL explicitly, we can remove the locale: 'en' default value from the route definition. Then, you'll need to add the below route:
#[Route('/')]public function indexNoLocale(): Response{ return $this->redirectToRoute('app_homepage', ['_locale' => 'en']);}
Adding a new language
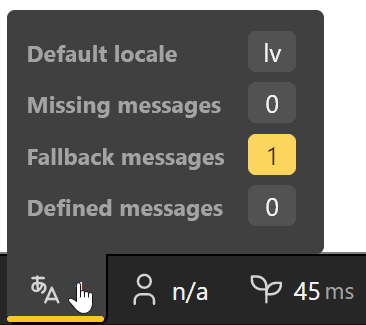
Reload your app, navigate to the localhost:8000, and note that you are automatically redirected to the /en path. Let's try requesting a different language, for example, Latvian by opening the localhost:8000/lv. Unfortunately, you will still see the English text on the home page. Why? Well, because Symfony has a special fallback mechanism that displays English text by default whenever translations for the requested locale cannot be found.
You'll see the following notification in the debugger:
You can adjust the fallback mechanism in the config/packages/translation.yaml file. For instance, if your default locale is French and you would like this language to act as a fallback, use this code:
fallbacks:
  - fr
Having a fallback is nice, but you will likely want to provide a proper translation for the welcome message. Let's take advantage of the extractor again:
Of course, you can use any other locale of your choice.
Open the newly created YAML file inside the translations directory and provide the translation for the homepage_welcome key, for example:
homepage_welcome: "Laipni lūdzam lietotnē!"
Now reload the page and make sure the newly added translation is displayed. Well done!
Performing pluralization in Symfony
Pluralization is a very common task when translating a Symfony app, so let's check out how to do it.
Add some more content to the block body of the homepage template:
{% for i in range(0, 5) %} <p>{{ 'i_have_apples'|trans({"%apples%": i}) }}</p>{% endfor %}
Let's suppose we would like to display the text "I have X apples", where X is a number. When X equals 1, the text should transform to "I have 1 apple" (or even "I have one apple"), but for all other values we should use the "apples" form. English pluralization rules are quite simple, but the situation might be more complex in other languages.
Therefore, we will need to provide so-called "plural forms" when performing translations. The Unicode website has a dedicated document that lists plural forms for different languages. For example, English has two plural forms: one and other. Latvian has three forms (zero, one, and other), whereas some other languages can even have four forms.
So, we'll extract our newly added translation key for both locales:
Then, open the English translation file and provide the following translation:
i_have_apples: >-
    {apples, plural,
        =0    {I have no apples.}
        =1    {I have an apple.}
        other {I have # apples!}
    }
What we can see here is an ICU expression called plural. Depending on the value of the apples variable, we display one of the texts. So if the value equals 0, we display the first text, if it is 1, we render the second text. In all other cases, we use the third text that contains interpolation represented as #.
However, you might ask: why do we provide three plural forms here if English supports only two? Well, it appears that these two plural forms are mandatory, but we can specify more forms as needed. Specifically, to tackle the case when the number equals 0, we introduce the zero form.
Next, let's also provide the Latvian translations:
i_have_apples: >-
    {apples, plural,
        =0    {Man nav ābolu.}
        =1    {Man ir viens ābols.}
        other {Man ir # āboli.}
    }
Now you can reload the app and make sure the texts are properly pluralized.
Working with gender information
Displaying different texts based on the user's gender is also a very common task. Let's imagine we'd like to display some text written by a user but adjust the introductory message based on their chosen gender:
they_say: >-
    {gender, select,
        female {She {text}}
        male {He {text}}
        other {They {text}}
    }
So, based on the value of gender, we display one of three messages. The text variable is also interpolated into the rendered translation.
Awesome!
Translating Symfony forms
Next up, let's see how to perform translations in forms. For example, create a new contact form:
symfony console make:form Contact
When prompted for the entity name, simply hit Enter to choose "none".
Modifying the controller
Open your Homepage controller and modify the index action to process the form:
#[Route('/{_locale}', name: 'app_homepage')]
    public function index(Request $request): Response
    {
       $form = $this->createFormBuilder()->create('contactForm', ContactType::class)->getForm();

       $form->handleRequest($request);

        if ($form->isSubmitted() && $form->isValid()) {
            $this->addFlash('success', new TranslatableMessage('i_have_apples', ['%apples%' => $form->getData()['applesCount']]));

            return $this->redirectToRoute('app_homepage');
        }

        return $this->render('homepage/index.html.twig', [
            'controller_name' => 'HomepageController',
            'contact_form' => $form->createView()
        ]);
    }
Also add the following imports into your controller:
use App\Form\ContactType;use Symfony\Component\HttpFoundation\Request;use Symfony\Component\Translation\TranslatableMessage;
Tweaking views
Add your form inside the index.html.twig file:
{{ form(contact_form) }}
Then, open src/Form/ContactType.php and modify it like so:
namespace App\Form;use Symfony\Component\Form\AbstractType;use Symfony\Component\Form\FormBuilderInterface;use Symfony\Component\OptionsResolver\OptionsResolver;use Symfony\Component\Form\Extension\Core\Type\NumberType;use Symfony\Component\Form\Extension\Core\Type\SubmitType;use Symfony\Component\Validator\Constraints\GreaterThanOrEqual;use Symfony\Component\Validator\Constraints\LessThanOrEqual;class ContactType extends AbstractType{ public function buildForm(FormBuilderInterface $builder, array $options): void { $builder ->add('applesCount', NumberType::class, [ 'constraints' => [ new GreaterThanOrEqual(1), new LessThanOrEqual(10), ], 'label' => 'apples_count' ]); $builder->add('submit', SubmitType::class, [ 'label' => 'request_apples' ]); } public function configureOptions(OptionsResolver $resolver): void { $resolver->setDefaults([ 'translation_domain' => 'forms' ]); }}
Here, we are adding constraints to make sure that the number of apples stays within the [1, 10] range.
We use the apples_count as the label. This is the key name and we'll provide a translation for it as well.
Also note that within the configureOptions function we are providing a new translation domain called forms. While you can use the default domain, it might be a good idea to separate your messages into multiple domains to make working with them easier.
To display a confirmation message to the user, we need to add flash messages. Open the templates/base.html.twig file and modify body in the following way:
<body>
        {% for message in app.flashes('success') %}
            <div class="alert alert-success">
                {{ message | trans }}
            </div>
        {% endfor %}
        {% block body %}{% endblock %}
    </body>
We don’t need to pass any arguments to |trans because they are stored in the TranslatableMessage instance.
Adding translation files
Unfortunately, the extractor does not seem to detect translations properly in this case, so you'll need to create files inside the translations directory manually by following this pattern: forms+intl-icu.LANG_ISO.yaml where LANG_ISO is the locale code.
Here are the English translations for the newly added keys:
apples_count: 'Number of apples'request_apples: 'Request apples!'
Now you can reload the app, proceed to the main page, enter any number from 1 to 10 in the form, and make sure that the flash message is properly pluralized!
Using the Lokalise TMS
At this point, our app is localized but there's a problem: what if I would like to invite professional translators to work on the texts? Should I send them YAML files directly? Well, of course it is possible but perhaps not too convenient. Moreover, if you have many people working on the same project it will quickly turn to chaos.
A translation management system can streamline this process, helping you manage collaboration effectively. On top of that, you might need to introduce quality assurance or take advantage of machine translation.
Is there a solution that can do the heavy lifting for you? Meet Lokalise, a translation management system for agile teams that is here to save the day! It offers all the basic translation features with the ability to work in teams, and advanced tools and integrations with dozens of third-party services including Amazon S3, GitHub, Figma, and many others.
So, let's add Lokalise to the app as a translation provider by running:
Enter your details and follow the wizard to create a new project. A project is basically a collection of your keys and translations along with contributing users, settings, and other useful things.
Once you've navigated to the newly created project, click More > Settings and take note of the project ID.
Next, click on your avatar in the bottom left corner and choose Profile settings. Switch to the API tokens tab and generate a new read-write token.
Now provide both the project ID and the token in the .env file:
Replace the locales with the actual locale codes used in your app. Please note that the domains option contains more domains than we've mentioned in this article. This is because Symfony has some built-in domains with system messages.
Now run the following command to push your translations to Lokalise:
symfony console translation:push lokalise --force
The --force switch is needed for the very first export. For any subsequent ones, only use it if you want to overwrite existing keys.
Now, return to your Lokalise project and make sure the translations have been uploaded!
You can tweak them as needed and then download them back to the Symfony app by running:
In this article, we have seen how to translate Symfony apps into multiple locales. We have covered translation basics, pluralization, working with gender information, and translating forms. We've also added support for the second locale and integrated Lokalise into the workflow.
Thank you for staying with me today, and until next time!
Ilya is the lead for content, documentation, and onboarding at Lokalise, where he focuses on helping engineering teams build reliable internationalization workflows. With a background at Microsoft and Cisco, he combines practical development experience with a deep understanding of global product delivery, localization systems, and developer education.
He specializes in i18n architectures across modern frameworks — including Vue, Angular, Rails, and custom localization pipelines — and has hands-on experience with Ruby, JavaScript, Python, Elixir, Go, Rust, and Solidity. His work often centers on improving translation workflows, automation, and cross-team collaboration between engineering, product, and localization teams.
Beyond his role at Lokalise, Ilya is an IT educator and author who publishes technical guides, best-practice breakdowns, and hands-on tutorials. He regularly contributes to open-source projects and maintains a long-standing passion for teaching, making complex internationalization topics accessible to developers of all backgrounds.
Outside of work, he keeps learning new technologies, writes educational content, stays active through sports, and plays music. His goal is simple: help developers ship globally-ready software without unnecessary complexity.
Libraries and frameworks to translate JavaScript apps
In our previous discussions, we explored localization strategies for backend frameworks like Rails and Phoenix. Today, we shift our focus to the front-end and talk about JavaScript translation and localization. The landscape here is packed with options, which makes many developers a
Build a smooth translation pipeline with Lokalise and Vercel
Internationalization can sometimes feel like a massive headache. Juggling multiple JSON files, keeping translations in sync, and redeploying every time you tweak a string… What if you could offload most of that grunt work to a modern toolchain and let your CI/CD do the heavy lifting? In this guide, we’ll wire up a Next.js 15 project hosted on Vercel. It will load translation files on demand f
Hands‑on guide to GitHub Actions for Lokalise translation sync: A deep dive
In this tutorial, we’ll set up GitHub Actions to manage translation files using Lokalise: no manual uploads or downloads, no reinventing a bicycle. Instead of relying on the Lokalise GitHub app, we’ll use open-source GitHub Actions. These let you push and pull translation files directly via the API in an automated way. You’ll learn how to: Push translation files from your repo to LokalisePull translated content back and open pull requests automaticallyWork w