Welcome to our gettext tutorial, crafted for developers who are new to the world of software internationalization. This guide will introduce you to gettext, a popular tool that enables your applications to support multiple languages and display localized time with ease.
Gettext is essential for software localization as it allows you to extract text from your code and manage it in separate files. This approach simplifies the translation process and ensures that your core application remains untouched.
In this tutorial, we'll demonstrate how, by using Python, you can prepare your code for internationalization with gettext. We'll guide you through the steps of installing gettext, extracting text, and handling translations, then integrating them back into your application.
Whether you're just starting out in software localization or seeking to improve your existing skills, this guide aims to provide straightforward, step-by-step instructions and practical advice to help you effectively localize your applications with gettext.
Let's proceed.
📚 Further reading
Want to learn more about the use of AI in code translation? Discover how LLM code translation can help you convert your code from one programming language to another.
Gettext is a vital tool for developers looking to make their software applications accessible to users from different linguistic backgrounds. The primary goal of gettext is to ease the localization process, allowing software to be adapted to various languages without needing to significantly modify the program's codebase. This approach not only saves development time but also simplifies the process of updating text across different languages.
Gettext was originally developed by Sun Microsystems in the early 1990s as part of the GNU project, spearheaded by the Free Software Foundation. It was designed to be a standard for Unix-based systems, but has since been adopted across various platforms due to its effectiveness and open-source nature.
How does gettext work?
Gettext works by extracting text strings from the source code of an application and organizing them into a set of files that can be easily translated. This separation of code and content allows translators to work on language files without any risk of disrupting the code structure. Once translations are completed, gettext can integrate these back into the application, therefore enabling it to run in multiple languages.
File types in gettext
Gettext primarily uses three types of files:
PO (Portable Object) files: These are editable files where the extracted text strings are stored and translated. Each string in a PO file has an associated identifier (msgid) and its corresponding translation (msgstr).
MO (Machine Object) files: These are binary files compiled from PO files using the msgfmt command. MO files are optimized for use by the software, allowing it to load translations quickly.
POT (Portable Object Template) files: These template files serve as the master files for translations. They contain all the source strings extracted from the application's source code. POT files are the starting point for creating PO files for each language. They do not contain translations but rather the original text and placeholders for translations.
In summary, gettext simplifies the internationalization and localization process by separating textual content from source code. Thus it enables efficient management and updating of translations without affecting the application's functionality.
Installing gettext
Windows 10 and 11
To install gettext on Windows, you can use the GnuWin32 package, which provides ports of tools with a GNU or similar open-source license:
Download GnuWin32: Go to the GnuWin32 project page and download the gettext package.
Install the package: Run the downloaded installer and follow the on-screen instructions. Be sure to include the bin directory of GnuWin32 in your system's PATH environment variable to use gettext from the command line.
Alternatively, if you're using a package manager like Chocolatey, you can install gettext easily by opening a command line and running:
choco install gettext
Ubuntu
Gettext can be installed on Ubuntu through the standard package manager. First, update your package list like so:
sudo apt update
Then install gettext:
sudo apt install gettext
Please note that while this is the simplest approach, it might install an outdated version of gettext. If you're looking for the latest version, it might be a better idea to compile from source.
macOS
For macOS users, the easiest way to install gettext is via Homebrew, a popular package manager for macOS. First, install Homebrew if it's not already installed:
In this example, gettext.bindtextdomain("messages", "locales") tells Python where to find the MO files (locales directory).
The textdomain("messages") specifies the default domain (files named messages.mo). In more complex apps, you may create multiple text domains to further group your translations.
Now, let's also prepare the directory structure for gettext. Suppose we're translating the app into Spanish and French, while English will be used as a base language. Here’s how our structure should look:
That's it! In the next section, we'll look at how to generate the .po files needed for translation and how to use them to create .mo files that Python can use to display the translated text.
Managing PO files
So, as you already know, PO files are text files that contain the translation strings used by gettext to localize a Python application. Each PO file corresponds to a specific language and contains both the original text (in English, in this case) and the translated text.
To start translating, you need to generate a PO file for each language you intend to support. First, you need to extract translatable strings from your Python files. This can be done using the xgettext tool. Run the following command in your terminal in the root directory of your project:
This command creates a template file (messages.pot) containing all the strings marked for translation (_("Hello, world!") in your case) in the locales directory. The -d flag provides the text domain.
Now, use the template to create PO files for each language. For Spanish, do as follows:
These commands generate messages.po files, which you will fill with translations, under the respective language directories.
Editing PO files
Once you have generated your .po files, you need to add the translations via your favorite text editor or using a PO file editor like Poedit.
First, open the locales/es/LC_MESSAGES/messages.po file and find the line that contains the source text "Hello, world!". It looks like this:
msgid "Hello, world!"
Below it, you'll see a line starting with msgstr where you'll add the translation. For Spanish, it would look like this:
msgstr "¡Hola, mundo!"
Now let's provide the French translation by following the same process as above. Open locales/fr/LC_MESSAGES/messages.po and add msgstr below the msgid:
msgstr "Bonjour, monde!"
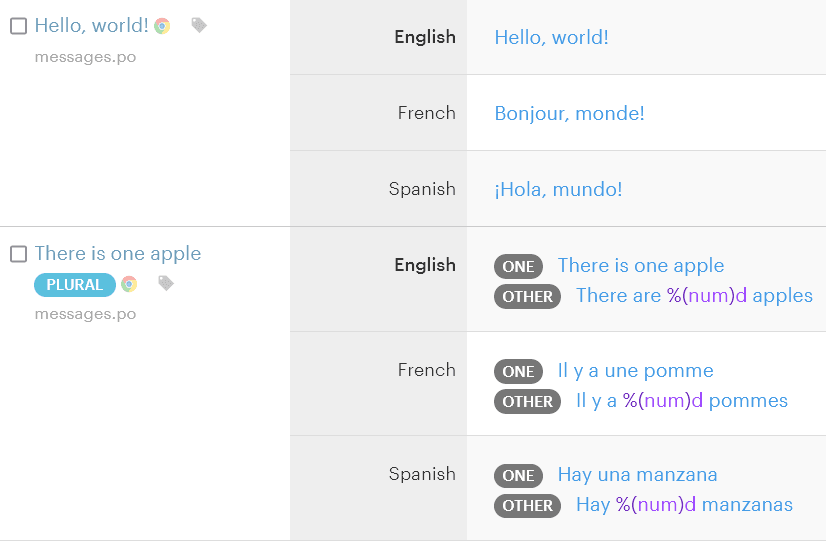
By editing these PO files, you have localized the "Hello, world!" message into Spanish and French.
Finally, within your English translation file, you can keep the original text under the msgstr or adjust it as needed:
msgid "Hello, world!"msgstr "Hello, world!"
PO file contents
Besides the basic msgid and msgstr, PO files can contain several other elements that help manage and contextualize translations:
Comments: Translators often benefit from comments left by developers. These can explain context or provide instructions about how strings are used within the application.
#. This is a comment for the translatormsgid "Submit"msgstr "Enviar"
Plural forms: Some languages have multiple plural forms. PO files support this through msgid_plural and multiple msgstr[n] lines, where n is the plural form number.
Flags: Flags can be used to give special instructions to translators or the gettext tool itself.
#, fuzzymsgid "Welcome back!"msgstr ""
A "fuzzy" flag, for instance, indicates that a translation needs review.
Headers: At the beginning of PO files, headers store metadata like content type, project version, language, and more. This data is crucial for tools and applications to handle the file correctly. For example, in your PO file with the Spanish translations, you'll see something like:
These are the headers providing information on the target locale, encoding, and plural forms.
Each of these elements plays a specific role in ensuring accurate and contextual translation, thus helping translators understand the nuances of the application's language requirements.
In the next section of the blog post, we'll cover how to compile these PO files into binary MO files for use by gettext at runtime, therefore ensuring efficient localization performance.
Translating with Lokalise
While editing PO files via a text editor is doable, it's not too convenient, especially for translators who might not be familiar with gettext.
Confirm your email and follow the wizard’s instructions to create a new team and a project with Web and mobile type. A project is where your translations will be stored.
Be sure to choose the proper base and target languages for your project. The base language is like the main language of your app, therefore I’ll set it to English. Target languages are the ones you’ll be translating into (I’ll choose Spanish and French). Also, when choosing these languages, make sure the locale codes match the Language header values provided in the PO files. Specifically, if your Language is set to en then choose English (en) as the base language.
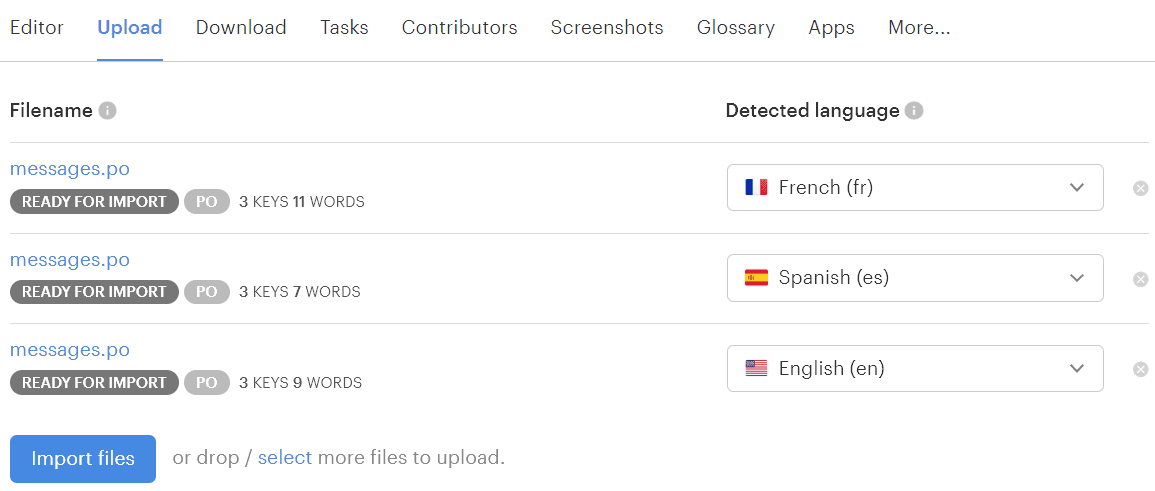
After creating the project, proceed to the Upload page.
Choose your PO translation files from your PC (you don’t need to upload the POT and MO files!). The languages should be detected automatically:
You can keep all options set to the default values and press Import files.
If you’d like to translate your texts into additional languages, you can hire a professional translator or use a neural network for the task. Just proceed to the Orders page and create a new order. You can learn more in our documentation. You can also use Lokalise AI to translate your texts into multiple languages as explained in this article.
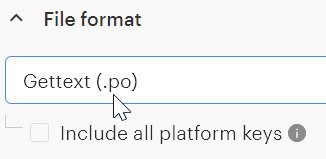
Once you are ready, you can download PO files back to your project. To achieve this, proceed to the Download page and choose Gettext (.po) from the File format dropdown:
Scroll to the bottom of the page and click Build and download. You’ll get an archive with all your translation files. Alternatively, click Preview if you’d like to understand exactly how your translations will look.
While Lokalise allows you to manage your translations through a GUI, it has a CLI tool that you may use to automate your translation management process. On top of that, we offer a Python SDK that works easily with the Lokalise API.
Compiling PO files into MO files
When working with gettext for localization, translations are stored in PO files during development. However, to use these for mobile application translation efficiently at runtime, PO files must be compiled into binary MO files.
MO (Machine Object) files are binary files that gettext uses to load translations. The primary reasons for using MO files are:
Performance: Binary files are faster for the program to read compared to text-based PO files. This speed is crucial in production environments where loading time affects user experience.
Efficiency: MO files allow gettext to quickly locate translations by offset, which is much faster than parsing text data.
Compiling PO files to MO
Compiling PO files into MO files is straightforward with the msgfmt command. To perform this compilation, simply run the msgfmt command for each file you've created.
By executing these commands, you generate MO files that your Python application can use to display the correct translations based on the user's locale settings.
Configuring locale settings in your Python application
To allow users to set their preferred language dynamically, you can enhance your Python application to accept a locale parameter via command line arguments. This will enable the application to display messages in the user's preferred language, utilizing the MO files you compiled earlier.
We import the sys module to parse command line arguments.
The application checks if a command line argument is provided (sys.argv[1]). This argument specifies the desired locale (e.g., es for Spanish or fr for French). The default locale is en.
The gettext.translation() function is called with the desired locale and domain. Then we install the chosen language.
Finally, we use the _ function to translate our message.
Now, your application can display messages in different languages based on the locale specified at runtime. Here's how to run your application for different language settings:
poetry run python3 app.py espoetry run python3 app.py frpoetry run python3 app.py en
Each command will launch the application and display "Hello, world!" translated into the respective language. This demonstrates how your Python application handles internationalization dynamically based on user input.
Handling unknown locales
Currently, if you try to run your app with an unsupported locale, for example:
poetry run python3 app.py jp
You'll get an error saying that the corresponding translations cannot be found. To overcome this problem, you can either enable fallbacks or handle the exception.
A fallback means that when the corresponding translation cannot be found, the base text will be displayed instead. To enable fallbacks, simply provide the following argument to the translation() function:
lang = gettext.translation("messages", localedir="locales", fallback=True, languages=[locale])
Now, when an unknown locale is requested, you'll see "Hello, world!" printed to the screen instead of an exception.
Another solution is to handle the exception manually, for instance:
try: lang = gettext.translation("messages", localedir="locales", languages=[locale])except FileNotFoundError as e: print("Error while trying to load translations:\n", e) sys.exit(1)
So, you can choose the approach that suits you best.
Advanced topics
Using plural forms in gettext and Python
Many languages have different rules for pluralization, which can complicate the translation process. gettext supports this variability by allowing you to define plural forms and specify translations for each form. Plural forms are based on a numeric expression that determines which version of a translation is used, depending on the number in question.
To get started, let's update our Python script a bit. Specifically, I'd like to display the message "There is one apple" or "There are X apples" depending on the provided count. The count can be passed as the second command line argument:
import gettextimport sysgettext.bindtextdomain("messages", "locales")gettext.textdomain("messages")locale = sys.argv[1] if len(sys.argv) > 1 else "en"try: lang = gettext.translation("messages", localedir="locales", languages=[locale])except FileNotFoundError as e: print("Error while trying to load translations:\n", e) sys.exit(1)lang.install()_ = lang.gettextngettext = lang.ngettextdef main(): count = int(sys.argv[2]) if len(sys.argv) > 2 else 5 print( ngettext("There is one apple", "There are %(num)d apples", count) % {"num": count} ) print(_("Hello, world!"))if __name__ == "__main__": main()
Here we use the ngettext function to handle plural forms. It takes three arguments: the singular text, the plural text, and the number determining which form to use.
The next step is updating the PO files, but running the msginit command again is not desirable: it will fully overwrite our files with new content, and we don't want to lose our existing translations, right?
In this case, we are adding new content to the English translation file from the template without overwriting the existing translations. Neat, isn't it? Make sure to run this command for all the other locales your application supports.
Now we need to define plural forms in the PO files. The plural forms rule is usually provided in the header at the top of the file. For example, English has two forms: one for the singular and one for the plural, so add the following line into your PO file above the translations:
"Plural-Forms: nplurals=2; plural=(n != 1);\n"
This means there are two plural forms (nplurals=2), and the plural form is used if n (the number) is not equal to 1. In fact, depending on your setup, this line might be added automatically when generating PO files using the msginit command. To view plural forms for other locales, please refer to the official gettext documentation.
Within the PO file, you specify translations for each plural form using msgid_plural for the original plural message and msgstr[0], msgstr[1], etc., for each form. For instance:
msgid "There is one apple"msgid_plural "There are %(num)d apples"msgstr[0] "There is one apple"msgstr[1] "There are %(num)d apples"
Spanish and French also have their own rules for pluralization. Let's take care of Spanish:
"Plural-Forms: nplurals=2; plural=(n != 1);\n"msgid "There is one apple"msgid_plural "There are %(num)d apples"msgstr[0] "Hay una manzana"msgstr[1] "Hay %(num)d manzanas"
And finally, French:
"Plural-Forms: nplurals=2; plural=(n > 1);\n"msgid "There is one apple"msgid_plural "There are %(num)d apples"msgstr[0] "Il y a une pomme"msgstr[1] "Il y a %(num)d pommes"
Repeat this command for all other locales and rerun the app to make sure everything works smoothly.
Automating the PO file update and MO file compilation workflow
Maintaining translations in a dynamic application involves frequent updates to PO files and recompiling them into MO files whenever changes occur. Automating this process helps ensure that your application always uses the most up-to-date translations without requiring manual intervention for each update. This can be achieved through scripts and integration with version control systems.
Several tools can be used to automate these tasks, including gettext utilities and build tools like make. A Makefile provides a set of directives used by the make utility to automatically build and manage projects. You can create a Makefile to handle PO and MO files like this:
The pattern rule converts PO files to MO using msgfmt
There's also a command to recreate the POT and update the PO files
Finally, there's a rule to clean up the compiled MO files
Integrating with version control
Automating translation updates can also be integrated into a version control system like Git. Here's how to set up a Git hook to update PO files every time changes are committed.
First, navigate to your Git hooks directory:
cd .git/hooks
Create or edit the post-commit hook:
nano post-commit
Add a script to update PO files and compile MO files:
#!/bin/shmake update_pomake all
Make the hook executable by running the below:
chmod +x post-commit
Now your translation files should be properly updated after every commit!
Debugging common gettext issues
When implementing internationalization with gettext, developers often encounter several typical issues. This section covers some of the most common pitfalls and provides guidance on how to troubleshoot and resolve them.
Text not translating
Problem: The application runs, but the text doesn't appear in the expected language. Instead, it shows the default English text.
Solution:
Check the MO files: Ensure that the MO files are properly compiled and located in the correct directory as specified in your gettext configuration.
Locale availability: Verify that the locale you're trying to use is installed and supported on your system. On Linux, you can check available locales by running locale -a in the terminal. If a locale is not present, run sudo nano /etc/locale.gen and uncomment the lines containing the desired locales. For example, to enable support for Spanish, uncomment es_ES.UTF-8 UTF-8. Save the changes to the file, close the editor, and run sudo locale-gen to regenerate the locales.
Correct the locale code: Make sure that the locale code passed to the application matches the locale directories (e.g., es for Spanish should correspond to locales/es/LC_MESSAGES/messages.mo).
Encoding issues
Problem: Characters in the translated text appear as question marks or random symbols, indicating encoding problems.
Solution:
File encoding: Ensure that your PO files are saved with UTF-8 encoding. This prevents characters from being misinterpreted by the system.
Specify encoding in Python: When setting up gettext in your Python code, make sure you are using UTF-8. You can specify the encoding explicitly when loading translations, e.g.: gettext.translation('messages', localedir='locales', languages=[locale], codeset='utf-8').install()
Changes to PO files are not reflected
Problem: After updating translations in the PO files, the changes do not appear when the application is run.
Solution:
Recompile the MO files: Every time you make changes to a PO file, you need to recompile it into an MO file. MO files are what the application actually reads, so updates to PO files won't be reflected until they are recompiled.
Restart the application: After recompiling, make sure to restart your application to load the new MO files.
Incorrectly handled plurals
Problem: Plural forms are not correctly displayed according to language rules, leading to grammatical errors in the translations.
Solution:
Correct the plural forms in the PO files: Ensure that your PO files define the plural forms correctly. The header of your PO file should include the appropriate plural forms expression and you should provide the correct translations for each form, e.g.: "Plural-Forms: nplurals=2; plural=(n != 1);\n"
Incorrect use of contexts
Problem: The same English word translates incorrectly in different contexts.
Solution:
Use contexts properly: When using contexts (msgctxt) in your PO files, ensure they are unique and correctly mapped in your Python code. Each context should clearly differentiate the use cases, for example:
c_ = gettext.npgettextprint(c_('menu', 'file', 1)) # Context for 'file' in a menuprint(c_('tool', 'file', 1)) # Context for 'file' as a tool
Conclusion
Implementing localization in Python applications with gettext is a robust method to ensure your software is accessible and user-friendly across multiple languages and cultures. By understanding the core concepts of PO and MO files, leveraging contexts for specific translation needs, and using plural forms, developers can provide accurate and context-aware translations.
Throughout this tutorial, we've covered the essentials of setting up gettext, creating and managing translation files, and the importance of automating the translation workflow to keep your application's translations up to date with minimal effort. We've also looked at some common pitfalls and how to debug them effectively.
Frequently asked questions
What is gettext?
gettext is a set of tools and libraries that are used to help developers manage multilingual text in their programs. It supports many programming languages, including Python, and is widely used in the open-source community to facilitate internationalization and localization.
How do I extract strings from my code to create PO files?
You can use the xgettext tool, which is part of the GNU gettext package. This tool scans through your source files to extract strings marked for translation, usually wrapped in functions like _() or gettext(), and generates a .pot (Portable Object Template) file. You then use this template to create .po files for each language.
Can gettext handle languages with complex plural forms?
Yes, gettext supports complex plural forms. In the PO file, you can define the rules for plural forms using the Plural-Forms header. You then provide the appropriate translations for each plural form using msgid_plural and msgstr[n] entries.
How do I use gettext with Python virtual environments?
When using Python virtual environments, you should ensure that the gettext library is installed within the environment. You can install it using pip if it’s not included by default. Additionally, make sure to correctly set the path to your localization files in your Python scripts using bindtextdomain() to refer to the virtual environment’s directories if necessary.
What should I do if gettext isn't translating a string even though it's translated in the PO file?
Ensure that:
The MO file has been generated and is up to date with the PO file.
The MO file is located in the correct directory structure expected by your application.
The domain set with textdomain() matches the name of your MO files.
The language/locale set in your environment matches one of the languages for which you have translations.
How do I handle dynamic content or user-generated strings in gettext?
For dynamic content that cannot be known and extracted at compile time (e.g., user-generated strings), you need a runtime solution that might involve database storage of translations or a real-time translation API. gettext is primarily designed for static strings that are known at the time of application development.
Is it possible to switch languages on the fly with gettext in a Python application?
Yes, you can switch languages on the fly by changing the locale at runtime and then reinitializing the gettext translation object. You might need to refresh or reload parts of your application to apply the new translations to already loaded interfaces or content.
Ilya is the lead for content, documentation, and onboarding at Lokalise, where he focuses on helping engineering teams build reliable internationalization workflows. With a background at Microsoft and Cisco, he combines practical development experience with a deep understanding of global product delivery, localization systems, and developer education.
He specializes in i18n architectures across modern frameworks — including Vue, Angular, Rails, and custom localization pipelines — and has hands-on experience with Ruby, JavaScript, Python, Elixir, Go, Rust, and Solidity. His work often centers on improving translation workflows, automation, and cross-team collaboration between engineering, product, and localization teams.
Beyond his role at Lokalise, Ilya is an IT educator and author who publishes technical guides, best-practice breakdowns, and hands-on tutorials. He regularly contributes to open-source projects and maintains a long-standing passion for teaching, making complex internationalization topics accessible to developers of all backgrounds.
Outside of work, he keeps learning new technologies, writes educational content, stays active through sports, and plays music. His goal is simple: help developers ship globally-ready software without unnecessary complexity.
Libraries and frameworks to translate JavaScript apps
In our previous discussions, we explored localization strategies for backend frameworks like Rails and Phoenix. Today, we shift our focus to the front-end and talk about JavaScript translation and localization. The landscape here is packed with options, which makes many developers a
Build a smooth translation pipeline with Lokalise and Vercel
Internationalization can sometimes feel like a massive headache. Juggling multiple JSON files, keeping translations in sync, and redeploying every time you tweak a string… What if you could offload most of that grunt work to a modern toolchain and let your CI/CD do the heavy lifting? In this guide, we’ll wire up a Next.js 15 project hosted on Vercel. It will load translation files on demand f
Hands‑on guide to GitHub Actions for Lokalise translation sync: A deep dive
In this tutorial, we’ll set up GitHub Actions to manage translation files using Lokalise: no manual uploads or downloads, no reinventing a bicycle. Instead of relying on the Lokalise GitHub app, we’ll use open-source GitHub Actions. These let you push and pull translation files directly via the API in an automated way. You’ll learn how to: Push translation files from your repo to LokalisePull translated content back and open pull requests automaticallyWork w