In this tutorial, we’ll discuss how to implement PHP translation, localization, and internationalization. PHP remains a stable and popular choice for web development, and despite the rise of other programming languages like Python, Ruby, and Node.js, a large number of applications are still built using flat PHP without any framework. Effective translation management system can streamline your localization efforts. So, mastering PHP localization techniques is a must-have skill for web developers.
First off, let’s clarify what localization (l10n) is and why it’s such a common task for developers. In software engineering, localization means adapting the content of a system to suit a specific locale, ensuring the target audience in that locale can understand it. It’s not just about translating content from one language to another, it also involves handling date formats, number formats, currencies, localized time, text direction, and proper pluralization.
Before diving into localization, it’s important to understand software internationalization (i18n), which prepares your PHP application to handle multiple languages and cultural differences. This ensures that your application is flexible and ready for localization when needed.
For example, pluralization rules are fairly straightforward in English compared to other languages. In some, like Slavic languages, you may have up to three or four plural forms for a given noun. Similarly, date, time, and number formatting can vary significantly depending on the target language.
So, as you can see, there’s a lot more to PHP localization than just simple language switching.
Let’s dive into how we can implement PHP l10n. This tutorial will cover five main approaches:
This is the most basic method for implementing PHP translation and has been around for a long time. It involves creating an associative array for each language. These arrays map source language keys to localized content. When you want to display localized content, you simply select the appropriate array and key for the desired language.
Plain text translation with PHP arrays
Let’s look at a quick example. We’ll implement localization for three languages—English, Arabic, and Spanish—but of course, you can expand this to include any other locales. We’ll use English as the base language since it’s the primary language of most systems and applications.
To keep things readable, we’ll place each array in its own separate PHP file, although you can store them all in a single file if you prefer.
Let’s see how we can display the sentence “Welcome to the tutorial” with PHP arrays in the languages mentioned above. First, you'll need to create a project directory with an index.php file inside, along with the locale folder. Here's the file structure:
Now we’ll create our translation files for the three languages inside the locale folder.
Here's the en.php file:
<?phpdeclare(strict_types=1);return [ "welcome" => "Welcome to the tutorial",];
The arab.php:
<?phpdeclare(strict_types=1);return [ "welcome" => "مرحبًا بكم في البرنامج التعليمي",];
And the es.php:
<?phpdeclare(strict_types=1);return [ "welcome" => "Bienvenida al tutorial",];
Next, let’s go back to our index.php file and display the localized text. The content should be translated according to the language selected from the dropdown. Add the following PHP code snippet to index.php:
If numberOfBooks equals 1, we use the i_bought_single_book key. For anything greater, we use i_bought_many_books. If zero or invalid, we fallback to i_bought_no_books.
Now, let’s add these keys to our translation files.
en.php:
return [ 'i_bought_single_book' => 'I bought a book.', 'i_bought_many_books' => 'Books bought: %d.', 'i_bought_no_books' => 'I didn\'t buy any books.',];
And that’s it! This way, you can handle basic text translation and pluralization using PHP arrays.
PHP translation with gettext
As we saw in the first section, PHP translation using arrays is straightforward. However, as the system scales, maintaining translation arrays becomes cumbersome.
That’s where the gettext Python system comes in—a widely used localization method across many programming languages, including PHP, Python, and C++. With gettext, it’s easy to keep locale files in sync with codebase changes.
Let’s build a small example to demonstrate PHP localization using gettext. Before diving in, you’ll need to set up your environment as described in the manual.
Setting up the project
Create a separate folder for this project to keep things organized. We’ll call it PHP-Gettext. Inside, create a file named index.php and a locale folder. This folder should contain subdirectories named after the locale codes, each holding messages.po and messages.mo files.
Great job! You now know how to implement PHP translation using Gettext for both plain text and pluralization. This method scales better for larger applications and is easier to manage compared to PHP arrays.
The define function in PHP
So far, we’ve covered two different methods for PHP translation: PHP arrays and gettext. In this section, we’ll learn how to implement PHP localization using the define function. This approach is simple and straightforward—let’s see how to set it up.
Setting up the project
Start by creating a new project with the following structure:
This method works by defining constants for each localized message. When a user selects a language, the corresponding file is included, and the constant (welcome) is used to display the correct translation.
The HTML form setup is the same as in previous examples, allowing users to select a language. This approach is clear and easy to implement, making it a great option for smaller projects or when managing a limited number of messages.
The PHP setlocale() function
setlocale() is a built-in function that supports PHP localization. It assigns your system a geographical location and helps control how content is displayed, including currency and date formatting, based on the specified locale. The syntax is:
setlocale($category ,$locale)
This function accepts two parameters:
$category: A constant that specifies which aspect of localization to change.
$locale: A string representing the desired locale (e.g., en_US, es_CO).
Let’s look at a few of the most common categories:
LC_ALL: Applies the locale settings to all categories below.
LC_COLLATE: For string comparison.
LC_CTYPE: For character classification and conversion.
LC_MONETARY: For monetary and currency formatting.
LC_NUMERIC: For numeric formatting.
LC_TIME: For date and time formatting with strftime().
LC_MESSAGES: For system responses.
Let’s see how to use the setlocale() function in PHP for localization. To start, create a new project with an index.php file.
Date formats
Date formats vary significantly based on locale, so it’s crucial to set the correct locale when displaying dates.
To check the locales currently installed on your machine, use the following command:
locale -a
Next, define a locale based on the language selected:
Note: If the specified locale is not installed on the machine, setlocale() will return false. This can be used to detect missing locales.
Once the locale is set, let’s format and display date and time using the strftime() method. In this example, we’ll show the time for two locales:
<?phpdeclare(strict_types=1);setlocale(LC_ALL, "en_US"); echo "The time in US is";echo(strftime("%m/ %d/ %Y , %X "));echo ("<br/>");setlocale(LC_ALL, "zh_CN"); echo "The time in China is ";echo(strftime("%m/ %d/ %Y , %X "));
strftime() Placeholders
You can customize date formats using the placeholders in strftime(). Here are a few examples:
%m: Month (01 to 12).
%d: Day of the month (01 to 31).
%Y: Year with century (e.g., 2023).
%X: Preferred time representation (without the date).
With setlocale() and strftime(), you can easily adapt date and time formats to match the conventions of different locales, enhancing the user experience for global applications.
Currency formatting
Currency formatting is an essential feature provided by PHP for localizing financial information. Let’s go through a simple example to see how to format currency based on locale settings.
In the snippet above, we used the LC_MONETARY category with the setlocale() function and the localeconv() function to retrieve numeric formatting details specific to the set locale.
Using the money_format() Function
Now let’s format a currency value using money_format():
Note:money_format() is only available on systems that support the strfmon capabilities, so it won’t work on Windows environments.
You can change the locale as required to format currency values for different regions. For instance, switching to en_GB would format the same number in a different way.
Number formatting
Next, let’s see how to perform general number formatting in PHP using setlocale().
The number_format() function takes two parameters:
The number to be formatted.
The number of decimal places to display.
This makes it easy to customize the presentation of numbers according to the needs of your application.
Frameworks
Nowadays, most developers rely on frameworks to streamline development and make it more efficient. Let’s take a quick look at the localization support provided by some popular PHP frameworks.
Almost all major PHP frameworks offer built-in support for PHP translation, and some even include advanced features like currency and date formatting. While we won’t dive into detailed implementations here, we’ll outline the methods these frameworks use for localization:
CodeIgniter and Kohana: Use PHP arrays for localization.
CakePHP: Utilizes the gettext method for translation.
Fat-Free Framework (F3): Supports both PHP arrays and INI files for localization.
Laminas Project: Offers several methods, including PHP arrays, CSV, TBX/TMX, gettext, Qt, XLIFF, and INI.
Many frameworks also provide internationalization modules that you can integrate into standalone PHP applications, giving you flexibility in how you approach localization.
What is the best method for PHP localization?
In this tutorial, we covered multiple PHP localization techniques. So, which one is the best?
There’s a lot of debate on platforms like Stack Overflow, but many PHP developers consider gettext the most robust method. It separates the translation text from your code, so you can update translations by modifying the .po files without touching the application logic.
Gettext is widely adopted and has native support in PHP. Even WordPress uses the GNU gettext system to handle translations. However, using gettext alone might not be sufficient for large applications—you might need to combine it with other methods, such as intl for advanced localization features.
That said, it’s rare to build large-scale applications today without using a PHP framework. When choosing a framework, consider its localization options and decide which techniques align best with your project needs.
Simplifying the translation process with Lokalise
Once your app is localized, you might wonder: How can I invite professional translators to work on the texts? Should you send them the translation files directly? While it’s possible, it’s not the most efficient approach. If multiple people are working on the same project, it can quickly become chaotic. Plus, you may want to introduce quality assurance or take advantage of machine translation to speed things up.
Is there a better solution? Meet Lokalise—a translation management system designed for agile teams. It offers all the core translation features, the ability to work collaboratively, and advanced tools and integrations with third-party services like Amazon S3, GitHub, Figma, and many more.
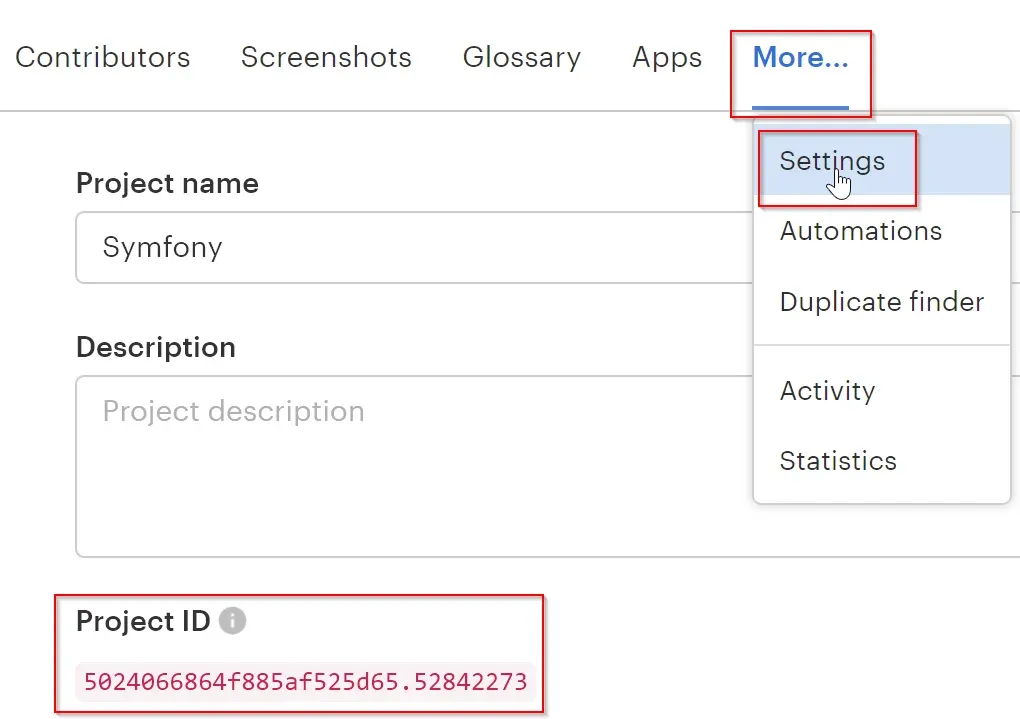
Follow the setup wizard to create a new project. A project is essentially a collection of your keys and translations, along with settings, contributors, and other useful resources.
Once inside your project, click More > Settings and take note of the Project ID.
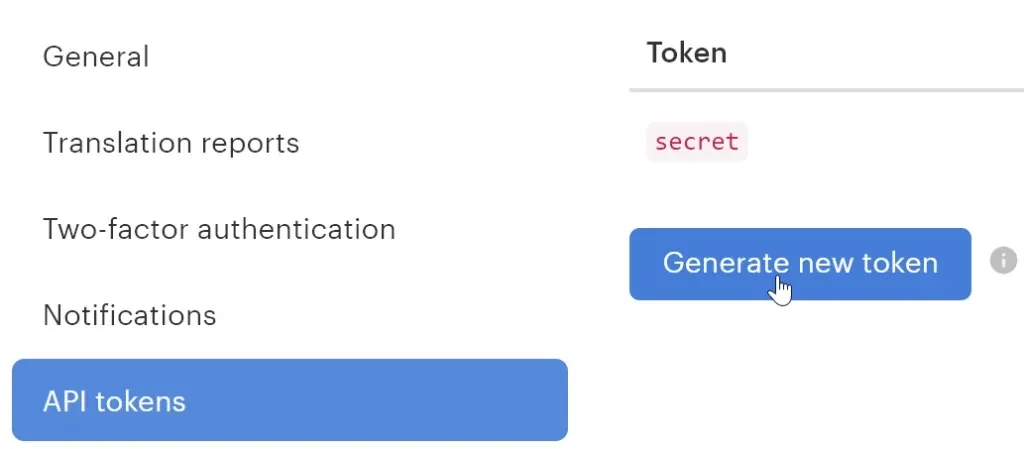
Click on your avatar in the bottom-left corner, choose Profile settings, and navigate to the API tokens tab. Generate a new read-write token.
Using Lokalise CLI
With Lokalise’s CLI, you can easily upload and download translation files:
And that’s it! Using Lokalise streamlines your translation workflow, making it easy to collaborate with translators and manage localization projects without the headache.
Conclusion
A huge thanks to my colleague Ondřej Frei for all the assistance and technical insights.
In this tutorial, we explored various methods for PHP translation, including PHP arrays, define functions, gettext, and setlocale. We also highlighted the localization capabilities of popular PHP frameworks.
The PHP array and define function methods are simple and easy to implement, making them ideal for smaller applications. However, as your project grows, maintaining these translation files becomes more challenging. For larger projects, gettext offers a better solution by separating translations from code, but it lacks support for number, date, and currency formatting. Meanwhile, the setlocale function is a straightforward option for locale-based formatting.
If you’re building larger applications, consider using a PHP framework with built-in localization support. For more details, check out our Laravel localization and Symfony tutorial.
Ilya is the lead for content, documentation, and onboarding at Lokalise, where he focuses on helping engineering teams build reliable internationalization workflows. With a background at Microsoft and Cisco, he combines practical development experience with a deep understanding of global product delivery, localization systems, and developer education.
He specializes in i18n architectures across modern frameworks — including Vue, Angular, Rails, and custom localization pipelines — and has hands-on experience with Ruby, JavaScript, Python, Elixir, Go, Rust, and Solidity. His work often centers on improving translation workflows, automation, and cross-team collaboration between engineering, product, and localization teams.
Beyond his role at Lokalise, Ilya is an IT educator and author who publishes technical guides, best-practice breakdowns, and hands-on tutorials. He regularly contributes to open-source projects and maintains a long-standing passion for teaching, making complex internationalization topics accessible to developers of all backgrounds.
Outside of work, he keeps learning new technologies, writes educational content, stays active through sports, and plays music. His goal is simple: help developers ship globally-ready software without unnecessary complexity.
Libraries and frameworks to translate JavaScript apps
In our previous discussions, we explored localization strategies for backend frameworks like Rails and Phoenix. Today, we shift our focus to the front-end and talk about JavaScript translation and localization. The landscape here is packed with options, which makes many developers a
Syncing Lokalise translations with GitLab pipelines
In this guide, we’ll walk through building a fully automated translation pipeline using GitLab CI/CD and Lokalise. From upload to download, with tagging, version control, and merge requests. Here’s the high-level flow: Upload your source language files (e.g. English JSON files) to Lokalise from GitLab using a CI pipeline.Tag each uploaded key with your Git branch name. This helps keep translations isolated per feature or pull request
Build a smooth translation pipeline with Lokalise and Vercel
Internationalization can sometimes feel like a massive headache. Juggling multiple JSON files, keeping translations in sync, and redeploying every time you tweak a string… What if you could offload most of that grunt work to a modern toolchain and let your CI/CD do the heavy lifting? In this guide, we’ll wire up a Next.js 15 project hosted on Vercel. It will load translation files on demand f