Internationalization is an important yet often overlooked step in software development. In fact, software localization would not be possible without internationalization (i18n). Setting up a Vue 3 website with Vue I18n support may sound daunting at first, but it’s actually easier than you might think. For this tutorial, we will be using Vue I18n, a great package from the core Vue devs, to show you how to build a multi-language app with a locale switcher. We'll also discuss some Vue I18n best practices that will come in really handy.
In this article, we are going to cover the following topics:
Vue I18n setup.
Adding support for multiple languages.
Storing and using translations.
Implementing pluralization.
Datetime and number localization.
Switching locale.
Integrating Vue Router and making it work with multiple locales.
Lazy loading of translation files based on the chosen locale.
Reading the user's preferred locale and adjusting the default language based on it.
The source code demonstrating the Vue I18n example is available on GitHub. The working demo can be found on Firebase.
To follow along, you'll need to install the following:
Node 20+(in fact, it's even better to utilize Node 22+)
Your favorite code editor and a command-line interface
I will also assume that you are familiar with the Vue 3 framework.
Creating the app to demonstrate Vue i18n
Let's start by creating the Vue 3 app with Vue I18n support by running the following command:
npm create vue@latest
You might be asked to install some additional tools, so choose "yes" to continue.
Next, give your app a name — I'm calling mine lokalise-vue. You'll also need to pick extra features (TypeScript, JSX, Pinia, etc.). In fact, the only feature that we will require later in this article is the Vue Router. All other components are not mandatory. Also, I'll keep the sample code Vue generator creates for us for the purposes of this demo.
Finally, go to the project directory, install the necessary dependencies, and make sure your app is booting correctly:
cd lokalise-vuenpm installnpm run dev
You can visit the localhost:5173 URL in your browser to ensure everything is working well.
Adjusting the views
Before proceeding, let's prepare some views for demonstration purposes. Upon creation, your app should contain two views: Home and About. Let's tweak the src/views/HomeView.vue first:
<template> <main> <h1>Welcome to the Vue 3 I18n tutorial!</h1> <p>This tutorial was brought to you by Lokalise.</p> <p>This page has been visited 30 times.</p> </main></template>
Open the src/views/AboutView.vue file and provide sample data inside it:
Next, we need to configure the plugin within the vite.config.js file, so change it as follows:
import { fileURLToPath, URL } from 'node:url'import { resolve } from 'node:path'import { defineConfig } from 'vite'import vue from '@vitejs/plugin-vue'import vueDevTools from 'vite-plugin-vue-devtools'import VueI18nPlugin from '@intlify/unplugin-vue-i18n/vite'export default defineConfig({ plugins: [ vue(), vueDevTools(), VueI18nPlugin({ include: resolve(fileURLToPath(new URL('./src/i18n/locales/**/*.json', import.meta.url))), // provide a path to the folder where you'll store translation data (see below) }) ], resolve: { alias: { '@': fileURLToPath(new URL('./src', import.meta.url)) } }})
Please note that if the interpolation or pluralization is not working in production, you can also try setting the runtimeOnly option to false in the config. For example:
We are setting the default locale (language) for our application. Its value will be fetched from the environment variable that we'll add in a moment. Please note that all environment variables must start with the VITE_ prefix.
We are adding a fallback locale. If translations for the currently set locale are unavailable, Vue will try to read values from the fallback locale instead.
In the previous package versions we also had to set the legacy parameter to ensure that the i18n plugin properly works with Vue 3. However, it's not required anymore in 2026, as the default value is legacy: false.
Okay, great!
Now let's create an .env file in the project root and add two environment variables inside it:
VITE_DEFAULT_LOCALE=enVITE_FALLBACK_LOCALE=lv
I'll use English as a base language and Latvian as a fallback, but please feel free to choose any other locales.
At this point, we can use the Vue I18n plugin inside the src/main.js file, so let's modify it in the following way:
import "./assets/main.css";import { createApp } from "vue"; // <--- 1import App from "./App.vue";import router from "./router";import i18n from "./i18n"; // <--- 2const app = createApp(App);app. use(router). use(i18n); // <--- 3app.mount("#app");
Main things to note here:
Import createApp. Previously we had to import from vue/dist/vue.esm-bundler but it's not needed anymore.
Import the I18n object.
Use the I18n plugin when mounting the app.
Performing basic translations with the Vue I18n plugin
Adding translation messages
So, our Vue I18n plugin is now configured, but it's not doing anything as we haven't provided any translations yet! Let's start with the simplest case and translate plain text within our views. Basically, we should extract the hard-coded strings into a separate file and replace these strings with keys that will act as placeholders. Once the app is served to the end user, these keys will be replaced with the actual texts based on the currently set locale.
This process is known as internationalization (i18n), and it's often confused with localization, which is a different thing. Localization means adapting dates, times, currencies, images, and other assets to suit a specific country or region. You can read more about the differences between internationalization and localization.
Therefore, let's open the src/i18n/index.js file and add English translations in the key-value format:
import { createI18n } from "vue-i18n";const messages = { en: { nav: { home: "Home", about: "About" }, home: { header: "Welcome to the Vue 3 I18n tutorial!", created_by: "This tutorial was brought to you by Lokalise." }, about: { header: "About us" } }}// ...
So, the header and created_by are the translation keys that we will use in our source code. Please note that I'm nesting these keys into "namespaces" for better manageability. You can learn more about some best practices for key management and organization in our blog.
Also note that the root key (en) must be named after the locale that you are planning to support.
The translations are now ready to be used. Next, we have to replace the hard-coded texts with the keys and ask the Vue I18n plugin to properly handle those keys. By default, the Vue I18n plugin is not globally injected into the app, so you'll have to include it manually in every view. Here's an example for the HomeView.vue:
<template> <main> <h1>Welcome to the Vue 3 I18n tutorial!</h1> <p>This tutorial was brought to you by Lokalise.</p> <p>This page has been visited 30 times.</p> </main></template><script setup>import { useI18n } from 'vue-i18n'const { t } = useI18n()</script>
Here we are importing the Vue I18n plugin, extracting the t function from it (it simply means "translate"), and exposing this function to the view.
The t function can now be used to handle our translation keys:
<template> <main> <h1>{{ t("home.header") }}</h1> <p>{{ t("home.created_by") }}</p> <p>This page has been visited 30 times.</p> </main></template><script> // ...</script>
We are simply passing the key names to this function so that the keys are properly replaced with the corresponding messages once the app is served to the user. As long as our keys are nested, we have to use the "dot notation". For example, the header key is nested under the home namespace, therefore we're saying home.header.
Now we'll do something similar in the src/views/AboutView.vue file:
<template> <div> <h1>{{ t("about.header") }}</h1> <p>Donations raised: $1456.00</p> </div></template><script setup>import { useI18n } from 'vue-i18n'const { t } = useI18n()</script>
Finally, let's use translation keys in the src/components/Nav.vue file:
At this point, you can check that everything is working properly by running npm run dev and proceeding to localhost:5173. As long as our default locale was set to English, you should see English messages. We don't have any controls to switch between the supported languages yet, so you can open the .env file and set the VITE_DEFAULT_LOCALE to lv to make sure the Latvian translations are displaying properly. Don't forget to set the default locale to en once you are done testing.
Globally injecting the translate function
Exposing the t function manually is fine, but you might find it overly tedious as you'll have to do this in every view and component. Instead, it's possible to globally inject all i18n-related goodies into your app. To achieve this, add a new option to the src/i18n/index.js file:
// ... your translations ...export default createI18n({ locale: import.meta.env.VITE_DEFAULT_LOCALE, fallbackLocale: import.meta.env.VITE_FALLBACK_LOCALE, globalInjection: true, // <--- add this messages})
Once you've set the globalInjection to true, all your views and components should have access to the $t function and it will no longer be necessary to import manually. For example:
<template> <main> <h1>{{ $t("home.header") }}</h1> <p>{{ $t("home.created_by") }}</p> <p>This page has been visited 30 times.</p> </main></template>
A few notes about globalInjection:
In some older vue-i18n versions (for example around v9.2), this option was enabled by default.
Injected properties like $t are not available inside script setup; they only work in templates.
This feature is considered “magic” and can make your code less predictable, so many developers prefer to avoid it and employ useI18n() explicitly instead. I'm not going to enable it in today's demo.
Vue I18n: Check if a translation exists
One question you might ask is: How do I check if a translation exists at all? That's a good question! First of all, it's important to understand how exactly the translation is sought:
First, the vue-i18n plugin will search for a requested key in the current locale. If the corresponding translation is found, it's returned right away. If not, proceed to step 2.
If the translation cannot be found in the current locale, vue-i18n will check if there are any fallback rules defined. If a fallback locale is available and the key can be found for that locale, the corresponding translation is returned. In development mode. you'll also see a console warning message saying that the key can't be found in the current locale and that the fallback locale will now be searched.
If the fallback locale is not set or the translation cannot be found there either, the key name itself will be returned as a translation.
This means that you can create a simple condition and make sure the fetched translation does not equal the key name:
if(t("missing.key") === "missing.key") { console.log("Can't find this translation!")} else { console.log("Here's your translation", t("missing.key"))}
However, there's a simpler method: you can use the te function, which is also available from the useI18n(). This function accepts two arguments: the key name and the locale to search (which is optional). This function returns true if the key has been found, and false otherwise. Therefore, you can say something like this:
const { t, te } = useI18n()if(te("missing.key")) { console.log("Here's your translation", t("missing.key"))} else { console.log("Can't find this translation!")}
Advanced translation features with Vue I18n
Now we know how to translate simple texts, but in some cases, this might not be enough. In this section, we'll see how to perform interpolation and pluralization, as well as the localization example of numbers, dates, and times in Vue 3 using Vue I18n, which are crucial aspects of software localization to ensure a seamless user experience across different languages and regions.
Interpolation
Interpolation enables you to add dynamic values within static translation messages. For example, suppose you want to greet a user by their name. But the problem is, there are so many names in the world and therefore we simply cannot hard-code it right into the translation! To overcome this problem, we can use interpolation and dynamically inject the current user's name into the text when the app is served. In other words, your translation turns into something like "Hello, USERNAME_HERE".
So, let's see how to interpolate custom values into translations. To achieve this, we should introduce special placeholders written in the following format: {placeholder_title}. These placeholders should be added directly into the translation texts, while their values will be provided when calling the t function.
Open the src/i18n/index.js file and make the following changes:
const messages = { en: { home: { header: "Welcome to the Vue 3 I18n tutorial!", created_by: "This tutorial was brought to you by {company}." // <--- }, // other translations omitted ... }, lv: { home: { header: "Laipni lūdzam Vue 3 I18n ceļvedī!", created_by: "Šo ceļvedi jums sagatavoja {company}." // <--- }, // other translations omitted ... }}// ... other code ...
Our placeholder is called company — please note that it must have the same name for all languages. If the placeholder value is not provided, it will be empty by default. Let's now provide the value inside the src/views/HomeView.vue:
<template> <main> <h1>{{ t("home.header") }}</h1> <p>{{ t("home.created_by", {company: "Lokalise"}) }}</p> <p>This page has been visited 30 times.</p> </main></template>
The t function accepts a second optional argument containing placeholder names and values that should be interpolated into the translation. Make sure to pass the same placeholder as you provided in the translation. If needed, a single translation can contain multiple placeholders.
Pluralization with Vue i18n
Pluralization is another important feature that developers commonly utilize. It allows you to display different messages based on a given number. For instance, in English you would say "0 apples" and "5 apples", but "1 apple". English pluralization rules are quite simple, but other languages (for example, Slavic ones) are more complex. For instance, in Latvian, you'd say "0 ābolu", "5 ābolu", "1 ābols". Crazy, right?
The good news: Vue I18n supports plural messages out of the box (the 0 | 1 | many syntax which we'll see in a moment). The less good news: for some languages you'll still need to provide pluralization rules, so Vue I18n knows which form to pick. You can either write the logic yourself, or base it on the browser’s Intl.PluralRules to reuse standard language rules. To create rules for other languages, you can use this table which has pluralization information for all languages.
To provide Latvian pluralization rules, we'll create a new file – src/i18n/rules/plurals.js:
function lvPlurals(choice, _choicesLength, _orgRule) { if (choice === 0) return 0 return new Intl.PluralRules('lv').select(choice) === 'one' ? 1 : 2}export default { lv: lvPlurals }
Now we'll use our rules in the src/i18n/index.js file:
// ... other imports ...import pluralRules from "./rules/plurals"; // <--- add this // ... translations ...export default createI18n({ locale: import.meta.env.VITE_DEFAULT_LOCALE, fallbackLocale: import.meta.env.VITE_FALLBACK_LOCALE, messages, pluralRules, // <--- add this });
With these rules in place, let's add new translations into the same file:
const messages = { en: { home: { num_visits: "This page hasn't been visited :( | This page has been visited {n} time | This page has been visited {n} times" } // ... other translations omitted ... }, lv: { home: { num_visits: "Šī lapa vēl nav apmeklēta :( | Šī lapa ir apmeklēta {n} reizi | Šī lapa ir apmeklēta {n} reizes" } }}
For English, we are providing three different translations separated with the "pipe" (|) character: when there are no visits, when there is one visit, and when there are many visits. For Latvian, also provide three different options. Please note that in this case, the placeholder must be named either n or count so that it's properly handled by the Vue I18n plugin.
Now we can use the t function within the src/views/HomeView.vue file and provide any number as the second argument:
Please note that it's not necessary to give your placeholder a name in this case. You can try changing this number to make sure that the displayed message changes accordingly. Also note that previously you had to use Vue I18n tc function, but now it's considered obsolete and works only in legacy mode.
Great job!
Numbers and currencies with Vue i18n
It's no secret that there are numerous currencies in the world: US dollars, euros, Russian roubles, Japanese yen, and so on. The Vue I18n plugin enables you to format numbers using different currency formats based on the currently chosen locale. We have to provide these formatting rules manually, but the plugin does the heavy lifting for us.
To format numbers, we use the n function, so make sure to define it:
<script setup>import { useI18n } from 'vue-i18n'const { t, n } = useI18n()</script>
Now for the English locale, you'll see "$1,456.00" whereas for Latvian this sum will change to "1456,00 €".
Date and time
The final topic that we'll cover in this section is related to datetime localization. Thing is, different countries use different date and time formatting and we need to adapt the displayed information based on the currently set locale. Let's create yet another file called src/i18n/rules/datetime.js:
Here we are providing two formats: short and long. Of course, you can add as many formats as needed. Please refer to this document to learn about other formatting options.
Now use these rules in the src/i18n/index.js file:
To format datetime, we are using the d function, so don't forget to add it:
<script setup>import { useI18n } from 'vue-i18n'const { t, d } = useI18n()</script>
Try changing the longFormat to shortFormat to observe the differences.
Storing Vue 3 translations in JSON files
Please find more information on managing and translating JSON files in our tutorial.
Multiple Vue I18n translation files
We can keep all our translations in the i18n/index.js file, but at some point this becomes very inconvenient. Why?
Complexity with multiple languages: If you need to support many different languages, it becomes increasingly complex to navigate your translations.
Large apps: If your app is large, you might have hundreds or even thousands of translation keys, resulting in a huge JS file.
Translation lazy loading: It will be impossible to introduce translation lazy loading. Your users probably won't view your website in all the available locales; therefore, the translations should be loaded on demand to optimize performance. We'll see how to implement lazy loading later in this article.
Professional translators: You might need to hire professional translators to add and/or review your texts. However, translators are usually less technically savvy than software developers, and they might have problems modifying JS files (they might even unintentionally break something).
Exporting to a TMS: At some point you might want to use a translation management system (like Lokalise). Keeping all translations inside a JS file makes it much harder to export, sync, or import updates. Storing translations as separate JSON files keeps the structure clean and makes TMS integration straightforward.
To overcome all these problems, I recommend storing all your translations in separate JSON files. For now, we're going to be using a "one locale, one file" approach, but as your app grows, you can separate translations into smaller files.
First, create the src/i18n/locales/en.json file and place all English translations inside it:
{ "nav": { "home": "Home", "about": "About" }, "home": { "header": "Welcome to the Vue 3 I18n tutorial!", "created_by": "This tutorial was brought to you by {company}.", "num_visits": "This page hasn't been visited :( | This page has been visited {n} time | This page has been visited {n} times" }, "about": { "header": "About us", "donations": "Donations raised: {donations}" }}
Note that we don't need to provide the top-level en key anymore.
And here are the contents of the src/i18n/locales/lv.json file:
{ "nav": { "home": "Sākums", "about": "Par mums" }, "home": { "header": "Laipni lūdzam Vue 3 I18n ceļvedī!", "created_by": "Šo ceļvedi jums sagatavoja {company}.", "num_visits": "Šī lapa vēl nav apmeklēta :( | Šī lapa ir apmeklēta {n} reizi | Šī lapa ir apmeklēta {n} reizes" }, "about": { "header": "Par mums", "donations": "Ziedojumu savākts: {donations}" }}
These files won't be loaded automatically, so let's import them in the src/i18n/index.js file and use their translations:
// ... other imports ...import en from "./locales/en.json" // <--- add thisimport lv from "./locales/lv.json" // <--- add thisexport default createI18n({ locale: import.meta.env.VITE_DEFAULT_LOCALE, fallbackLocale: import.meta.env.VITE_FALLBACK_LOCALE, messages: { en, // <--- add this lv, // <--- add this }, pluralRules, numberFormats, datetimeFormats})
Finally, remove the old messages variable from the i18n/index.js file.
From the user's perspective, nothing has changed. However, we've neatly organized our translations and made an important step toward lazy loading. Nice!
Uploading translation files to Lokalise
Managing translations for multiple languages can get messy really fast, especially as your project grows. Even with all the modern AI tools, things are not as simple as "press translate and forget". AI is great, and everyone uses it now, but there are a few real-world problems:
AI doesn’t know your brand voice by default. It won’t magically keep the tone you want (formal, casual, friendly, technical, etc.) unless you teach it.
AI doesn’t know your terminology or product specifics. If your app has special terms or vocabulary, an AI model can easily mistranslate them or make the wording inconsistent across pages.
Context matters. AI often translates strings in isolation and might choose the wrong gender, wrong form, or wrong meaning if it doesn’t see the wider picture.
This is exactly where a proper translation management system becomes essential. Meet Lokalise, a modern TMS built for both humans and AI workflows. It gives you:
Style guides to define tone, voice, and writing rules. AI and human translators can follow the same style.
Glossaries to keep product terms consistent across all languages.
Custom AI profiles that learn from your existing translations and translation memory, so the AI translates with your context, not generic internet phrasing. Moreover, we offer smart routing to pick the best LLM for the task.
Bulk translation tasks: select many keys at once, apply an AI translation pass, and review everything in a clean interface.
Human review layers: after AI does the initial translation, you can assign a linguist or reviewer to check and fix the output.
Complex workflows without coding: approvals, QA steps, reviews, automated checks — everything is configurable.
Integrations with 50+ tools so your translations sync automatically (GitHub, GitLab, Figma, Contentful, and many others).
Throughout this section, I’ll briefly show how to get started with Lokalise. For now, you’ll need to go through the following steps:
Generate a new read-write token (make sure to keep it safe!).
Open the projects dashboard by clicking the Lokalise logo in the side menu and press New project.
Choose Web and mobile project type.
Give your project a name (for example, “Vue i18n demo”) and set English (en) as the base language. Make sure the language code exactly matches the one used in your Vue app. For example, if your main locale is fr_FR in Vue, you must choose French (France, fr_FR) as the base language in Lokalise.
Pick one or more target languages — your additional locales. I'll select Latvian (lv).
Hit Create once you're ready.
You’ll be taken to the project dashboard. From the top menu, choose More > Settings. On that page, find your project ID and make a note of it.
That’s basically it: our Lokalise setup is ready. The only thing missing is actual content, so let’s fix that. There are several ways to upload translation data into Lokalise:
The UI (just click Upload in the top menu)
Lokalise CLIv2
Lokalise API
One of the integrations (for example, the GitHub app if your code lives on GitHub)
In this tutorial, we’re going to use the lokalise-node-file-exchange package — a tool I created to make sending and retrieving translation files from Lokalise much easier. First, install it:
npm install lokalise-file-exchange
Now let's create a separate .env.local file in the project root with the following content:
Make sure to exclude this file from version control. Theoretically, you could paste this content inside the .env file we've created earlier but I'd like to keep things logically separated. If you decide to stick with the .env file make sure not to prefix sensitive items with VITE_ — otherwise your API token will be visible to everyone!
Let's create a new script under tools/i18n/upload.js:
import { existsSync } from "node:fs";import { loadEnvFile } from "node:process";import path from "node:path";import { LokaliseUpload } from "lokalise-file-exchange";const envFile = '.env.local';if (existsSync(envFile)) { loadEnvFile(envFile);}// Load Lokalise API token and project ID from environment variablesconst apiKey = process.env.LOKALISE_API_TOKEN;const projectId = process.env.LOKALISE_PROJECT_ID;if (!apiKey || !projectId) { console.error("Missing LOKALISE_API_TOKEN or LOKALISE_PROJECT_ID in .env.local"); process.exit(1);}async function main() { // Initialize LokaliseUpload client const lokaliseUploader = new LokaliseUpload( { apiKey, enableCompression: true, }, { projectId, }, ); const uploadFileParams = { replace_modified: true, // Replace modified files on Lokalise }; const localesPath = path.resolve("src/i18n/locales"); const collectFileParams = { inputDirs: [localesPath], // Absolute path to the "locales" directory extensions: [".json"], // Collect only JSON files recursive: false, // Only collect files in the root directory }; const processUploadFileParams = { pollStatuses: true, // Wait for file processing to complete on Lokalise }; try { const { processes, errors } = await lokaliseUploader.uploadTranslations({ uploadFileParams, collectFileParams, processUploadFileParams, }); for (const process of processes) { console.log("Created At:", process.created_at); console.log("Status:", process.status); console.log("Details:", process.details); console.log("==="); } if (errors.length > 0) { console.error("Errors during upload:"); for (const error of errors) { console.error(error); } } } catch (error) { console.error("Unexpected error:", error); }}main().catch((err) => { console.error("Unhandled error:", err); process.exit(1);});
Here we configure main options, ask the uploader to wait until the operation completes, and print some debug info.
Once the operation completes, return to Lokalise and make sure your content is there. Great! Later I'll show you how to translate into additional locales and download everything back to the Vue project.
Switching locales in a Vue 3 app
The next big feature that we're going to implement is the ability to switch the currently set locale and persist it inside the page URL. We'll also see how to change the language dynamically.
Introducing the language switcher for Vue i18n
First things first: we should create a new component that allows choosing of the app language. This component will live inside the src/components/LanguageSwitcher.vue file. Let's perform some initial setup as follows:
You've already seen the t function, but the locale object is new. Basically, it represents the currently set locale and we can use it to switch language in the following way: locale.value = newValue.
Now we should discuss two important matters: how to display the list of all the supported locales and how to set a new locale properly.
Listing the available locales
Speaking of the first question, there are at least three answers (yep, there’s always more than one). The simplest thing we could do is extract all the available locales from the global scope:
Then, the availableLocales can be used in the component to properly build a collection of options for the select tag. This will work in our current setup because we load all the translations when creating an I18n instance. However, once we introduce lazy loading, this approach becomes unreliable: at startup only one locale is loaded, so availableLocales won’t contain the full list.
Alternatively, we can add a new environment variable to the .env file:
VITE_SUPPORTED_LOCALES=en,lv
Then you'll need to read this value and split locales like import.meta.env.VITE_SUPPORTED_LOCALES.split(","). This works, but it’s a bit clunky, and you must remember to update the list every time you add or remove a locale.
The third approach is to scan the locales directory and build the list dynamically based on your translation files — which means adding a new language is as simple as adding a new file. This solution is more involved but probably the most flexible, therefore let's stick to it. Add a new src/i18n/manager.js file with the following content:
We return an array with all the support locales so that it can be iterated over it inside the component.
Note: this example assumes you have one JSON file per locale, like en.json, lv.json, etc. If you prefer splitting one language into multiple files (for example common.json, nav.json, home.json), a good structure is:
In that case, the scanning logic should look for folders (locale codes) instead of JSON filenames, and the code needs a small tweak.
Now use this method within the LanguageSwitcher.vue component:
<template></template><script setup>import { useI18n } from 'vue-i18n'import I18nManager from '@/i18n/manager'const { t, locale } = useI18n()const supportedLocales = I18nManager.supportedLocales</script>
So far, so good.
Performing locale switching
And what about locale switching? Actually, the locale object can be treated as a model so theoretically you can build a dropdown with all supported languages and bind it directly:
watch(locale, (newLocale) => { // set the new locale})
This works fine for a basic, fully preloaded i18n setup. However, there's a problem: later we want to introduce lazy loading for translation files and update the page URL to display the new locale code. Therefore, simply watching the locale changes won't work. Instead, we are going to use a special change action, bind it to the select tag, and perform all the necessary steps once a new item has been selected.
Here, we're iterating over all the available locales and displaying their names. I'd like to translate the language names, so let's add new translations to the src/i18n/locales/en.json file:
Open the src/i18n/manager.js file and add the following lines of code:
let _i18n = null;const I18nManager = { init(i18nInstance) { if (!i18nInstance?.global?.locale) { throw new Error("I18nManager.init: invalid i18n instance"); } _i18n = i18nInstance; }, async setLocale(newLocale) { if (!_i18n) throw new Error("I18nManager.setLocale called before init"); const current = _i18n.global.locale.value; if (current !== newLocale) { _i18n.global.locale.value = newLocale; } document.documentElement.lang = newLocale; },};
setLocale accepts the newly chosen language. It sets the locale and adjusts the lang attribute for the html tag. Here you can also implement right-to-left text orientation for certain languages like Hebrew or Arabic.
Note that inside the manager we use an "injected" i18n object, so let's call init() in the main.js file:
import "./assets/main.css";import { createApp } from "vue";import App from "./App.vue";import router from "./router";import i18n from "./i18n";import I18nManager from "./i18n/manager";const app = createApp(App);I18nManager.init(i18n);app. use(router). use(i18n);app.mount("#app");
Great job! Now you can open your app and use the switcher component to change the currently set language. We can do even better though, so let's move on. Just a quick note: if you're using Lokalise, make sure to upload new keys to the platform by running:
npm run lokalise:upload
Downloading translation files from Lokalise
Let's also create a new script to download translations from Lokalise. Create a new tools/i18n/download.js file:
import { existsSync } from "node:fs";import { loadEnvFile } from "node:process";import path from "node:path";import { LokaliseDownload } from "lokalise-file-exchange";const envFile = '.env.local';if (existsSync(envFile)) { loadEnvFile(envFile);}// Load Lokalise API token and project ID from environment variablesconst apiKey = process.env.LOKALISE_API_TOKEN;const projectId = process.env.LOKALISE_PROJECT_ID;if (!apiKey || !projectId) { console.error("Missing LOKALISE_API_TOKEN or LOKALISE_PROJECT_ID in .env.local"); process.exit(1);}async function main() { const lokaliseDownloader = new LokaliseDownload( { apiKey, enableCompression: true, }, { projectId, }, ); const downloadFileParams = { format: "json", // Format of downloaded translations original_filenames: true, // Keep original filenames from Lokalise indentation: "2sp", // Indentation style placeholder_format: "icu", // Preserve original placeholder format directory_prefix: "", // Directory structure prefix (optional) }; const extractParams = { outputDir: "./", // Target directory for extracted files }; console.log("Starting the download..."); await lokaliseDownloader.downloadTranslations({ downloadFileParams, extractParams, }); console.log("Download completed successfully!");}main().catch((err) => { console.error("Unhandled error:", err); process.exit(1);});
That's it! The downloader will automatically extract your JSON files into the proper directory replacing the existing translations. Let's add a new script for convenience:
We always use the English locale by default, without checking the user's preference first.
We do not store the user's preferred locale once the language is switched.
We'll actually start with the second issue and persist the chosen locale by saving it into the local storage. Modify the src/i18n/manager.js file as shown here:
const I18nManager = { // ... async setLocale(newLocale) { if (!_i18n) throw new Error("I18nManager.setLocale called before init"); const current = _i18n.global.locale.value; if (current !== newLocale) { _i18n.global.locale.value = newLocale; } document.documentElement.lang = newLocale; localStorage.setItem("user-locale", newLocale); },};
"Guessing" the preferred locale
Now we need to try and "guess" the user's preferred locale using the following approach:
If the preferred locale is found in the local storage and this locale is actually supported by the app, switch to this language.
Otherwise, read the preferred language sent by the browser (detect browser language).
If the preferred language is not available or is not supported, revert to the default locale, which is English in our case.
Let's add a bunch of new methods into the same manager.js file:
The isLocaleSupported method checks whether the locale is present in the list of all the available locales.
Inside the getUserLocale(), we read the preferred language sent by the browser. Next, we return this language in two "flavors": with and without the region code. Thing is, locales might contain the region part written in the following way: en-US, ru-RU, fr-BE, and so on. The region part represents a country or region where the language is spoken because sometimes the differences are quite significant (compare US English to British English, for instance). In our case, the supported locales do not contain the region part but who knows what the future will bring. To cover both scenarios, we'll compare the preferred language with and without the region code (with prior normalization) to understand whether we can support it or not.
getPersistedLocale() reads the local storage and checks whether the persisted locale is supported by the app.
Finally, normalizeLocale() converts the requested locale to lowercase and replaces dashes with underscores (feel free to tweak this logic further but be aware that Lokalise uses underscore notation to separate locale and region).
Next, add the method to set the proper locale based on all the gathered information:
One last thing I'd like to tweak here (yeah, there's always that "last thing" to fix), is the supportedLocales() getter. Let's implement a simple caching to avoid re-creating the same list multiple times:
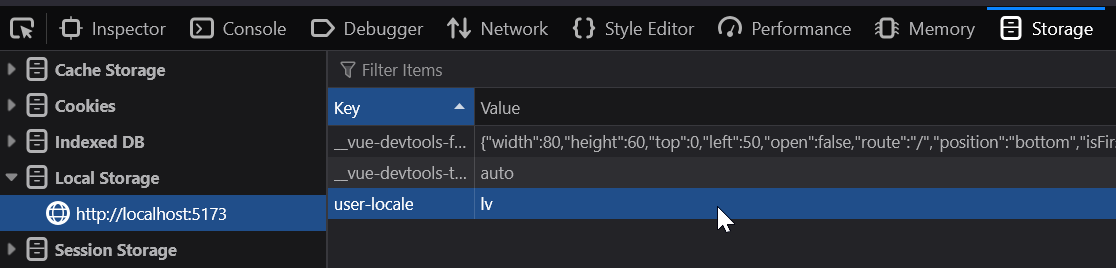
To see this new feature in action, try changing the locale using the switcher, then open your debugger, and view the locale storage contents.
There's a new problem, however: even though we have a method to "guess" a locale... we never actually call it anywhere! But don't worry, we'll fix that in a moment.
Locale code in the page URL
Vue Router language prefix
To properly handle setting the preferred locale, first I'd like to modify our routes so that the current locale is displayed in the URL.
Open the src/routes/index.js file and make the following changes:
Add a new parent path. The :locale is an optional parameter so we add the ? postfix. It means that all of the following routes are correct: /en/about, /ru/, /about. If the locale is not explicitly set, we'll try to "guess" it using the method defined previously.
We will use the RouterView to display our views.
All other routes will be within the children property.
This path changes from '/' to just '' because it's a child route.
Same change here; remove the forward slash.
Having made these changes, let's proceed to the next section.
Adding the beforeEnter hook to support Vue 3 i18n
Now the locale code can be part of the URL, but we don't do anything with it. Thus, let's introduce the beforeEnter hook in the src/routes/index.js file:
Here we are reading the locale code from the URL and checking if it's supported by the app. If not, we "guess" the locale and redirect the user to the corresponding route. If it is supported, we switch to it and proceed to the requested page.
To test this feature, try changing the locale code directly within the URL. For example, try entering en, lv, an unsupported locale, and no locale at all: every case should be properly handled. Nice — now we know how to change the language dynamically in our app!
Rewriting the URL on locale switch
There's one last thing that we should take care of. Currently, when the user switches the locale the URL is not being updated. In other words, if you visit the /en/about page and switch the language to Latvian, the URL won't update to /lv/about, which is not good. Let's deal with this issue as well!
Open the src/components/LanguageSwitcher.vue file and make the following changes to the script:
Replace our URL to the history, and add the requested locale.
If something goes wrong, redirect the user to the root page.
Try switching the language using the dropdown and note that the URL is properly updated. Cool, right?
Displaying the locale in the router links
If you think our job is done, you're mistaken. But brace yourself, we're nearly there. Another thing that I wanted to fix is our router links in the src/components/Nav.vue that do not contain language codes in the generated links. Of course, we can simply use the locale object and interpolate the locale's value, but let's use a slightly different approach.
Open the src/i18n/manager.js file and add a new helper function and a getter:
We're using the helper function and the named route to build a proper link. Now the links contain the locale!
Lazily loading Vue 3 translation files
The very last feature that we're going to implement today is lazy loading for our translation files. As previously explained, it makes little sense to import all the translations when the app is loaded because most likely the user won't need all of them. Instead, let's load the necessary files when the language is switched. To achieve this, modify the src/i18n/manager.js file:
import { nextTick } from "vue";const localeModules = import.meta.glob('./locales/*.json');let supportedLocalesCache = null;let _i18n = null;const loadedLocales = new Set();const loadingPromises = new Map();const I18nManager = { async setLocale(newLocale) { if (!_i18n) throw new Error("I18nManager.setLocale called before init"); const current = _i18n.global.locale.value; await this.loadLocaleMessages(newLocale); if (current !== newLocale) { _i18n.global.locale.value = newLocale; } document.documentElement.lang = newLocale; localStorage.setItem("user-locale", newLocale); }, async loadLocaleMessages(locale) { if (!_i18n) throw new Error("I18nManager.loadLocaleMessages called before init"); if (loadedLocales.has(locale)) return; if (loadingPromises.has(locale)) return loadingPromises.get(locale); const key = `./locales/${locale}.json`; const loader = localeModules[key]; if (!loader) throw new Error(`Locale file not found: ${locale}`); const p = (async () => { const messages = (await loader()).default; _i18n.global.setLocaleMessage(locale, messages); loadedLocales.add(locale); await nextTick(); })().finally(() => loadingPromises.delete(locale)); loadingPromises.set(locale, p); return p; }, // ...}
Main things to note:
Import the nextTick function.
Load translation files before the locale is switched.
Import the necessary JSON file, use the loaded messages, and return nextTick saying that the translation data is ready to be used.
To prevent loading the same file multiple times, we use set and map.
Also, open the src/i18n/index.js file and modify it like so:
import { createI18n } from "vue-i18n"import pluralRules from "./rules/pluralization"import numberFormats from "./rules/numbers.js"import datetimeFormats from "./rules/datetime.js"// don't import locales here!export default createI18n({ locale: import.meta.env.VITE_DEFAULT_LOCALE, fallbackLocale: import.meta.env.VITE_FALLBACK_LOCALE, pluralRules, numberFormats, datetimeFormats})
As you can see, we've don't load messages here anymore. However, when the app is mounted we must have messages for at least one language, therefore let's slightly adjust the main.js file:
Here we are reading the current locale from the location or try to pick the best candidate. Then we switch locale and, consequently, load the corresponding language files.
You can also remove the include param from the VueI18nPlugin inside vite.config.js. For example, you can simply say:
import { fileURLToPath, URL } from 'node:url'import { defineConfig } from 'vite'import vue from '@vitejs/plugin-vue'import vueDevTools from 'vite-plugin-vue-devtools'import VueI18nPlugin from '@intlify/unplugin-vue-i18n/vite'export default defineConfig({ plugins: [ vue(), vueDevTools(), VueI18nPlugin(), ], resolve: { alias: { '@': fileURLToPath(new URL('./src', import.meta.url)) } }})
To test this feature, open the English version of the app by navigating to localhost:5173/en. Then open your debugger and switch to the Latvian language. You should see the lv.json file being loaded under the Network tab:
Awesome! At this point our app is translated into two languages, it has a language switcher and locale detection, as well as a translations lazy loading feature.
Adding more languages and translating with AI
In this section I'll show you how to easily translate your app into multiple languages with the help of modern AI and how to implement complex workflows.
Context is the king
As already mentioned before, AI struggles without context — even the best model will guess wrong if it doesn’t understand the meaning, tone, target audience, or domain-specific vocabulary of your app. To make translations consistent and not accidentally break your UX or brand voice, you need to give the AI enough guardrails.
Lokalise gives you the tools for that out of the box:
Build glossary. In the top menu open Glossary and add the terms that must be translated consistently. Examples:
Product names
UI-specific phrases
Domain terminology
Words that should never be translated
Add a style guide. It's available in the side menu under the Style guide tab. Here you define:
Tone of voice (formal / casual / neutral)
Writing style
Formatting rules
Things to avoid
Examples of correct vs wrong translations
Create a custom AI profile. Go to Team settings > Custom AI profiles. Here you can:
Feed it your existing translations as examples (super important as it learns your phrasing)
Enable dynamic routing so Lokalise auto-selects the best engine for the task
Add a new project language
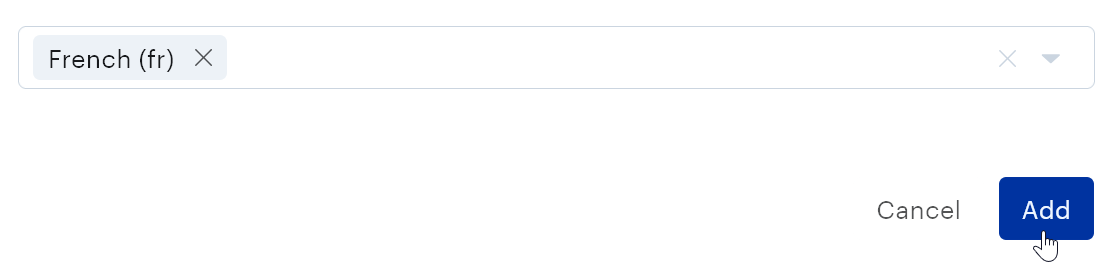
Now suppose we would like to translate our app into a new language — French. So, open your Lokalise project, click on the languages dropdown in the top menu, and click New language. Next, pick French (fr) from the dropdown and click Add. Of course, you can select as many languages as needed, just make sure to use proper locale codes.
Creating translation workflow and implementing review cycle
At this point you could simply assign a new task to the AI and wait for it to finish. But let’s make things more interesting and build a full-fledged workflow with a proper review cycle. The idea is pretty simple:
Every week the workflow runs automatically
It uses AI to translate all untranslated keys into Latvian and French (super convenient if you keep adding new strings)
After the AI pass, it automatically creates a review task for a human to verify the translations
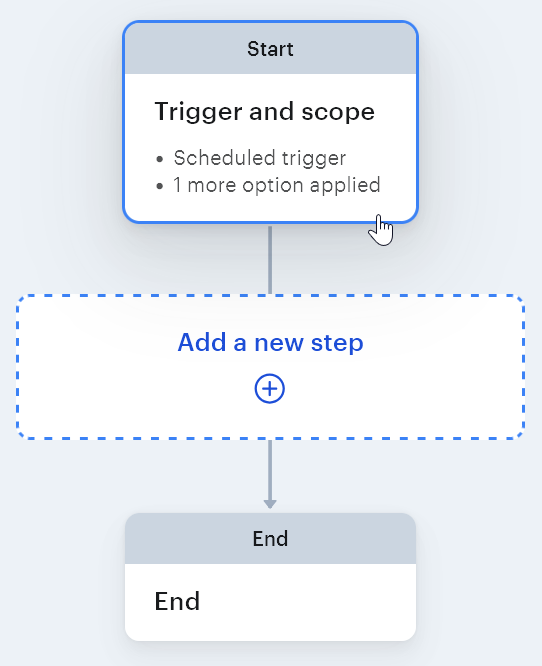
And the best part? We can set all of this up in Lokalise workflows with just a few steps! So, open your Lokalise project and click Workflows in the top menu. Then, click Create workflow. You can pick an existing template or start from scratch. Let's choose Create a custom workflow, press Preview, and then Create. You'll be navigated to a simple visual editor that enables you to adjust the workflows steps:
First, open the Trigger and scope step. This is where you control how often the workflow runs and which languages it covers. Adjust the following options:
Starts on — choose the date and time for the first run (you can still trigger the workflow manually anytime).
Run frequency — pick hourly, daily, weekly, or monthly.
Repeat every — fine-tune the interval (every two weeks, every three days, every hour, etc.).
Timezone — select which timezone the schedule should follow.
Target languages — choose the locales to translate into. I’ll use Latvian and French.
Monitored keys — decide which keys should be watched by the workflow. I’ll select Newly added and updated.
Filters (optional) — for example, you can process only keys with a specific tag.
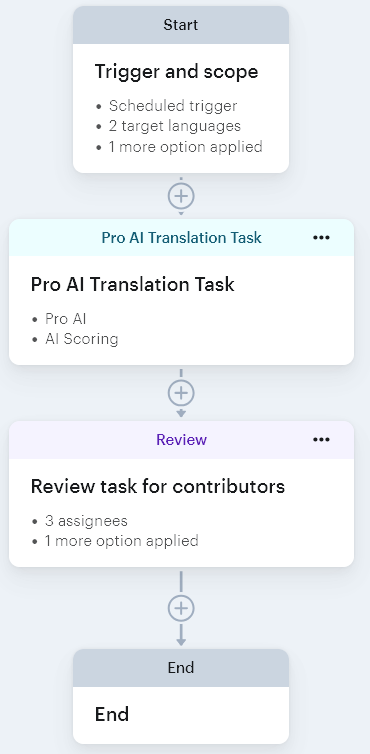
That’s all for the Trigger and scope. Now click Add new step and choose Translate with Pro AI. You don’t have to tweak this step, but you can rename the task or add instructions if needed. Just keep in mind: it’s not recommended to use task descriptions as a place for detailed AI guidance — use your glossary, style guides, and custom AI profiles instead.
Next, click the plus button again to add another step: Create review task for contributors. This step also comes with sensible defaults, but you can adjust the due date, pick which languages require review, and select assignees per language (by default, you’ll be assigned to all of them).
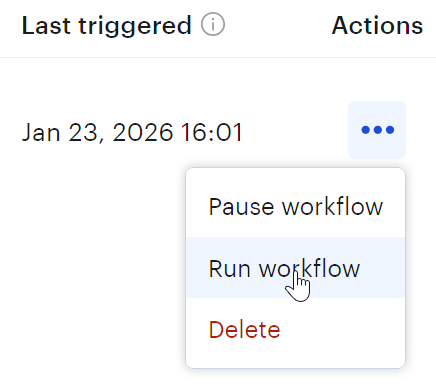
Feel free to customize the workflow further. When everything looks good, click Activate workflow in the top menu. If you don’t want to wait until the scheduled time, you can run it instantly via Run workflow in the Actions menu.
There’s one small caveat: workflows only track new and updated keys. So let’s return to the Editor, select all translation keys, and delete them. After that, use your upload script to push all the content again. If you only need a one-off translation, creating a single translation task is perfectly fine, but here we’re building a more advanced workflow for projects where content changes regularly.
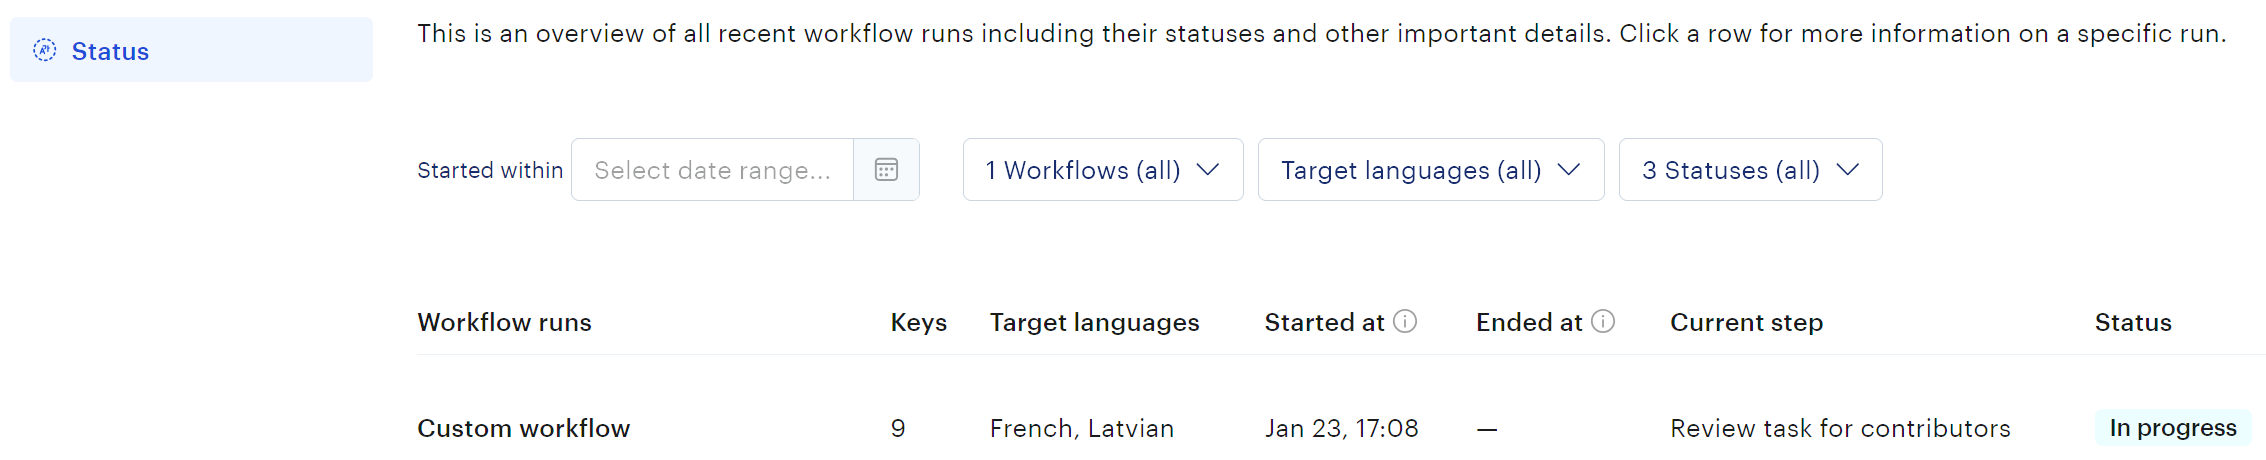
Once your content is re-uploaded, trigger the workflow manually and you’ll be able to monitor its progress under the corresponding tab.
When the workflow finishes, all untranslated keys should now be localized into French, and a new review task will be assigned to the contributors you selected. On top of that, AI will automatically apply translation scoring so that you can easily understand if the text has any issues.
You don’t have to wait for the review task to be completed: you can export the new content immediately by running the download script. You’ll notice a new fr.json file in your locales folder, which means the new language is successfully generated. Simply reload your Vue app and you should see the updated translations in place.
Heads up: you’ll still need to add datetime, number, and pluralization rules for any new locale as these won’t magically appear in your Vue app. But by this point you already know the drill, so it should be straightforward. If you want to see one possible implementation, feel free to check the source code for this tutorial.
Adding more content
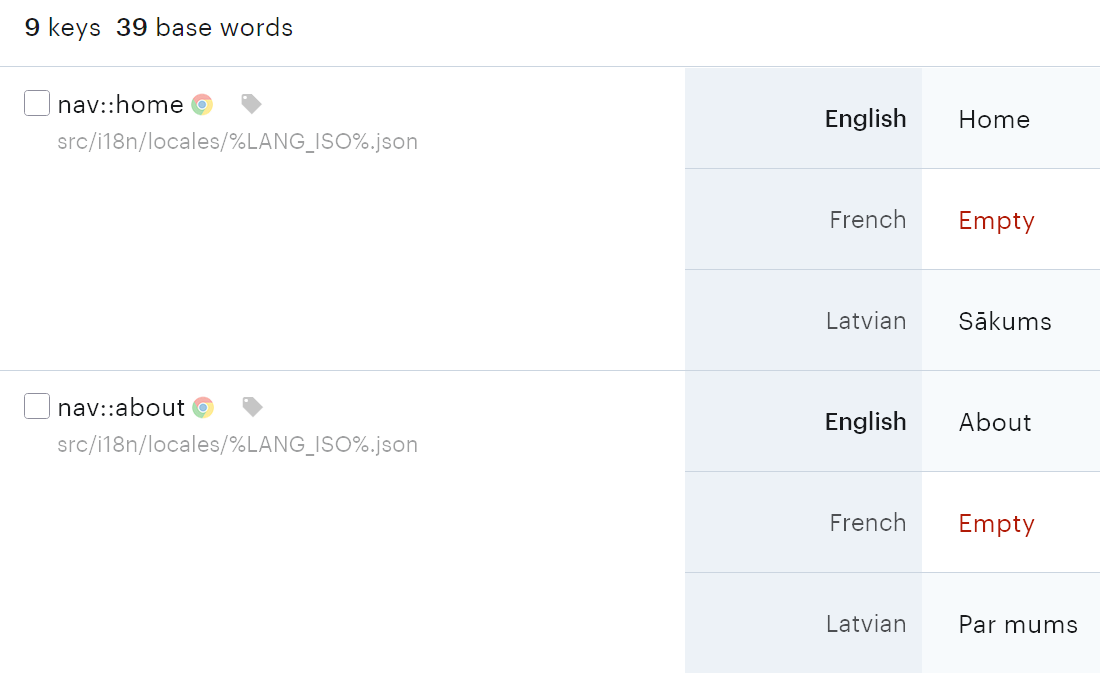
After rebooting the app, you’ll notice that the French locale is not properly displayed in the language dropdown. That’s quite expected as we simply haven’t added the corresponding key yet! Let’s fix that inside Lokalise.
Navigate to the editor and click Add key. You'll be presented with the key editor dialog:
Key name — locale::fr. Use this exact format so the nesting works correctly.
Base language value — set to "French".
Platforms — choose "Web" (default platform for JSON files).
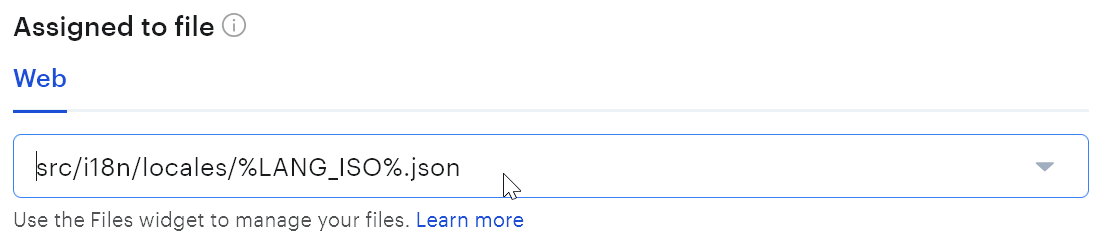
Next, switch to the Advanced tab and locate the Assigned to file section. Select your JSON file from the dropdown (it should look like src/i18n/locales/%LANG_ISO%.json):
Once everything is set, click Create.
Feel free to add more keys using the same steps. After that, re-run your workflow (or wait for the next scheduled run) and download the updated translations using your script.
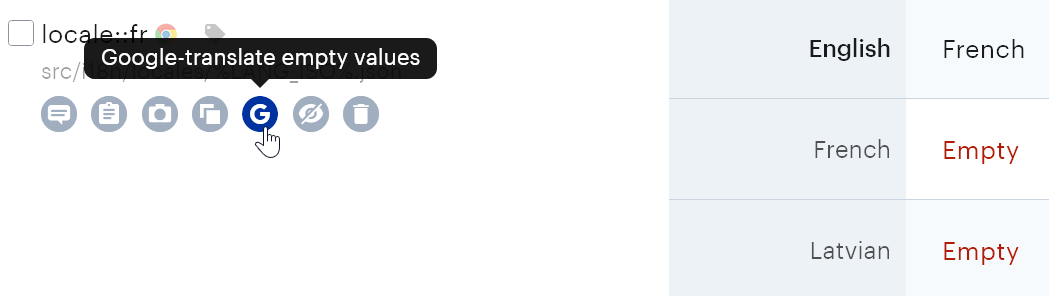
If you just want to fill in a missing translation quickly, you can also use the Google-translate empty values action under your key. Handy for quick testing:
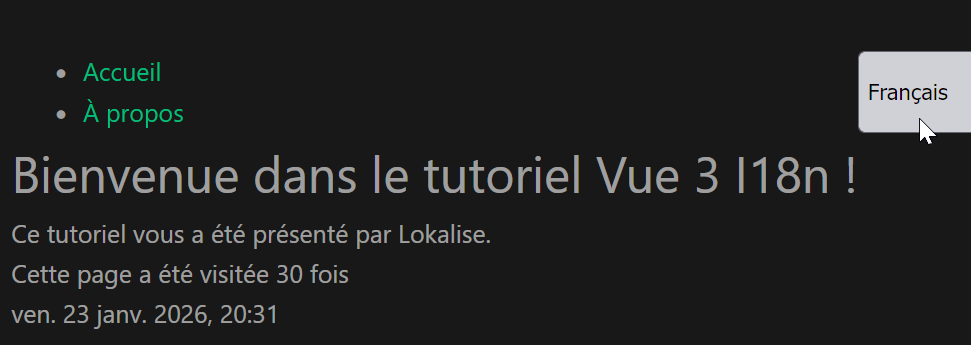
And so here's our final result:
Brilliant job!
Taking translation automation to the next level
Believe it or not, this is still just the beginning; we've barely scratched the surface of what Lokalise can automate for you. There are far more tools available than I could reasonably fit into a single article (a whole book would be more realistic). But here are a few ideas to explore:
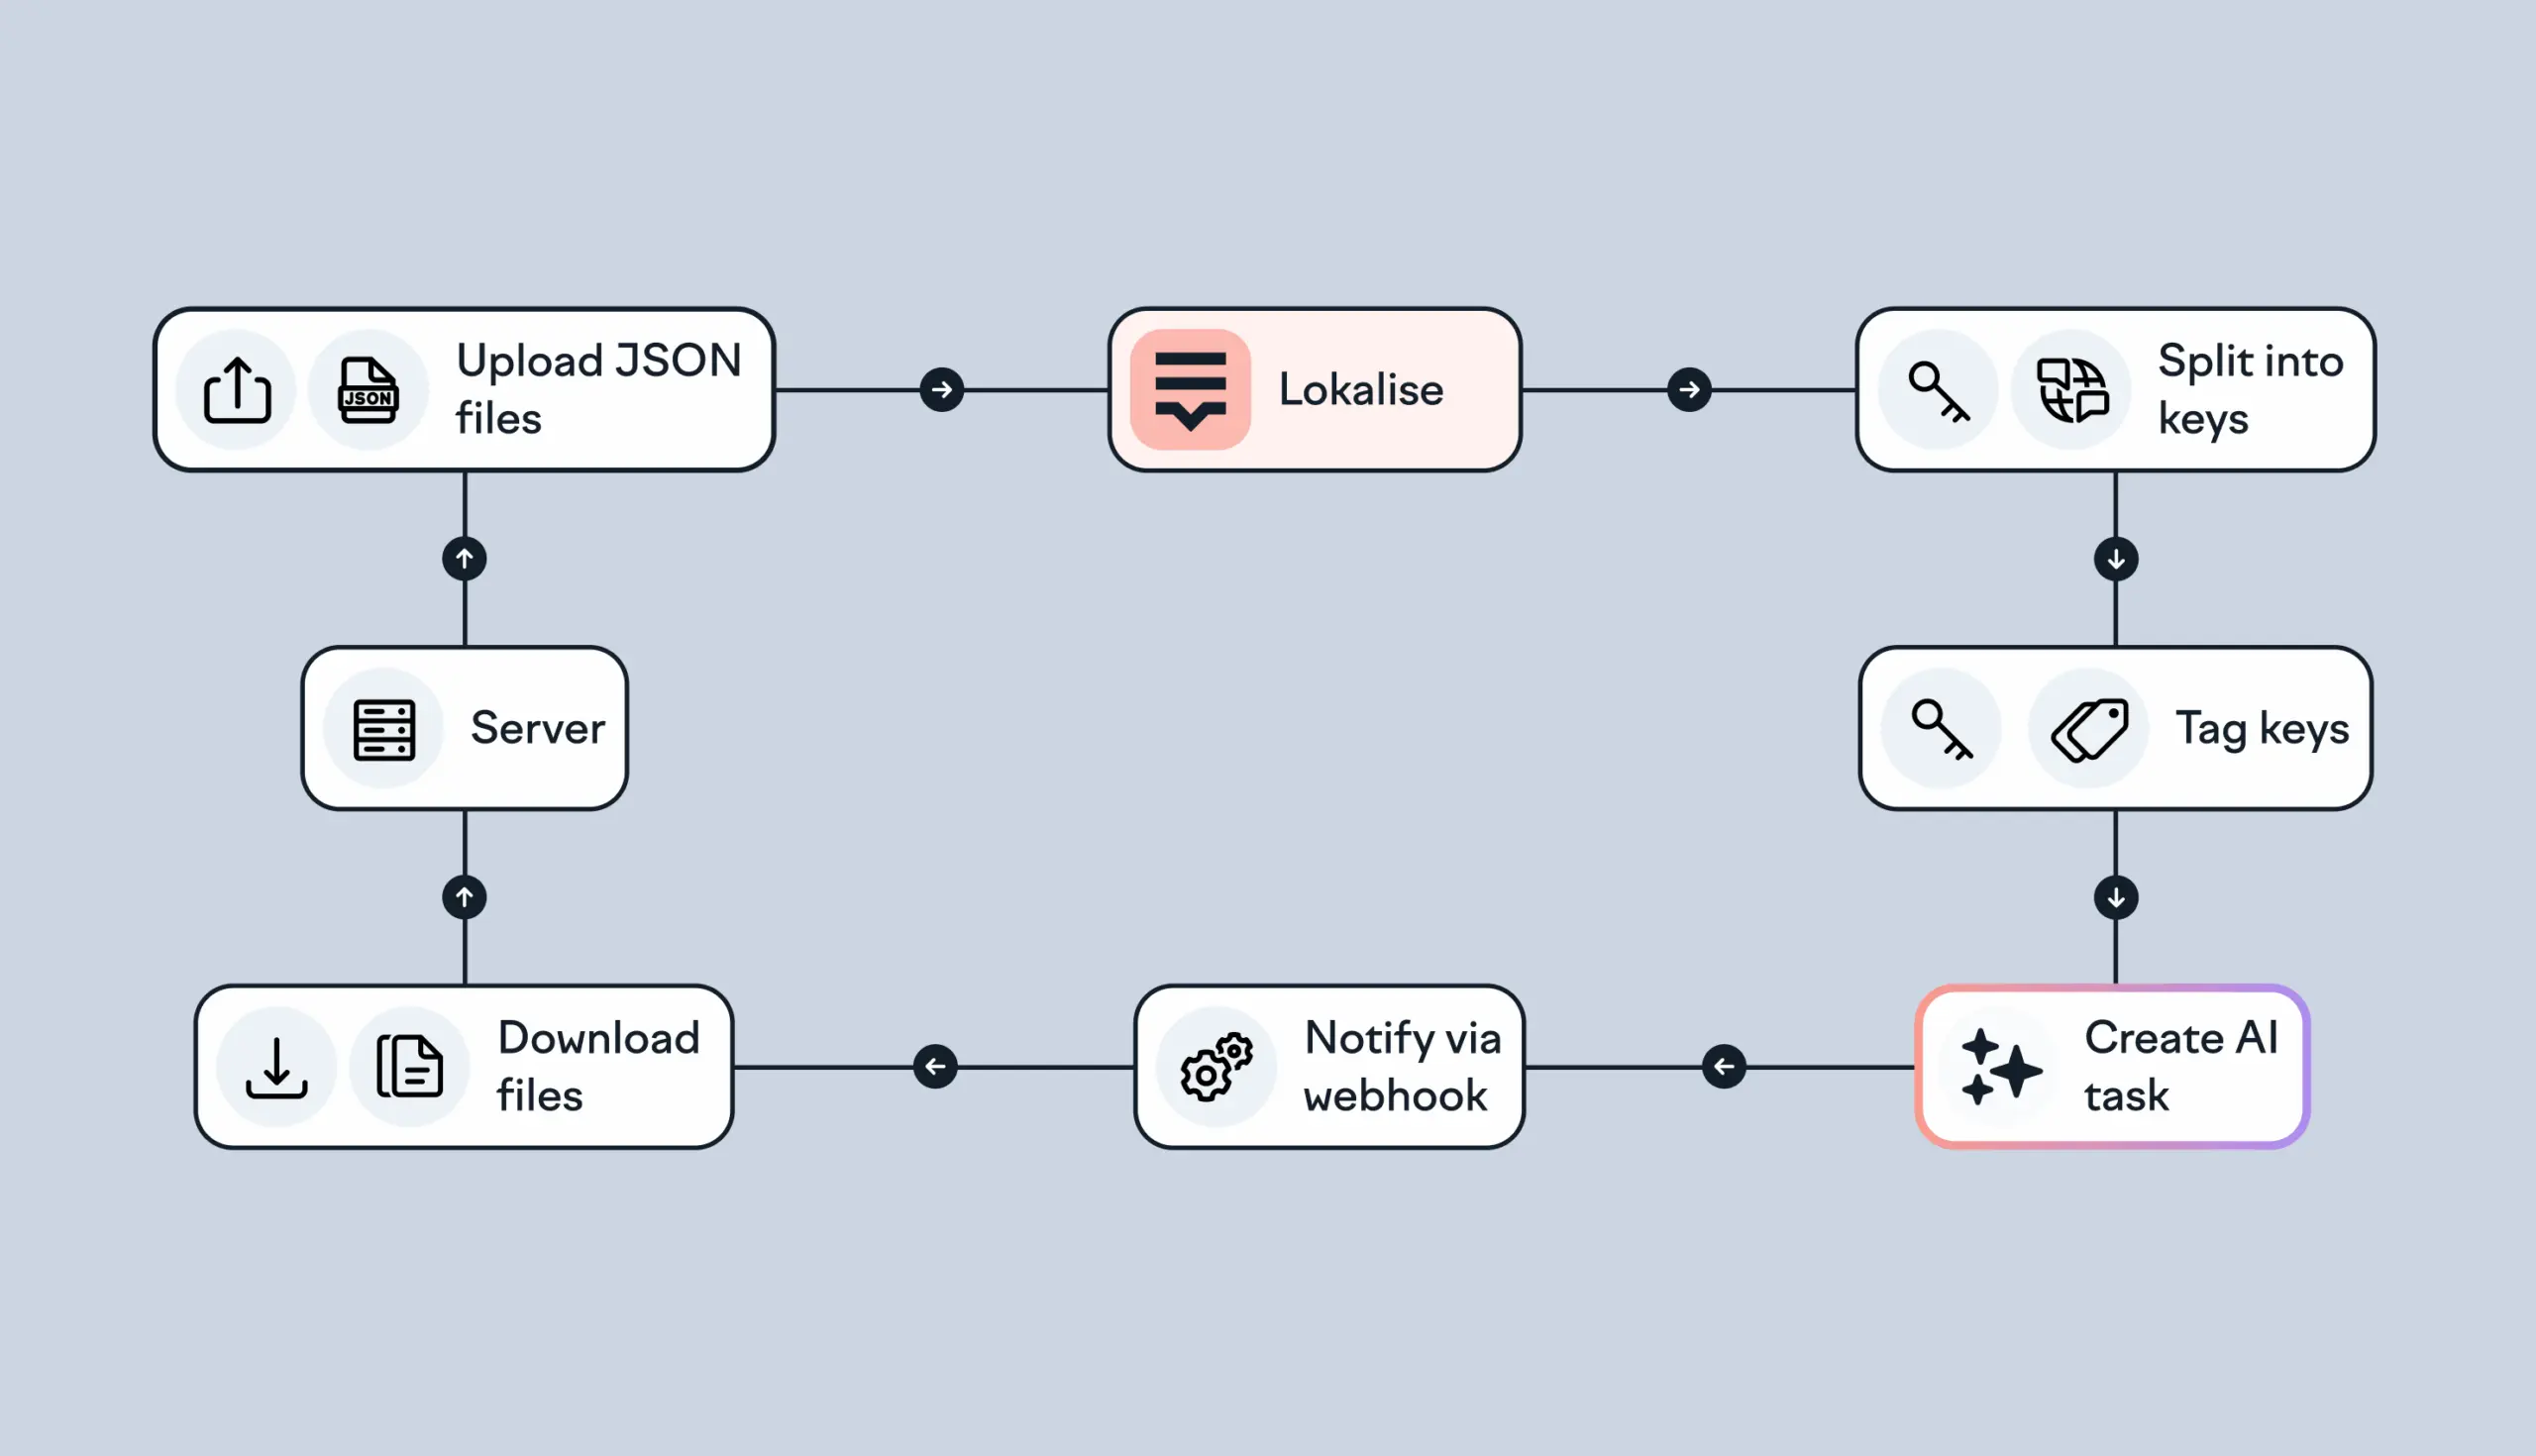
Enhance your upload/download scripts. You can integrate them into cron jobs, CI pipelines, or custom tooling so new content is automatically pushed or pulled on a schedule.
React to webhook events. Your app or backend can subscribe to Lokalise webhooks such as “task completed” or “keys updated”. When the event fires, you can automatically run your download script, trigger a deployment, or notify your team.
Use GitHub, GitLab, Bitbucket, or Azure integrations. Lokalise also supports auto-pull, which lets the platform automatically fetch translation files from your repository whenever you push changes. You simply add a webhook in your GitHub (or GitLab/Bitbucket/Azure) repository and point it to the Auto-pull URL generated in Lokalise. After that, every time you push to the repo, Lokalise receives the webhook event and pulls the updated files into your project without any manual action.
Leverage open-source GitHub Actions. Our official actions can push and pull content, run on schedules, sign commits, apply custom post-processing, or plug into complex CI workflows. They’re flexible enough for most automation scenarios.
Build custom GitLab pipelines. If you prefer GitLab, you can assemble your own pipelines to sync content between Lokalise and your repo. I have a dedicated tutorial for that exact setup.
Designers can sync via Figma. The Figma integration lets designers preview UI with real content and push updates back to Lokalise without leaving the design tool.
Write custom processors. For advanced use cases, you can preprocess uploaded content or post-process downloaded files — for example, normalize placeholders, clean formatting, or enforce project-specific conventions.
As you can see, there’s plenty of room to scale your translation workflow to whatever level you need. Feel free to explore the documentation and Developer Hub further, and if you ever get stuck, don’t hesitate to reach out to support or your CSM.
Conclusion
So, in this article we explored how to properly implement internationalization in a Vue 3 application. We covered the fundamentals of the Vue I18n plugin, added language switching and automatic locale detection, adjusted our routing so the locale is preserved across navigation, and implemented lazy loading to keep the bundle lightweight. Along the way we also looked at how to structure a clean i18n setup, avoid common pitfalls, and prepare your app for multiple languages in a scalable way.
Thank you for staying with me, and until the next time!
Ilya is the lead for content, documentation, and onboarding at Lokalise, where he focuses on helping engineering teams build reliable internationalization workflows. With a background at Microsoft and Cisco, he combines practical development experience with a deep understanding of global product delivery, localization systems, and developer education.
He specializes in i18n architectures across modern frameworks — including Vue, Angular, Rails, and custom localization pipelines — and has hands-on experience with Ruby, JavaScript, Python, Elixir, Go, Rust, and Solidity. His work often centers on improving translation workflows, automation, and cross-team collaboration between engineering, product, and localization teams.
Beyond his role at Lokalise, Ilya is an IT educator and author who publishes technical guides, best-practice breakdowns, and hands-on tutorials. He regularly contributes to open-source projects and maintains a long-standing passion for teaching, making complex internationalization topics accessible to developers of all backgrounds.
Outside of work, he keeps learning new technologies, writes educational content, stays active through sports, and plays music. His goal is simple: help developers ship globally-ready software without unnecessary complexity.
Build a smooth translation pipeline with Lokalise and Vercel
Internationalization can sometimes feel like a massive headache. Juggling multiple JSON files, keeping translations in sync, and redeploying every time you tweak a string… What if you could offload most of that grunt work to a modern toolchain and let your CI/CD do the heavy lifting? In this guide, we’ll wire up a Next.js 15 project hosted on Vercel. It will load translation files on demand f
Hands‑on guide to GitHub Actions for Lokalise translation sync: A deep dive
In this tutorial, we’ll set up GitHub Actions to manage translation files using Lokalise: no manual uploads or downloads, no reinventing a bicycle. Instead of relying on the Lokalise GitHub app, we’ll use open-source GitHub Actions. These let you push and pull translation files directly via the API in an automated way. You’ll learn how to: Push translation files from your repo to LokalisePull translated content back and open pull requests automaticallyWork w
Building an AI-powered translation flow using Lokalise API and webhooks
Managing translations in a growing product can quickly become repetitive and error-prone, especially when dealing with frequent content updates or multiple languages. Lokalise helps automate this process, and with the right setup you can build a full AI-powered translation pipeline that runs with minimal manual input. In this guide, you’ll learn how to: Upload translation files to Lokalise automaticallyCreate AI-based translation tasksUse webhooks to downloa