In a previous article, we were discussing how to work with Lokalise APIv2 and perform common actions, like project creation, task assignment, file upload, and so on. However, in that post we employed regular user tokens to authenticate with the API, which might not always be desirable. In certain cases, your third-party app might need to interact with the API on behalf of multiple users. Of course, you can simply ask users to copy-paste their tokens but it's not very safe; these tokens do not expire and it's impossible to choose which actions the app will be able to perform. What would you do this case? Set up an OAuth 2 flow! This way, users will have to log in to your application via Lokalise and explicitly state that they allow the app to perform certain actions on their behalf. The list of actions will be displayed upon every sign-in and can be customized as needed.
In this article, we will learn how OAuth 2 works and how to implement an authentication flow with JS/Node, Python/Flask, and Ruby on Rails.
OAuth 2 is an authorization protocol that allows a user to grant third-party applications access to their information on another site. Simply put, a user can allow your app to perform certain actions on his or her behalf, for example to create projects, update translations, add new orders, and so on.
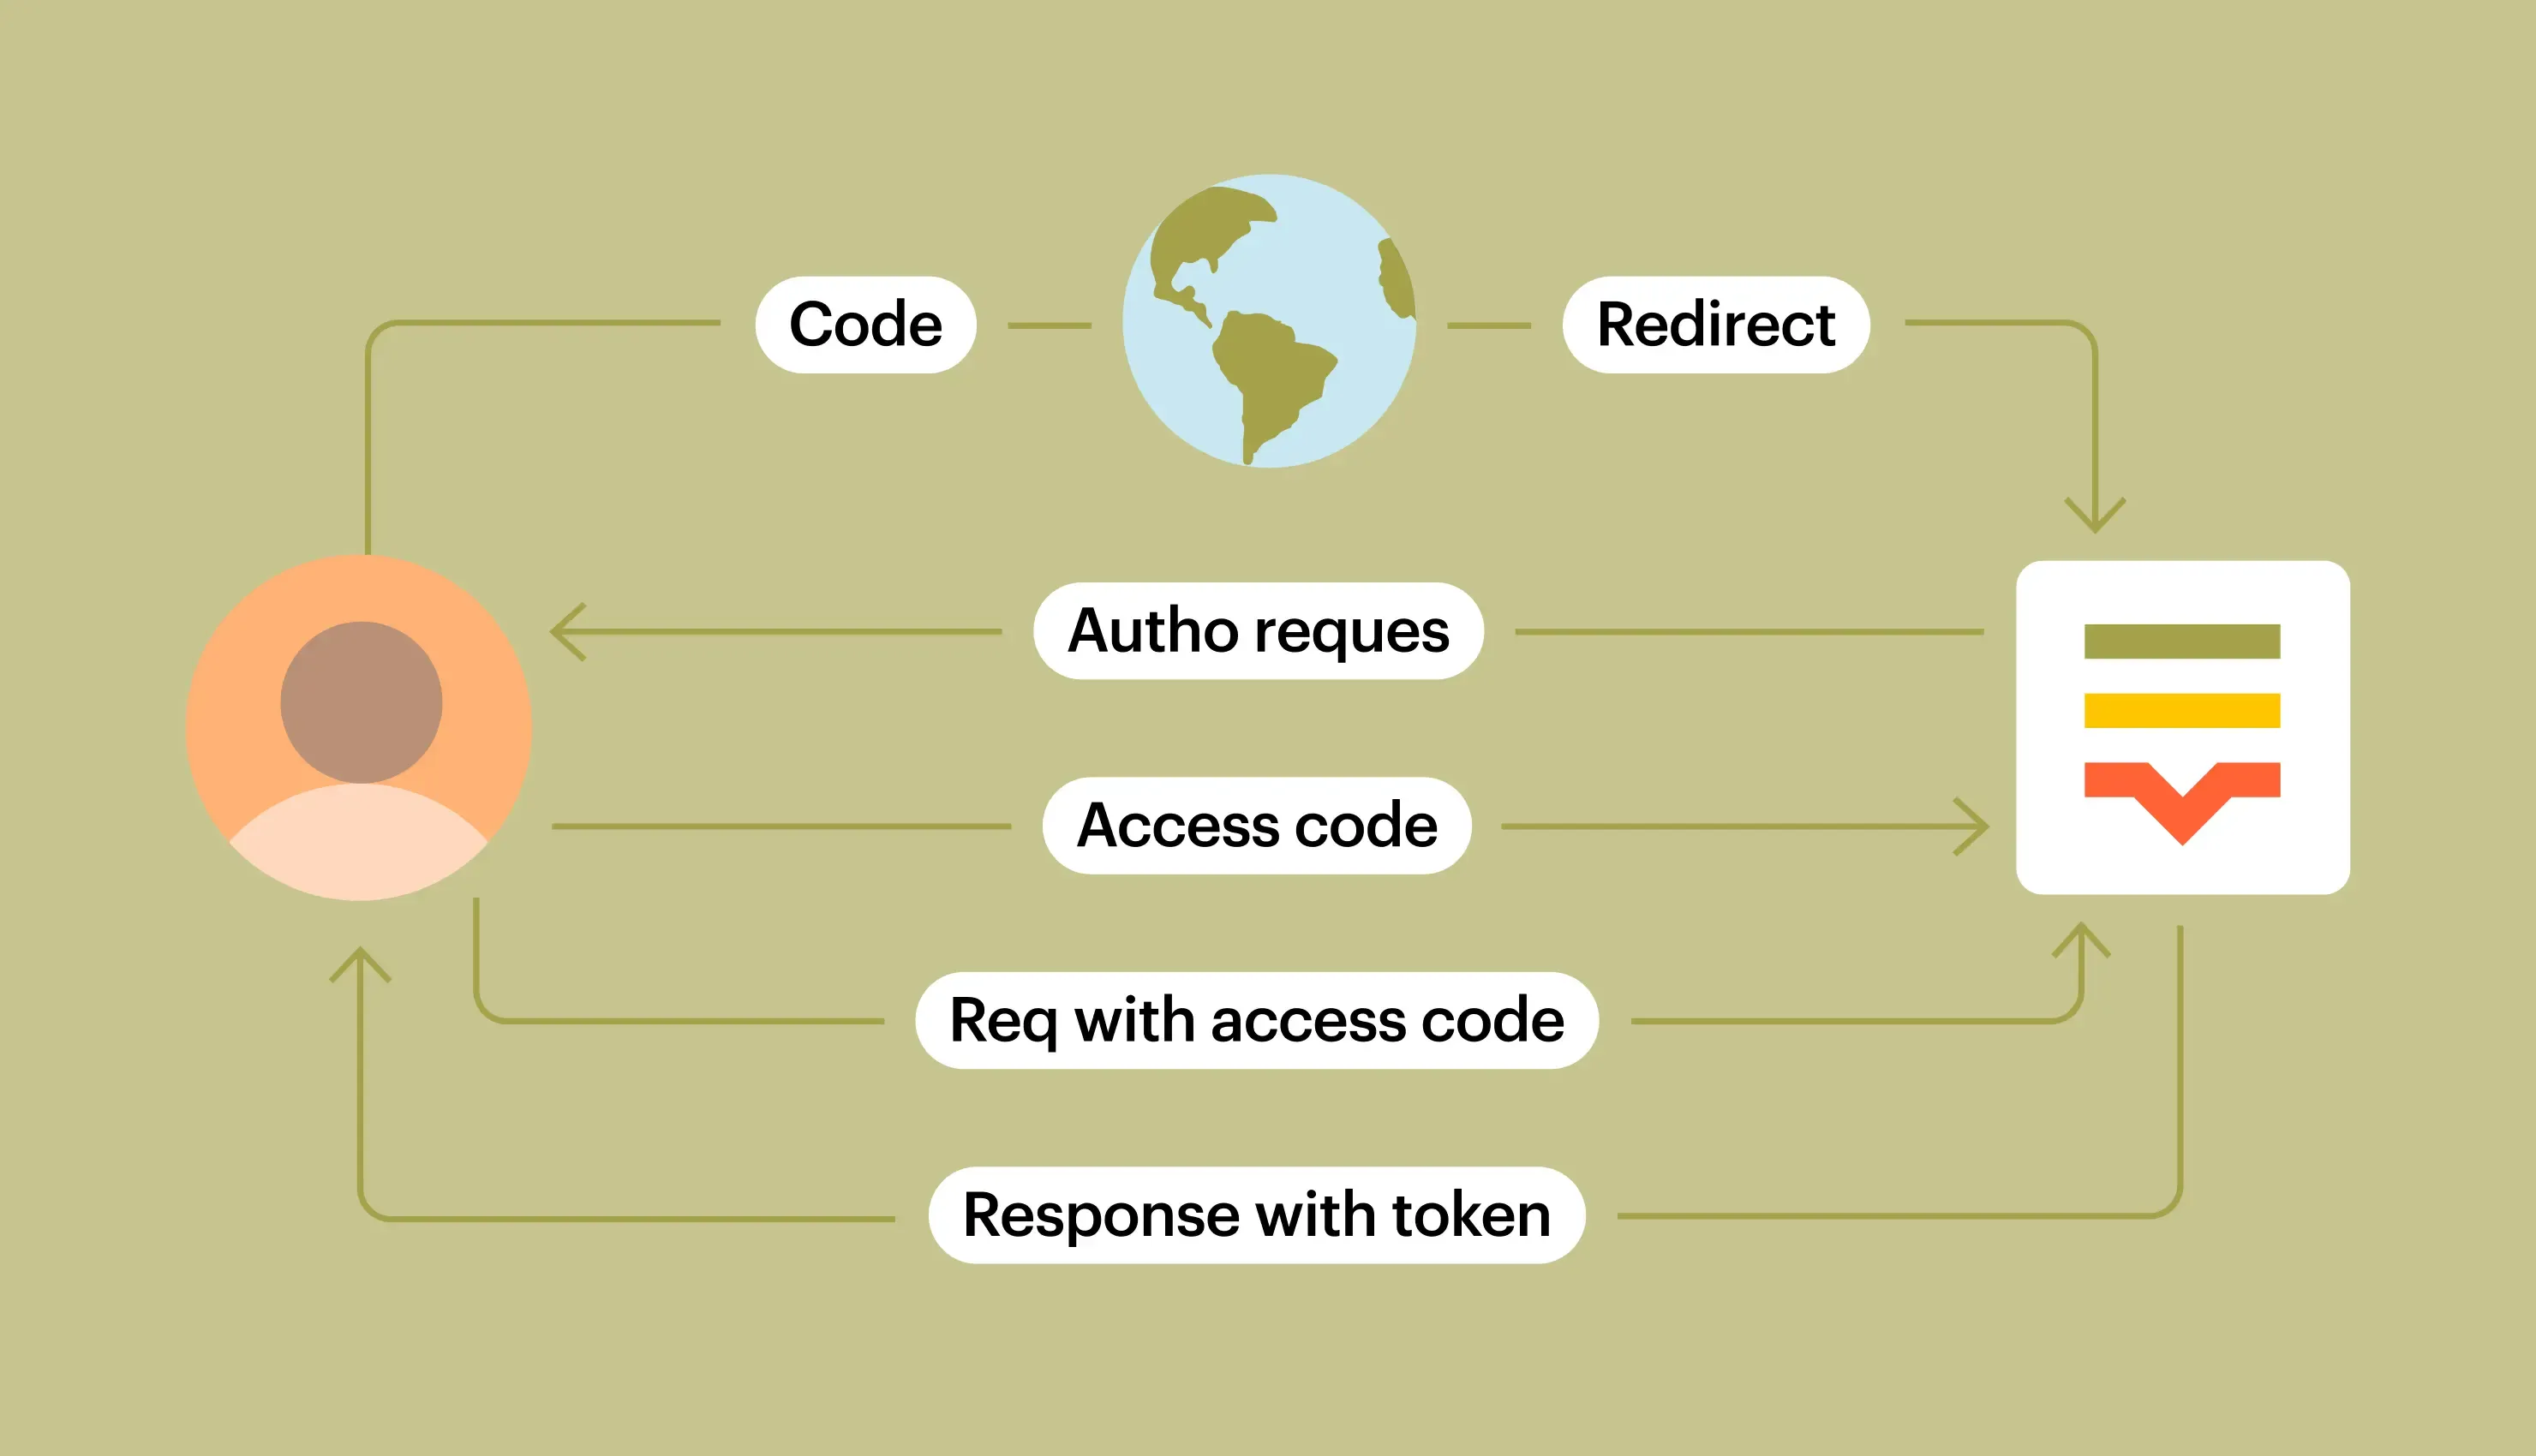
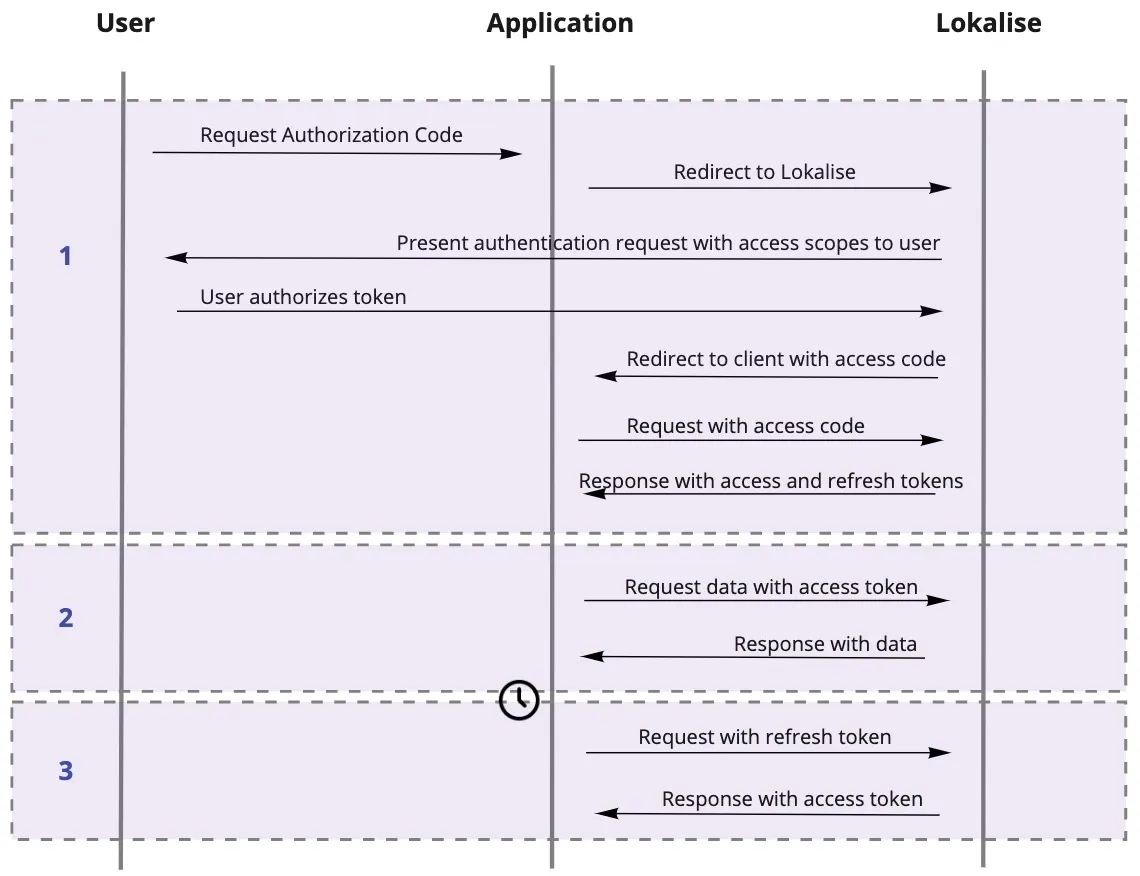
The flow can be separated into three steps:
The user initiates an OAuth 2 flow (usually by clicking some kind of a link saying "Log in via [service name]"). The user reviews the list of actions the app would like to perform on his/her behalf, clicks "Approve", and obtains a special secret code. This code might be displayed right on the web page, or the user might be redirected to the third-party app along with the code.
The third-party app obtains the secret code and sends it to the service in an HTTP POST request. The response contains an access code that can be used to act on the user's behalf. Specifically, the token can be used to perform API authentication. The response might also contain additional info like a refresh token and expiration time.
When the access token expires, the third-party app can use the refresh token to request a new access token.
First of all, you will need to register a new OAuth 2 app with Lokalise. To achieve this, you can reach out to the tech support team and ask them to create a new app for you. Please provide the following info:
Your app title and description. While the description is optional, it would be very helpful to have a few sentences explaining what exactly you are going to build.
Your app logo (in PNG or JPG format).
A link to the app website/documentation (optional).
Required scopes. This is important information because the list of scopes will determine which actions your app will be able to perform via the Lokalise API (you can also narrow this scope later when authenticating the user). For example, to view the projects you'll need a read_projects permission, whereas to create a new order a write_team_orders scope is required. You can find the list of all the required scopes for the corresponding API endpoints in the Lokalise API docs.
Once you have supplied this info, you'll be provided with a client ID and client secret — we'll use these to set up the authentication flow. Please note that you should never expose your client secret (as the name suggests, duh).
Basically, this is it. Now we can proceed to the main part of this tutorial.
OAuth 2 flow with JavaScript and Node
Setting up the project
So, let's start by implementing an OAuth 2 flow in a Node.js app. Create a new Node project and install the necessary dependencies:
The ground work is done and now we can add an OAuth 2 flow to our app.
Implementing OAuth 2 flow
Okay, so let's proceed to the actual OAuth 2 flow implementation. First of all, create a new controllers directory inside the project root and add an applicationController.js file inside:
import { LokaliseAuth } from '@lokalise/node-api'export class ApplicationController { static renderView(_req, res, view, data = {}) { res.render(view, data) } static lokaliseOAuth2() { return new LokaliseAuth(process.env.OAUTH2_CLIENT_ID, process.env.OAUTH2_CLIENT_SECRET) }}
The lokaliseOAuth2 static method will return an OAuth 2 client that we are going to use later.
Next, we'll create a staticPagesController.js file in the same directory:
In this file, we are generating a "log in via Lokalise link" that the users will have to visit. We are providing a single read_projects scope, passing a callback URL, and a secret state for protection from CSRF.
Now it's time to display this link, therefore create a new views/static_pages/index.hbs file:
<h1>Lokalise OAuth 2</h1><a href="{{authUrl}}">Log in via Lokalise</a>
Once the user has visited this link and logged in via Lokalise, s/he will be redirected to the callback URL that we specified a moment ago. Our job is to grab a secret code sent by Lokalise and use it to request an access and a refresh token. Thus, create a new controllers/callbacksController.js file:
So, we are using the JS SDK to request a token using the provided secret code. Then we store both tokens inside the session, and redirect the user to the /projects path.
Finally, let's add a new route to the config/routes.js file:
At this point we are ready to use the access token to communicate with the API and perform actions on the user's behalf. For instance, let's display all the projects a user has access to.
To achieve that, create a new controllers/projectsController.js file:
import { LokaliseApiOAuth } from '@lokalise/node-api'import { ApplicationController } from "./applicationController.js"export class ProjectsController extends ApplicationController { static async index(req, res) { const lokaliseApi = new LokaliseApiOAuth({ apiKey: req.session.accessToken }) const projects = await lokaliseApi.projects().list() this.renderView(req, res, 'projects/index', {projects: projects.items}) }}
The access token has an expiration time (usually it's 60 minutes), therefore you should refresh it once it expires. Let's see how to achieve this by tweaking the projectsController.js file:
So, if we get an exception when trying to list the projects, check the error code. If the code is 401 ("Unauthorized"), it probably means our token has expired. Thus, we refresh it using the refresh method, store it in the session, and try again. Otherwise just throw an exception.
You may also want to limit the number of retries to avoid endless recursion.
Testing it out
Everything is ready, so you can boot up your server by running the below:
npm start
Proceed to the http://localhost:3000, log in via Lokalise, and observe the list of all your projects.
Great job!
OAuth 2 flow with Python and Flask
Setting up the project
First of all, add a new directory for your project and create a virtual environment inside:
cd MY_PROJECT_NAME && python -m venv venv. venv/bin/activate
After the user visits the link and logs in via Lokalise, s/he will be redirected to the callback URL that we've provided when generating a link. Thus, the next step is to code this callback route.
We are reading the secret code sent by Lokalise and using it to request an access and a refresh token. We store these tokens inside the session and then redirect the user to the /projects page.
Using an access token to list projects via the API
At this point, we can use the access token to work with the API. For example, let's display the list of all projects our user has access to. Therefore, let's add two more methods to the app.py file:
Thus, we are using the projects() method to list all the projects and then render a projects template.
Let's create this template within the templates/projects.html file:
<!doctype html><html lang="en"><head> <title>Your Lokalise projects</title></head><body> <h1>Choose a Lokalise project to work with</h1> <ul> {% for project in projects %} <li>{{ project.name }}</li> {% endfor %} </ul></body></html>
In this file we iterate over the projects and display their names.
Using refresh tokens
The access token that Lokalise has generated for us usually expires in 60 minutes; consequently you have to refresh it on a regular basis. Let's implement this feature inside the app.py:
So, if we get an Unauthorized error, it probably means that the token has expired. Therefore, we refresh it using the corresponding method, store a new token inside the session, and retry the operation. You might think about introducing retry limits to avoid endless recursion.
Testing it out
Now everything is ready, therefore boot your server by running:
flask run
Proceed to http://localhost:5000, log in via Lokalise, and observe the list of your projects.
Great job!
OAuth 2 flow with Ruby on Rails
Setting up the project
Now let's see how to use Lokalise OAuth 2 with the Ruby on Rails framework! First of all, create a new Rails project as always:
rails new OAuth2Flow
I'm going to use Rails 7, but these instructions should be relevant for older versions as well.
ruby-lokalise-api is the official Ruby SDK for Lokalise API that we are going to use to send API requests and refresh tokens. It also allows you to set up an OAuth 2 flow from scratch, but for that purpose we are going to utilize another solution.
omniauth-lokalise is the gem I wrote some time ago. It makes setting up OAuth 2 with Rails a breeze.
Don't forget to add this file to .gitignore if you are using Git!
Setting up OAuth 2 with Omniauth
Next, let's create a new file called omniauth.rb inside the config/initializers folder:
Rails.application.config.middleware.use OmniAuth::Builder do provider :lokalise, ENV['OAUTH2_CLIENT_ID'], ENV['OAUTH2_CLIENT_SECRET'], scope: 'read_projects read_team_users'end
Here we are providing configuration for the omniauth-lokalise which is built on top of the Omniauth gem. This gem enables you to easily add multiple authentication providers to a Rails app, including Facebook, GitHub, LinkedIn, and many more.
Please note the scope param which contains the list of permissions we are going to request from the users. You should use space as a separator.
Omniauth expects our app to have a special callback route — that's the route the users will be redirected to after logging in via Lokalise. Therefore, let's add this route to the config/routes.rb:
get '/auth/:provider/callback', to: 'sessions#create'
Great! Now let's proceed to the next section and create a new controller.
Adding a callback action
So we've created a callback route, but we still need to create the corresponding controller and an action. Thus, add a new sessions_controller.rb file within the app/controllers directory:
So, after the user is navigated to the callback route, we can access their access and refresh token by reading the request.env object. We store these tokens inside the session and redirect to another page which will be created in a moment.
Displaying a login link
Now we can display a "login" link. Therefore, we'll create a new PagesController inside the app/controllers/pages_controller.rb file:
class PagesController < ApplicationController def index; endend
Add new routes to the config/routes.rb file:
resources :pages, only: :indexroot 'pages#index'
Finally, create a new view inside the app/views/pages/index.html.erb file:
<%= form_tag('/auth/lokalise', method: 'post', data: {turbo: false}) do %> <button type='submit'>Login with Lokalise</button><% end %>
Please note that we must use the HTTP POST verb here. Also, if your app has Turbo framework set up, don't forget to disable it for this exact link.
That's it, the OAuth 2 flow is now completed!
Using access tokens to work with the API
Let's try to use the obtained access token to list all the user's translation projects. To achieve that, tweak the pages_controller.rb file:
require 'ruby_lokalise_api'class PagesController < ApplicationController def index if session[:access_token] client = RubyLokaliseApi.oauth2_client session[:access_token] @projects = client.projects.collection end endend
<% if session[:access_token] %> Access token: <%= session[:access_token] %><br> Refresh token: <%= session[:refresh_token] %><br> Your projects: <ul> <% @projects.each do |project| %> <li><%= project.name %></li> <% end %> </ul><% else %> <%= form_tag('/auth/lokalise', method: 'post', data: {turbo: false}) do %> <button type='submit'>Login with Lokalise</button> <% end %><% end %>
We are simply displaying project names in a list.
Using refresh tokens
The access tokens that Lokalise generates for you usually expire in 60 minutes. Can we refresh them somehow? But of course! All we have to do is provide a refresh token to a refresh method available in Ruby SDK. Let's tweak the pages_controller.rb in the following way:
require 'ruby_lokalise_api'class PagesController < ApplicationController def index if session[:access_token] begin client = RubyLokaliseApi.oauth2_client session[:access_token] @projects = client.projects.collection rescue RubyLokaliseApi::Error::Unauthorized auth_client = RubyLokaliseApi.auth_client ENV['OAUTH2_CLIENT_ID'], ENV['OAUTH2_CLIENT_SECRET'] response = auth_client.refresh session[:refresh_token] session[:access_token] = response['access_token'] retry end end endend
So, if we get an Unauthorized error, we try to refresh our token with the Ruby SDK, store it in the session, and then retry the operation. You might also want to limit the number of retries to avoid an endless recursion.
Testing it out
Now everything is ready, therefore you can boot your server by running:
rails s
Proceed to http://localhost:3000, log in via Lokalise, and observe the list of your projects.
Great job!
Conclusion
So, in this article we have seen how to set up the Lokalise OAuth 2 flow with Node, Flask, and Rails. Now you can implement the described concepts in your own apps to build something fancy and useful!
You can also visit our DevHub which contains even more helpful tutorials for developers.
I thank you for sticking with me today, and until next time!
Ilya is the lead for content, documentation, and onboarding at Lokalise, where he focuses on helping engineering teams build reliable internationalization workflows. With a background at Microsoft and Cisco, he combines practical development experience with a deep understanding of global product delivery, localization systems, and developer education.
He specializes in i18n architectures across modern frameworks — including Vue, Angular, Rails, and custom localization pipelines — and has hands-on experience with Ruby, JavaScript, Python, Elixir, Go, Rust, and Solidity. His work often centers on improving translation workflows, automation, and cross-team collaboration between engineering, product, and localization teams.
Beyond his role at Lokalise, Ilya is an IT educator and author who publishes technical guides, best-practice breakdowns, and hands-on tutorials. He regularly contributes to open-source projects and maintains a long-standing passion for teaching, making complex internationalization topics accessible to developers of all backgrounds.
Outside of work, he keeps learning new technologies, writes educational content, stays active through sports, and plays music. His goal is simple: help developers ship globally-ready software without unnecessary complexity.
Libraries and frameworks to translate JavaScript apps
In our previous discussions, we explored localization strategies for backend frameworks like Rails and Phoenix. Today, we shift our focus to the front-end and talk about JavaScript translation and localization. The landscape here is packed with options, which makes many developers a
Syncing Lokalise translations with GitLab pipelines
In this guide, we’ll walk through building a fully automated translation pipeline using GitLab CI/CD and Lokalise. From upload to download, with tagging, version control, and merge requests. Here’s the high-level flow: Upload your source language files (e.g. English JSON files) to Lokalise from GitLab using a CI pipeline.Tag each uploaded key with your Git branch name. This helps keep translations isolated per feature or pull request
Build a smooth translation pipeline with Lokalise and Vercel
Internationalization can sometimes feel like a massive headache. Juggling multiple JSON files, keeping translations in sync, and redeploying every time you tweak a string… What if you could offload most of that grunt work to a modern toolchain and let your CI/CD do the heavy lifting? In this guide, we’ll wire up a Next.js 15 project hosted on Vercel. It will load translation files on demand f