In the localization of any software — from websites to web applications, mobile apps to games, and IoT to standalone software — there is no single instructional document to guide the process. There are, however, localization best practices and localization management approaches that can help streamline your workflow
There are also thousands of words and phrases that are often provided out of context. As a result, they’re often impossible to translate without knowing some background information.
For example, consider English words like go, pool, mine, and draft. Words like these are homonyms — words that, depending on the context, have completely different meanings. Pool could refer to a chlorinated body of water or a game of billiards. Draft could refer to beer from a keg or a gust of wind.
This is one of the many reasons why modern product teams should consider using a professional translation management system (TMS) like Lokalise instead of manually translating localization files or, even worse- sending documents to translators. In this guide, we'll discuss some localization best practices with Lokalise
A localization workflow refers to the process of adapting or translating content from one language or cultural context to another. It typically involves a series of steps such as file preparation, translation, editing, quality assurance, and delivery.
Benefits of using a TMS like Lokalise
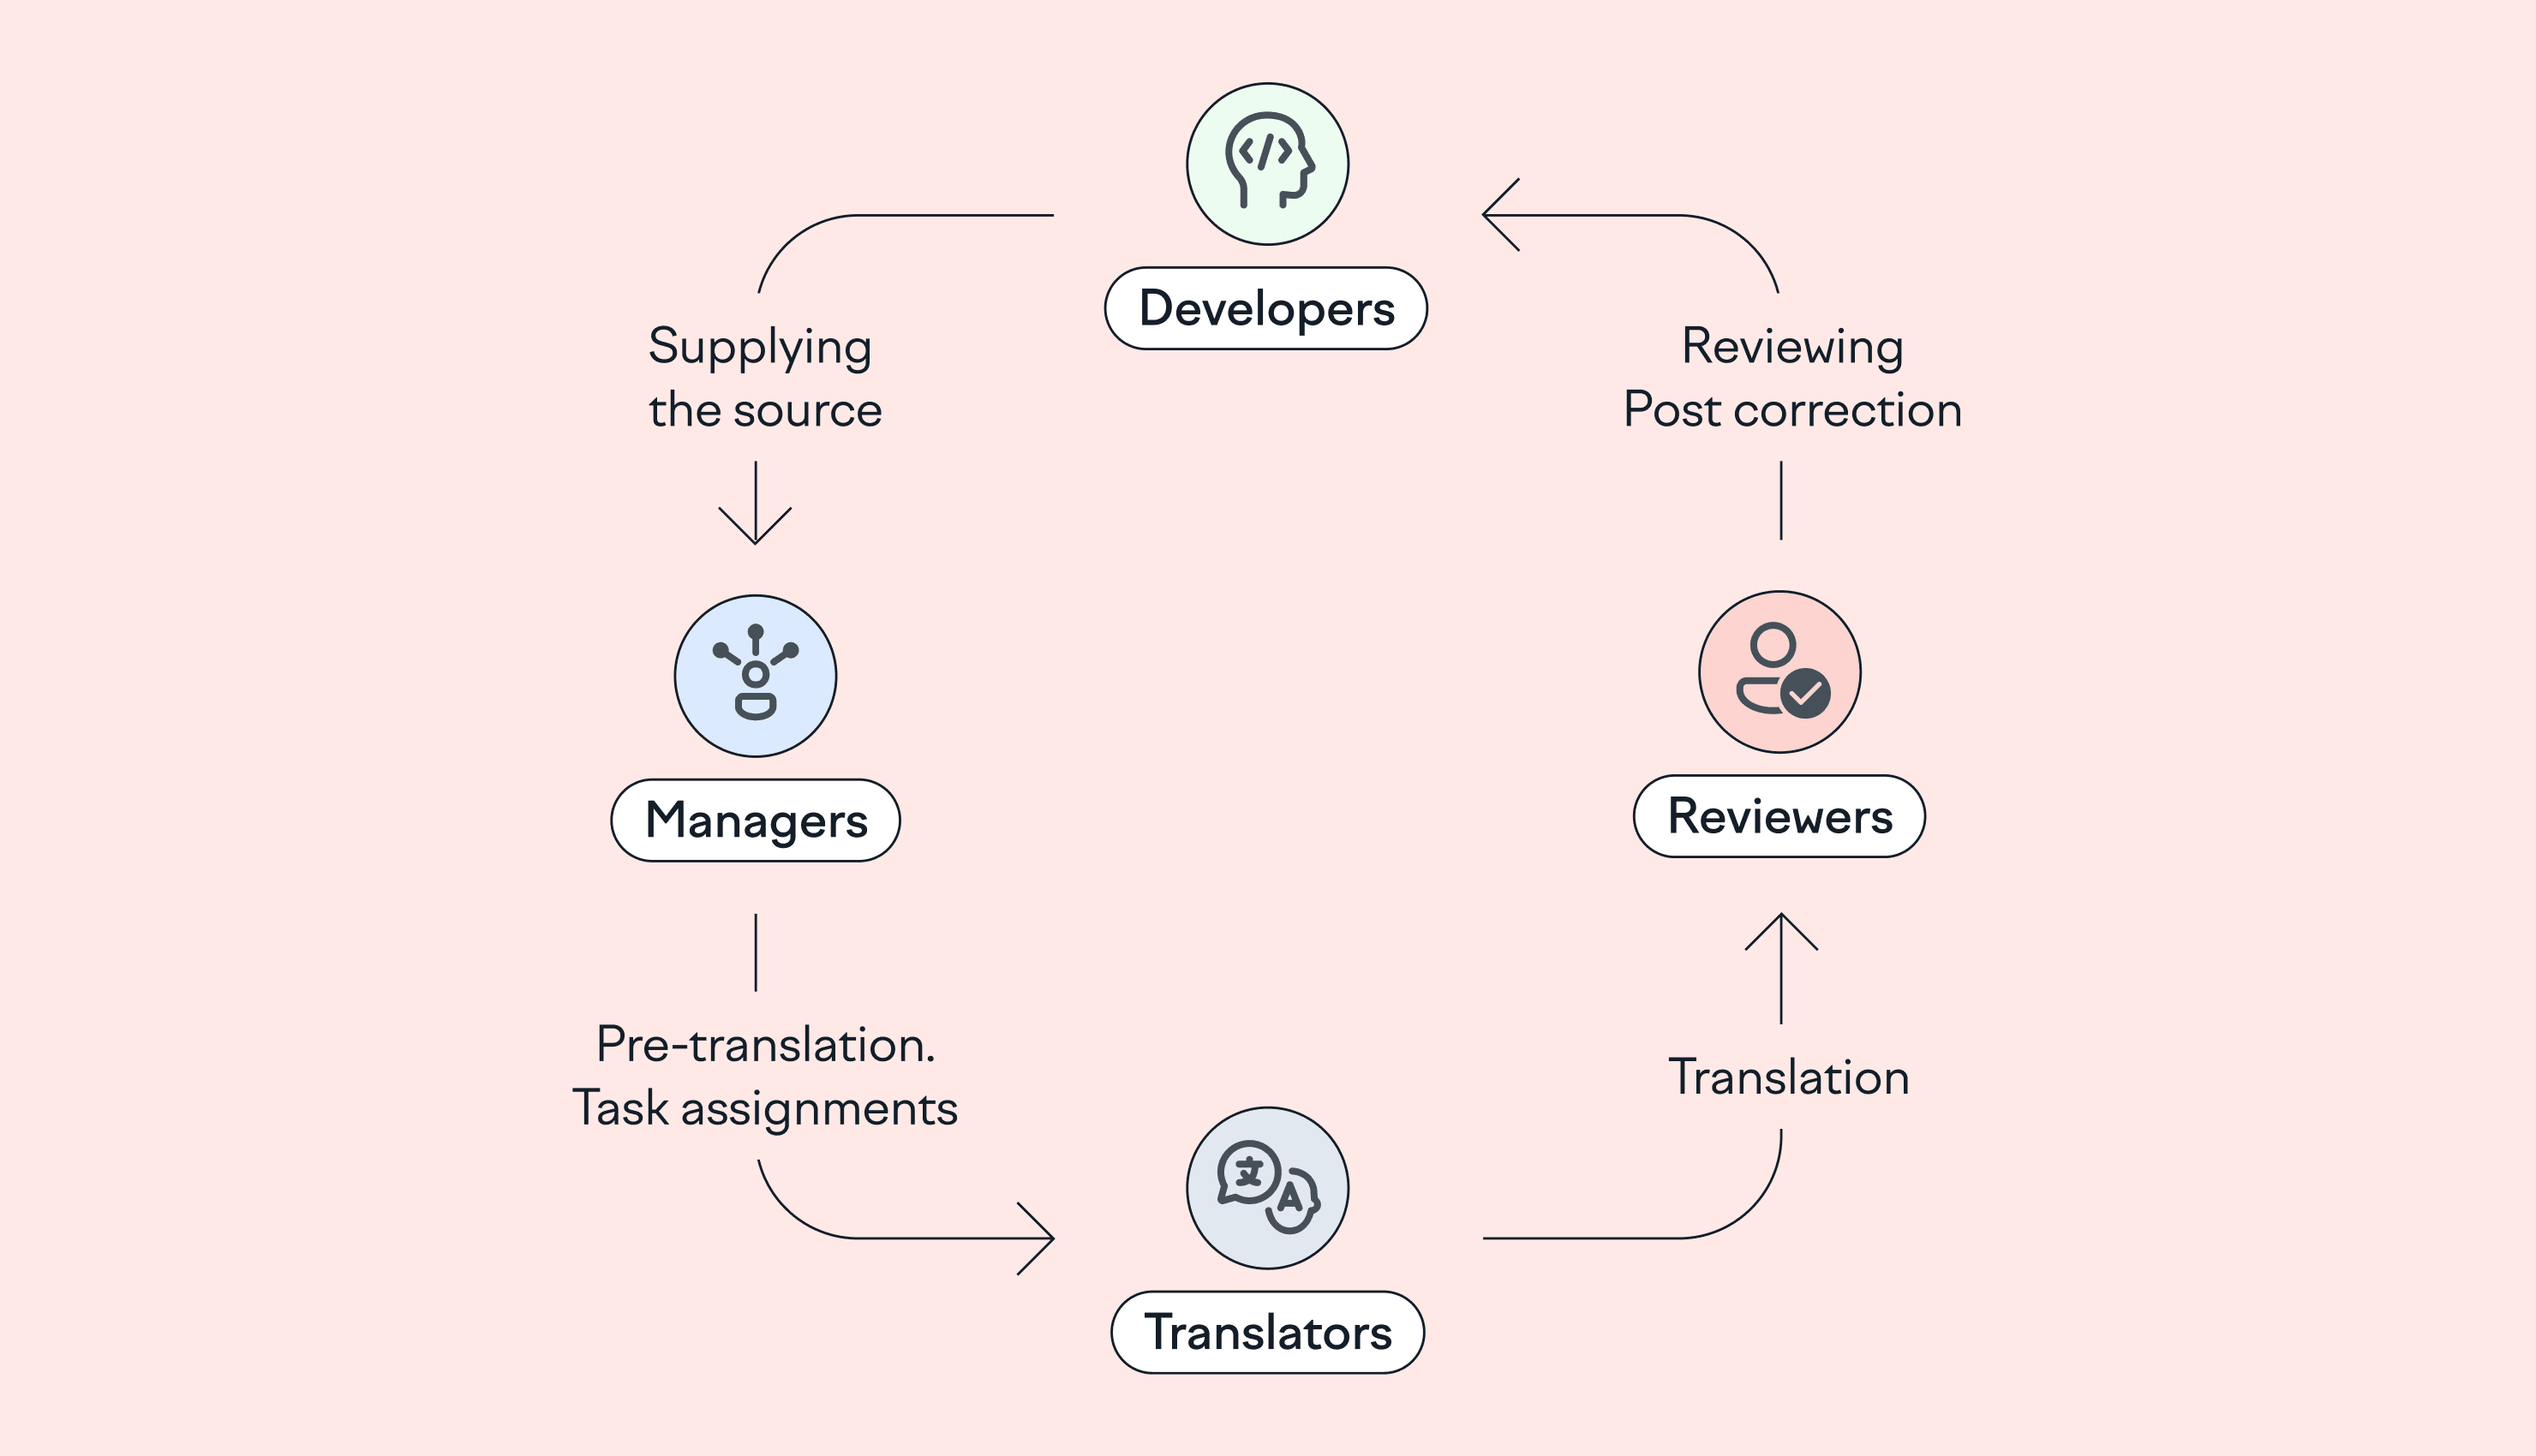
Developers are freed from participating in the localizing process, especially from copying and pasting translations into the code.
The translation process is fully automated and transparent.
Localization files are always consistent — translators cannot break the markup.
The context of a translation shown to a translator includes screenshots, descriptions, or comments to keys.
Translators can openly discuss the translations with localization and product managers and other translators in a direct project chat.
Quality assurance (QA) specialists may see the live preview on mobile device screens or browsers.
Who’s involved in the localization process?
The localization process typically involves four groups of collaborators: software developers; product, project, and localization managers; copywriters, marketers, and translators; and QA specialists and reviewers.
In most cases, developers start the localization process by adding string identifiers (also called keys, key identifiers, or key names) to code while programming user-facing screens. String identifiers are applicable to any software, be it a mobile app, website, game, IoT, or standalone software. Whenever there’s a need to display some text to a user, a string identifier is employed.
Localization files contain the mapping between key identifiers and actual translations or translation values. For example, a key identifier on the login button for a website may very well be button.login while the translation values are “Login” for English and “Iniciar sesión” for Spanish.
There are many localization file formats, including AppleStrings or XLIFF for iOS, XML for Android, and JSON/YAML/PO for Web. These are not plain-text files, and it can be difficult to understand their structure for a non-technical person.
How to develop a localization workflow with Lokalise
There are various localization best practices when localizing your website or software. With Lokalise, however, you can expect to follow three important steps when building your localization workflow.
The software localization process starts when the content source is supplied to a team of translators. This could be the initial translation to a new language or a new set of key identifiers you need to translate.
Let’s walk through the parts of this process.
Initial project setup
In most cases, you may already have some localization files developed, whether in the source language or in multiple languages. It’s a good idea to do the initial project setup using the Lokalise web user interface as you’ll be able to automate the upload process later.
Once you create a project, simply drag and drop all the existing localization files to the Uploads page. The system extracts keys and translations from all languages, creates key items in the database, and maps relevant language translations to these keys.
Lokalise is a multiplatform system, meaning that you can store iOS, Android, Web, and other strings together, even if they originally existed in different files and formats. Once you upload everything, the Lokalise system does the automatic merging for the keys with similar names.
There are a few steps to merge all other possible keys using translation matching. As you merge the keys, they only need to be translated once — the strings get exported to appropriate files with appropriate names depending on the platform.
It’s important to understand how keys are tied to platforms and filenames in Lokalise:
A key can be assigned to one or multiple platforms.
Assigning a key to a platform means including the key in the export routine for the file formats associated with the platform (e.g. if a key is assigned to iOS and Android platforms it would get exported to both .strings and .xml files, but would not go to the .json export).
A key can be assigned to one unique filename per each platform.
A path may be an integral part of the filename (e.g. locale/en.json and main/en.json are considered two different filenames). It is recommended to omit the path in filename and add it dynamically when generating the bundle.
Change Management
Once the project is set up, add some of automation, and leave the process to translators, reviewers, and quality assurance (QA) managers.
Whether these are new features, app screens, or web pages that are being added to your app, new keys along with base language translations (or translation prototypes at least) are added by a coder in the process of development. There are a few options here:
Option 1: Upload the files using the CLI tool.
As teams start using Lokalise, this is the most popular approach for change management. The CLI tool is a simple wrapper for the API (and it’s open source, too). Uploading your files is done by a single command line. Here is an example:
By default, Lokalise only adds new keys along with translations found in the files you are uploading. In case you want to overwrite translations modified in a local file you're uploading, add --replace 1 as a parameter.
Option 2: Use a GitHub, GitLab, Bitbucket, or Azure Repos integration.
Most teams use version control systems like GitHub. Instead of pushing the file changes to both GitHub and Lokalise, you may set up an integration in Lokalise that would automatically fetch the files as soon as developers push the changes to the repository.
Tip: You only need to link base language files when setting up the Github integration. Lokalise will automatically create a pull request with all language file versions as you perform the export. Make sure to configure the Auto-pull option in GitHub when setting up the integration.
Option 3: Add new keys in Lokalise directly.
Instead of adding keys to your local files and uploading them to Lokalise, you can add keys directly in Lokalise. Make sure that the Allow Key Editing option is enabled in project settings.
The key editor provides several handy options, including the ability to define the key pre-fill field mask — if you are adding multiple keys, like index.welcome, index.button, index.title just set a pre-fill mask to index. so it is automatically added as you hit Save and need to add another key.
Option 4: Use the API to create new keys.
Yet another option to add new keys to Lokalise as they are added in your backend is using the API. See /string/set method for more information.
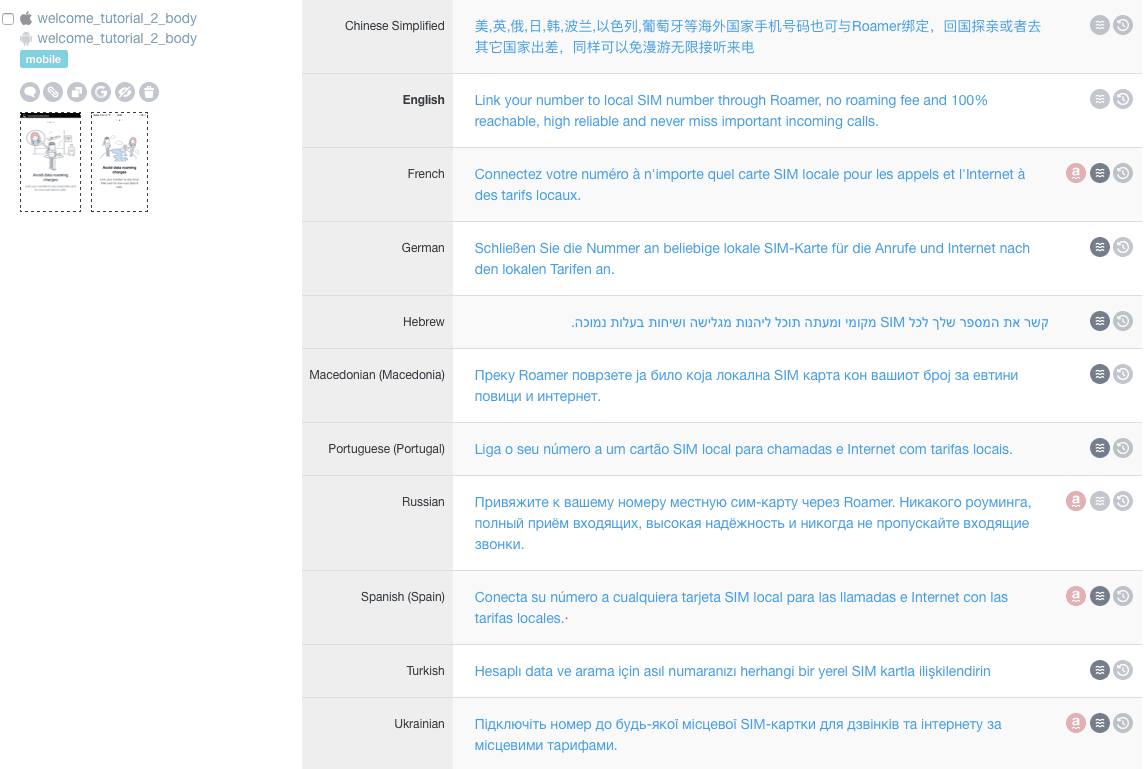
Screenshots
The easiest and quickest way to provide translators with a context is by using screenshots. Lokalise offers multiple ways to upload screenshots, including automatic snapping (see in-context editing below). However, the most popular one is the bulk uploading of the image files.
Once the localization files are in place and key/translation pairs are set up, it’s time to upload the images at the Screenshots page. The system automatically performs the OCR (optical character recognition) to identify any textual information and matches that against translations in the base language to make a link between image and keys.
If the OCR can not identify the text (i.e. low contrast images or too small or exotic font is used), it’s easy to make the mappings manually. The connection is many-to-many — each screenshot can be linked to multiple keys and each key can be linked to multiple screenshots.
Screenshots may be organized into logical groups using tags which gives translators even more contextual information while using the Screenshot Filter in the editor.
Versioning
We are actively working on adding our project branching feature to enable transparent version and branch support for Lokalise. Currently, the options are using tags with version/branch description or even creating a project copy in case of major version update.
2. Translate your content and review for accuracy.
When the initial setup is done and the change management process is clear, it’s time to understand how the actual translation and reviewing process works, with localization quality assurance playing a key role in maintaining accuracy and consistency.
You can invite a team of in-house translators, invite a third party translation agency, or use any of the translation partners we have built-in for your convenience.
Besides offering an ultimate toolset for localization process automation, Lokalise comes with a beautiful collaborative editor, comparable to modern professional CAT tools. The editor has two views:
Classic bilingual view (where the source is on the left and target is on the right)
Multi-lingual view that shows all language translations simultaneously
The latter is very handy for product and localization managers to see the overall progress of the project.
Lokalise comes with integrated machine translation options (DeepL, Google Translate, and Microsoft Translator) and a translation memory essential for efficient translation.
You may pre-translate the project using machine translation (using Orders menu on top) or by applying 100% translation memory matches. An alternative approach to pre-translating would be using inline suggestions while translating, thus ensuring better quality and minimizing the number of possible mistakes compared to bulk pre-translation.
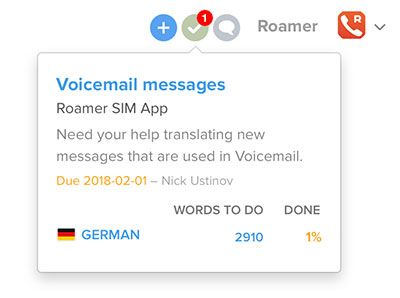
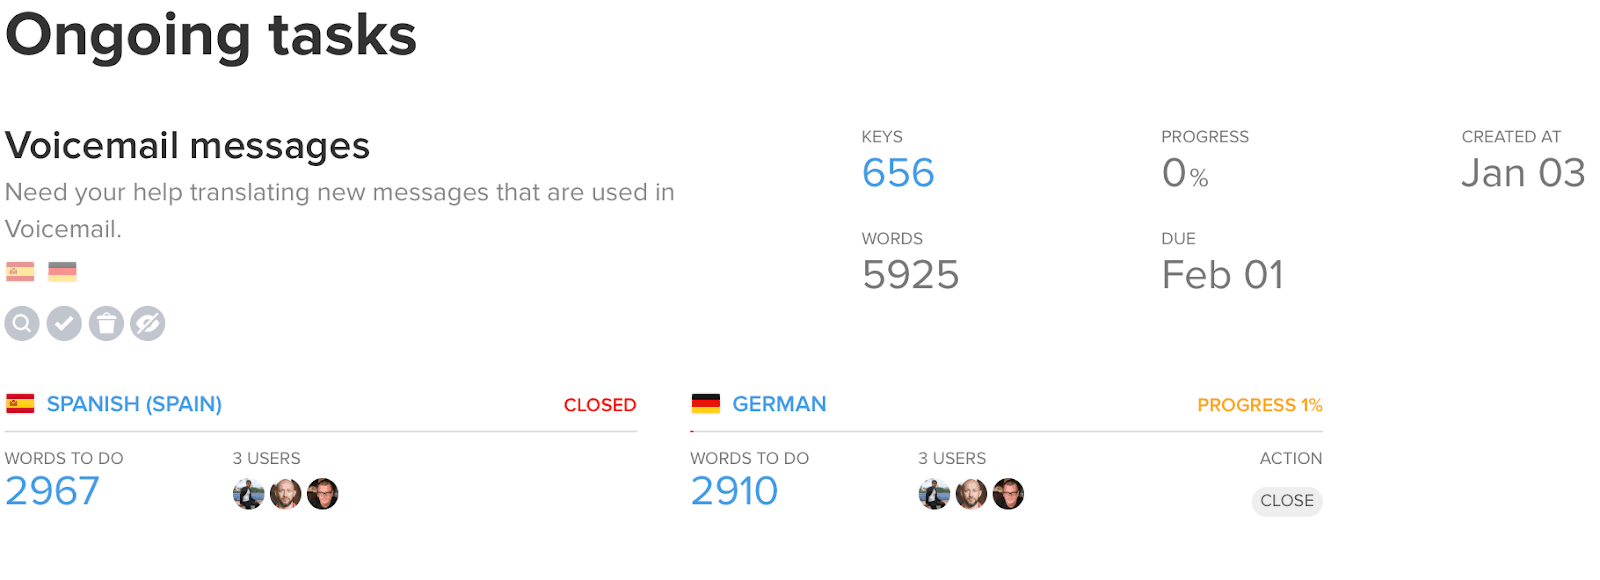
Project admins using the Lokalise web UI may manually set up tasks, or you may use the API to create tasks programmatically.
You need to define task scope (keys that have to be included), languages, and assignees. Each assignee gets a notification over email as well as in personal Incoming tasks widget.
Administrators can see task completion progress by language.
As the task is completed (or a language in the task is marked as completed), use project integrations to perform certain actions. You may inform administrators over email, send notification in Slack, create tickets in Trello, create tasks in Jira, or send a webhook to your endpoint so it performs the export and starts the delivery process.
Multiple review cycles
In case you need a separate review cycle (or even multiple review cycles by different people), create a chained task for review-only and only include contributors with the Reviewer access as assignees.
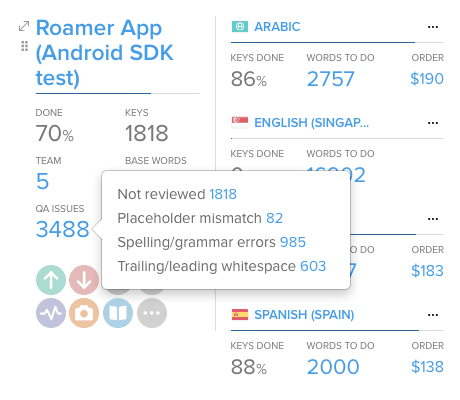
QA filters
There is an indicator for quality assurance (QA) issues in every project. It includes links to filters that show placeholder and HTML mismatches (differences between base language and target languages), spelling and grammar issues (automatic check available in 20+ languages), and a filter to show leading/trailing spaces that may be occasionally left by translators.
In-context editing
We provide a unique option for translators and QA specialists — the in-context editors for web (comes as JavaScript plugin) and mobile (currently available for iOS only). Instead of delivering the localization files back to code, releasing a version with new files in-context editors allow pixel-perfect visual translation experience.
Collaboration
Besides the actual contextual information like descriptions and screenshots that project admins may provide, Lokalise has a built-in project and key chat with @mentions so translators can discuss the nuances of particular translation approaches in place.
Using translation providers
Missing an in-house translator team? Not a problem — we have three human-powered translation partners at your service with prices starting at $0.07/word. Our localization service providers include Gengo, Language Inspired, and Alconost, with Gengo being the most affordable.
3. Tools to deliver translated content to the end-user
Once the translation tasks are complete, you need to export the content and deliver it to your end-users. Besides simply downloading the files using the web UI, there are several automation options to choose from.
Mobile SDK
Distributing your strings to your mobile app users has never been easier than with Lokalise mobile software development kits, also called SDKs (supported for iOS and Android). Embed the very lightweight SDK by adding just a few lines of code; this will allow you to distribute translations to end-users over-the-air bypassing AppStore or Google Play release cycle and reviews. Instantly fix typos, finish translations, or play with wording. You can even add new languages on the fly on Android.
CLI tool
The most popular option is to export your localization files using the command line (CLI) tool. Usually, the export is performed at the build process (for production) or prior to the build process in the case of the development environment. Just as with import, that is just one line of code, here is the example:
You can fine-tune the export, directory structure and set various parameters for filtering of data (see the CLI tool docs).
GitHub/GitLab/Bitbucket integration
If you have a repository integration set up, Lokalise can create pull requests in order to put translated localization files back into GitHub. Keep in mind that, even if you have only linked source files, we can still create commits with all files. The only thing you will have to do is to merge pull requests. Either the web interface or the CLI tool may trigger pull request creation.
Amazon S3/Google Cloud Storage
Most modern web frameworks suggest serving the static content like images, CSS, and language files from a CDN. We have created one-click integrations that upload exported files to an Amazon/GCS bucket of your choice.
Conclusion
Translation management systems like Lokalise completely transform your localization and translation processes. With these localization best practices, you can automate your localization workflow, create a collaborative localization environment, and ensure high-quality, consistent translations for your web or mobile application or software. Embrace automation, workflow transparency, and fast project delivery with Lokalise. [Book a Demo or Try it free today.]
Nick is Chief Innovation Officer and former CEO of Lokalise. He’s a serial entrepreneur and was an early internet technology pioneer in Latvia when he founded and developed the first email service – inbox.lv in the late 1990s (which still exists today). While working on one of his recent ventures - Roamer App, he developed a backend to ease localization to different languages which proved to be a product with market demand on its own and later became Lokalise.
Nick is Chief Innovation Officer and former CEO of Lokalise. He’s a serial entrepreneur and was an early internet technology pioneer in Latvia when he founded and developed the first email service – inbox.lv in the late 1990s (which still exists today). While working on one of his recent ventures - Roamer App, he developed a backend to ease localization to different languages which proved to be a product with market demand on its own and later became Lokalise.
The international SEO checklist: Go global without growth pains
International SEO is just SEO set on difficulty level: hard. Pick the wrong URL structure? Rebuild everything from scratch. Misunderstand local search behavior? Watch your content strategy crumble. Skip proper hreflang implementation? Google shows Hindi content to German users. The brands winning at international SEO don’t simply wing it. They follow a systematic approach to handle market research, technical setup, localization, and more. That’s why we created th
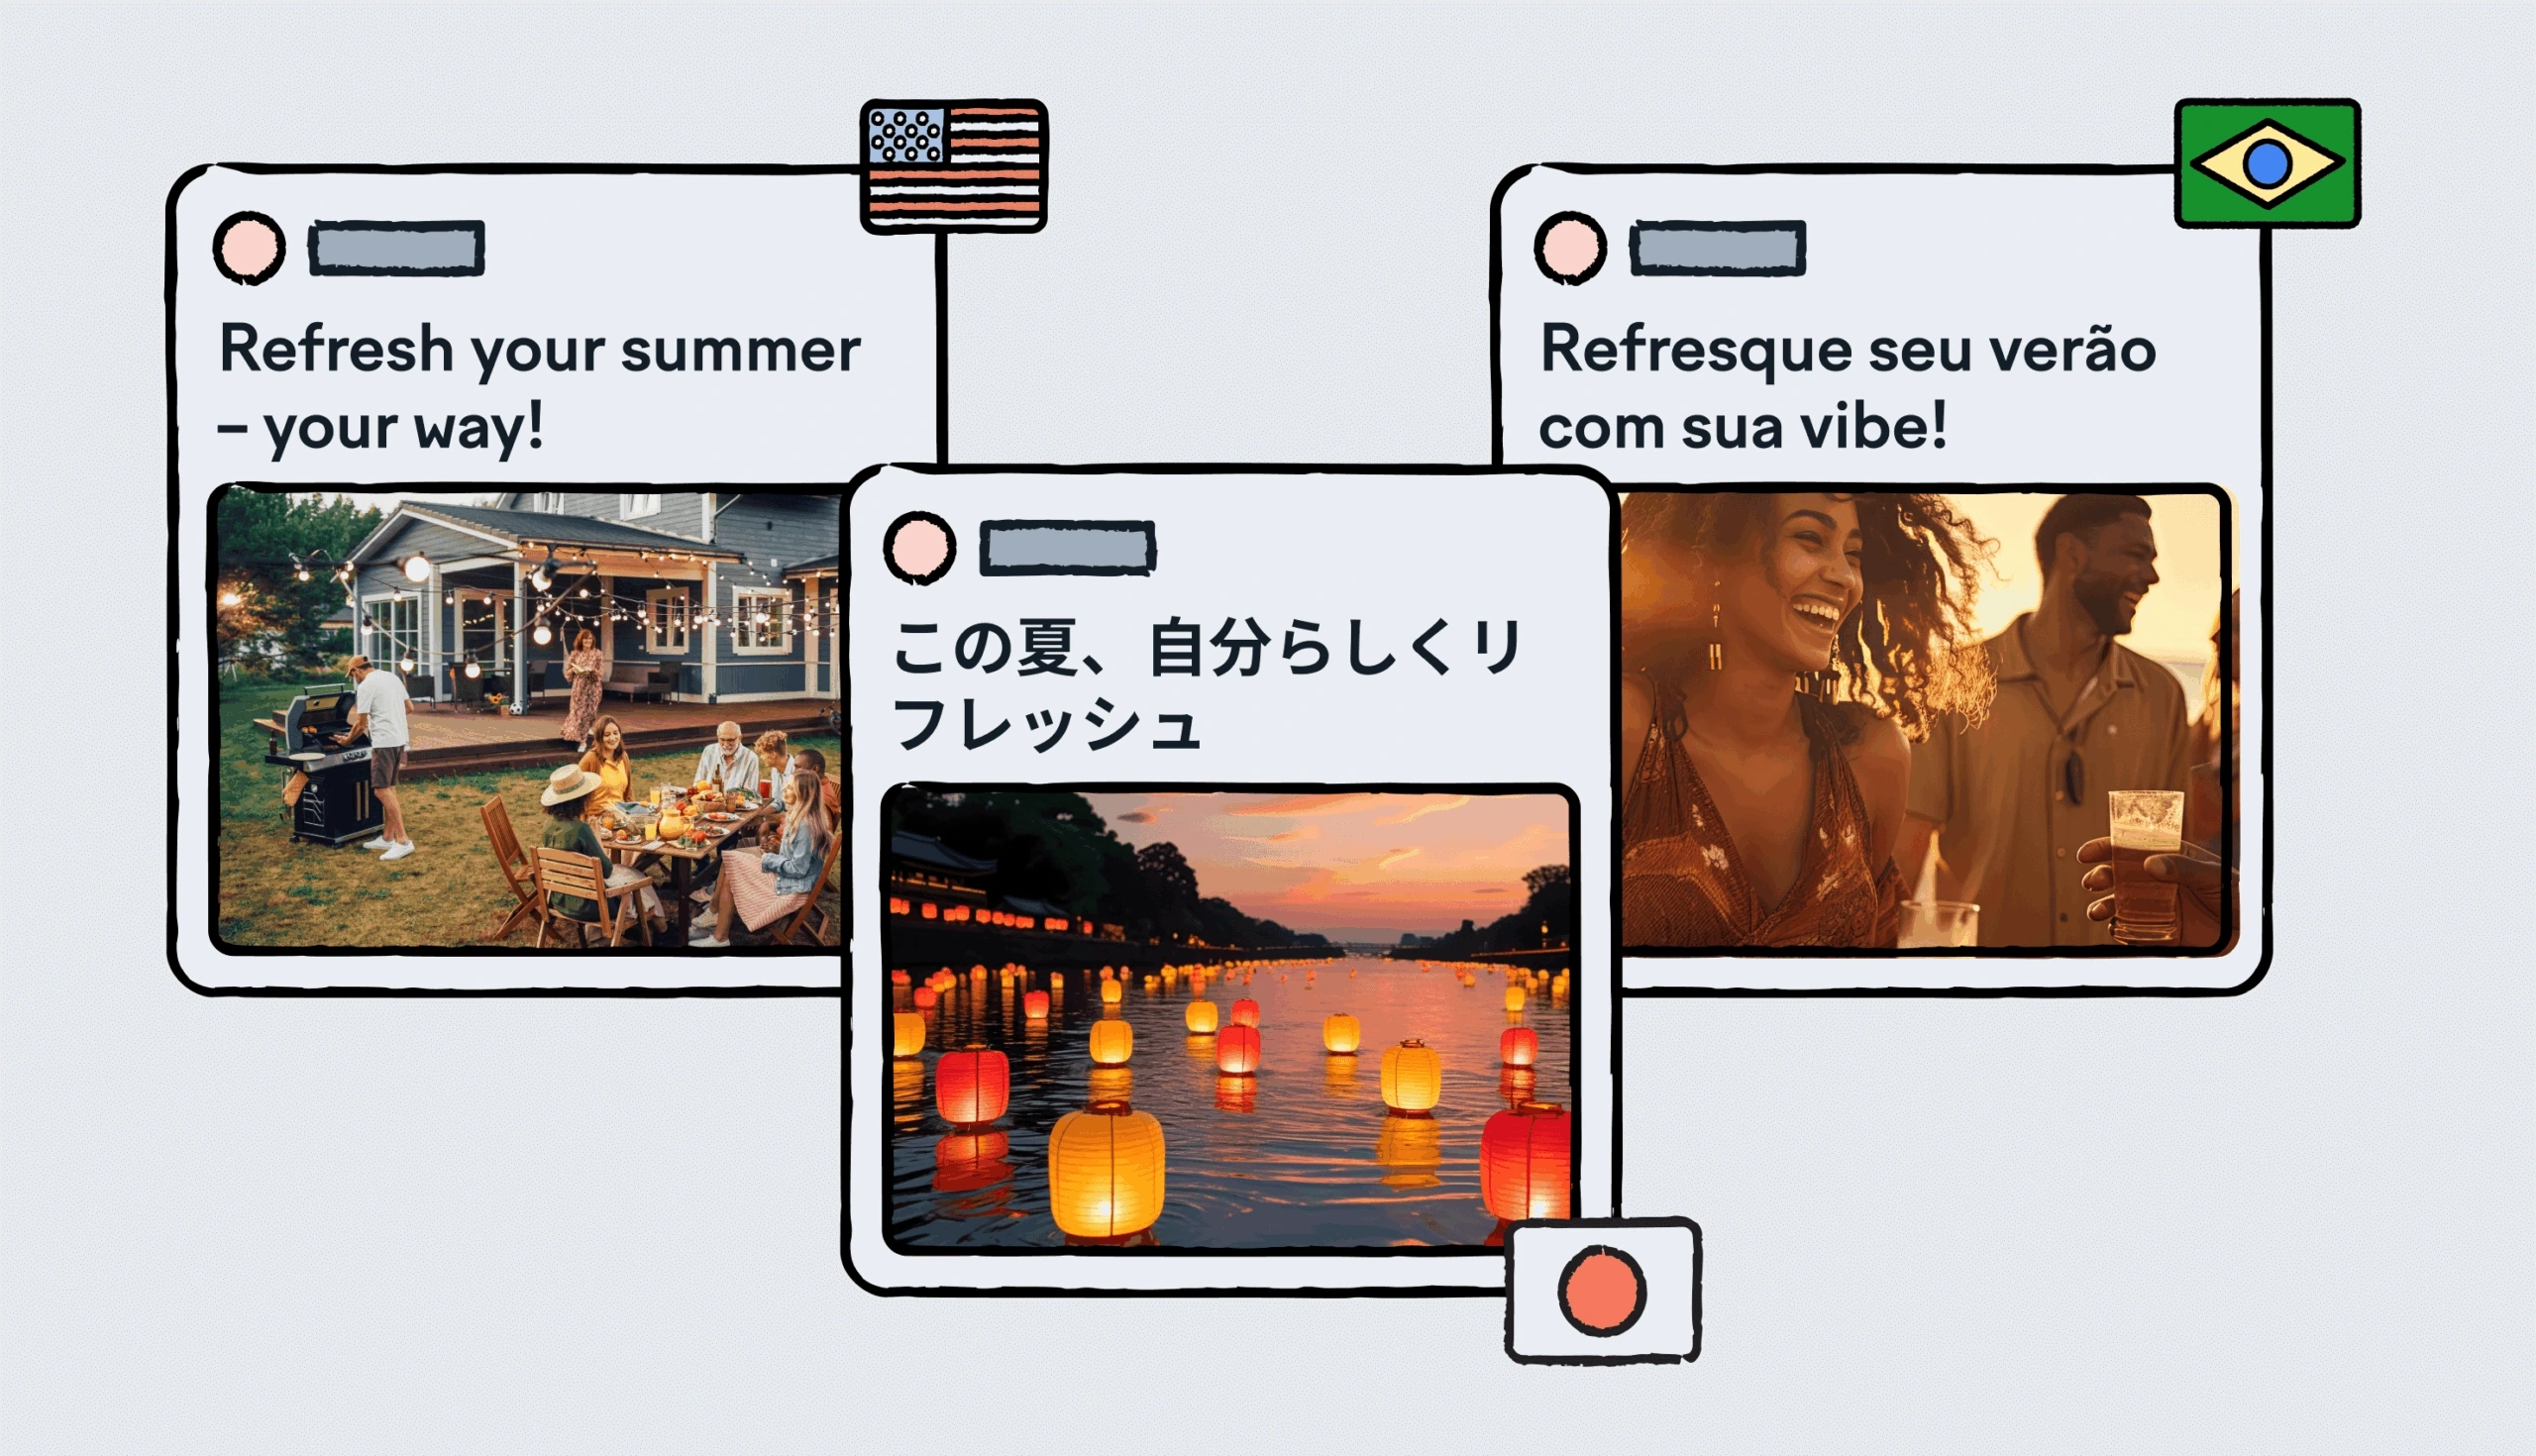
Ever read a perfectly translated ad that still felt off? That’s the gap transcreation closes. Instead of swapping words line‑for‑line, transcreation rebuilds a message so it lands with the same punch, humor, and emotion in every market. In this article, we’ll skip dwelling too much on theory and dive straight into real campaigns that nailed it (and a few niche gems you might have missed). Each transcreation example shows how a simple tweak like changing a headline, re‑shooting a v
Three months after launching the Spanish version of your SaaS site, you open Google Analytics. Traffic looks like a ghost town. Then you check your SEO tool. The English page ranks in the top three. The Spanish twin sits on page two, buried under local blogs and a Reddit thread. Same product, same benefits, spotless grammar. Yet searchers never see it. What gives? The gap is likely in the search intent. Users in Madrid type different queries, skim pages differently, and expe