Some time ago, we explored how Go (or Golang), a rising star among programming languages, supports internationalization (i18n). Now, if you’re here, chances are you (or your team) are looking to go further by using Beego i18n—leveraging one of Go’s popular web frameworks to enhance your web applications. While localization remains as important as ever, using Beego calls for a tailored approach to i18n.
Internationalization is a cornerstone of building software that adapts seamlessly to different languages and markets. In this tutorial, we’ll walk through how Beego simplifies i18n with its built-in tools and features, making localization in Go applications both straightforward and powerful.
Go installed on your machine (ensure it's the latest stable version).
A code editor of your choice (e.g., VS Code, GoLand, or any text editor you prefer).
Basic Beego i18n project setup
Let’s walk through setting up a simple Beego web application from scratch.
Step 1: Install Bee command-line tool
Download and install the latest version of Bee that will help us to create a new application:
go install github.com/beego/bee/v2@latest
Step 2: Create a new Beego app
Run the following command to create a new Beego application:
bee new lokalisebeego
Step 3: Start your app
Now run the following command to boot up the newly created app:
cd lokalisebeegogo getbee run
Your app should be available on http://localhost:8080/.
Adding translation files
To internationalize your Beego project, you'll need locale files for each supported language. Each locale file should use the same keys but provide values localized to the target language. Here's how you can set this up.
First, inside the conf directory of your project, create a file named en-US.ini with the following content:
welcome = Welcome!
Similarly, create another file named fr-FR.ini in the same directory for the French translations:
welcome = Bienvenue!
These .ini files will serve as the language-specific resources for your application.
Configure Beego for i18n
To enable internationalization in Beego, follow these steps:
Step 1: Configure supported languages
Open the app.conf file in your project and add the following configuration:
langs = en-US|fr-FR
This property lists the languages your application will support, separated by a |.
Step 2: Add Beego i18n package
Install the i18n module for Beego by running this command:
go get github.com/beego/i18n
Step 3: Load translation files in your app
Update the routers/router.go file to load the locale files during app initialization:
package routersimport ( "fmt" "log" "strings" beego "github.com/beego/beego/v2/server/web" "github.com/beego/i18n" "lokalisebeego/controllers")// init initializes routes and loads localization settingsfunc init() { if err := loadLocalization(); err != nil { log.Fatalf("Localization setup failed: %v", err) } // Set up the default route beego.Router("/", &controllers.MainController{})}// loadLocalization loads supported languages and locale filesfunc loadLocalization() error { // Get supported languages from app.conf langs, err := beego.AppConfig.String("langs") if err != nil { return fmt.Errorf("failed to load supported languages from app.conf: %w", err) } langsArr := strings.Split(langs, "|") for _, lang := range langsArr { // Load locale files for each language if err := i18n.SetMessage(lang, "conf/"+lang+".ini"); err != nil { return fmt.Errorf("failed to load locale file for %s: %w", lang, err) } } log.Printf("Supported languages loaded: %v", langsArr) return nil}
Key points:
The langs property from app.conf is read into a string variable.
If the configuration cannot be read, an error is logged and the function exits.
The langs string is split into individual languages using the | separator.
Each language is paired with its respective .ini file and registered using i18n.SetMessage. Any errors are logged with details.
Step 4: Configure localization in templates
To use localization in templates, you need to register the i18n.Tr function as a template function. Update the main.go file like this:
package mainimport ( beego "github.com/beego/beego/v2/server/web" "github.com/beego/i18n" _ "lokalisebeego/routers")func main() { // Register the i18n function for templates beego.AddFuncMap("i18n", i18n.Tr) // Start the Beego application beego.Run()}
This registers the i18n.Tr function under the name i18n, making it available for use in templates.
Step 5: Test it out
Restart your Beego app and make sure the following line is printed in the terminal:
Supported languages loaded: [en-US fr-FR]
It means that our locales have been loaded successfully.
Performing simple translations
Now that we've set up our locale files, it's time to use them in our Beego application. We'll create a new controller to handle internationalized content. To keep things clear and independent from the default setup, we'll create a new controller named PageController.
Step 1: Set up the route
First, update the routers/router.go file to register a new route for our controller. Add the following line to the end the init function:
func init() { // other code ... beego.Router("/page", &controllers.PageController{})}
This defines a new route (/page) and assigns the PageController to handle its requests.
Step 2: Create a new controller
Next, create a file named page.go inside the controllers directory. This file will define our new PageController. Here's the implementation:
package controllersimport ( "github.com/beego/beego/v2/server/web" "github.com/beego/i18n")type PageController struct { web.Controller // Embeds Beego's base controller i18n.Locale // Embeds i18n.Locale for localization support}// Get handles GET requests for the PageControllerfunc (p *PageController) Get() { // Get the "lang" parameter from the URL lang := p.GetString("lang") // Default to English if no language is specified if lang == "" { lang = "en-US" } // Store the language in the Data map for the template p.Data["lang"] = lang // Set the template file for rendering p.TplName = "page.tpl"}
Key points:
Beego's web.Controller: This provides RESTful HTTP and MVC functionality to the controller.
i18n.Locale: This enables locale-specific operations for the controller.
Get method: Retrieves the lang parameter from the query string, defaults to English (en-US) if none is provided, and sets it in the Data map.
Step 3: Create a template
Create a file named page.tpl inside the views directory. Add the following content:
Here the i18n function is called with two arguments:
The language code (.lang), which comes from the Data map.
The key ("welcome") to look up in the translation files.
Step 4: Test it out
Now, open a browser or use an API client to send GET requests to:
English (en-US): http://localhost:8080/page?lang=en-US This should display: Welcome!
French (fr-FR): http://localhost:8080/page?lang=fr-FR This should display: Bienvenue!
Use Accept-Language header
Another way to implement localization in Beego is by utilizing the Accept-Language header, which is commonly sent by browsers or HTTP clients to specify the user's preferred language. This approach eliminates the need for URL parameters and provides a more seamless user experience.
To enable Accept-Language header-based localization, update the PageController in the controllers/page.go file like this:
// other code ...// Get handles GET requests for the PageControllerfunc (p *PageController) Get() { // Check for the "lang" parameter in the query string lang := p.GetString("lang") // If "lang" is not provided or invalid, fall back to "Accept-Language" header if lang == "" || !isSupportedLanguage(lang) { lang = parseAcceptLanguageHeader(p.Ctx.Request.Header.Get("Accept-Language")) } // Default to English if no valid language is found if lang == "" { lang = "en-US" } // Store the language in the Data map for the template p.Data["lang"] = lang // Set the template file for rendering p.TplName = "page.tpl"}// isSupportedLanguage checks if the given language is supportedfunc isSupportedLanguage(lang string) bool { supportedLanguages := []string{"en-US", "fr-FR"} for _, supportedLang := range supportedLanguages { if lang == supportedLang { return true } } return false}// parseAcceptLanguageHeader parses the Accept-Language header and returns the first supported languagefunc parseAcceptLanguageHeader(header string) string { // Split the header by commas to get a list of languages languages := strings.Split(header, ",") for _, lang := range languages { // Trim any extra whitespace and check if the language is supported lang = strings.TrimSpace(lang) if isSupportedLanguage(lang) { return lang } } // Return an empty string if no supported language is found return ""}
How does it work
Prioritizing the lang query parameter The lang parameter in the URL query string is checked first. This allows users to explicitly specify their preferred language (e.g., ?lang=fr-FR).
Fallback to Accept-Language header If the lang parameter is missing or contains an unsupported language, the code falls back to the Accept-Language header. This ensures a seamless experience for users relying on browser settings for localization.
Graceful default If neither the lang parameter nor the Accept-Language header provides a valid language, the app defaults to English (en-US). This avoids localization failures.
Validation of supported languages The isSupportedLanguage function checks whether a language is supported by comparing it against a predefined list (en-US, fr-FR). This ensures only valid and expected locales are used.
Parsing the Accept-Language header The parseAcceptLanguageHeader function extracts and evaluates languages listed in the Accept-Language header, selecting the first language that matches the supported list.
Dynamic data for templates The selected language is stored in the Data map under the lang key, making it accessible for dynamic rendering in the template.
Using cookies for persistent language preferences
In the earlier methods, we relied on either the lang query parameter or the Accept-Language header to determine the user’s language. However, this requires sending the preference with every request. A more efficient way is to store the language preference in a cookie. This allows the app to persist the user’s language choice across sessions without requiring it in each request.
We’ll update the PageController to check for a language preference in a cookie. If the cookie is missing, we’ll set it based on the lang parameter or the Accept-Language header.
func (p *PageController) Get() { // Start by prioritizing the "lang" query parameter lang := p.GetString("lang") // If the query parameter is missing or invalid, fall back to the cookie if lang == "" || !isSupportedLanguage(lang) { lang = p.Ctx.GetCookie("lang_choice") } // If the cookie is also missing or invalid, fall back to the Accept-Language header if lang == "" || !isSupportedLanguage(lang) { lang = parseAcceptLanguageHeader(p.Ctx.Request.Header.Get("Accept-Language")) } // Default to English if no valid language is determined if lang == "" { lang = "en-US" } // Save the determined language in a cookie for future requests p.Ctx.SetCookie("lang_choice", lang, 3600, "/") // Cookie expires in 1 hour // Store the language in the Data map for the template p.Data["lang"] = lang // Set the template file for rendering p.TplName = "page.tpl"}
Explanation
Priority to lang query parameter:
• If a valid langis passed as a query parameter, it takes precedence.
• If it’s missing or invalid, we fall back to the next step.
Fallback to lang_choice cookie:
• The cookie is checked for a valid language.
• If it’s missing or invalid, we proceed to the next fallback.
Fallback to Accept-Language header:
• The header is parsed for supported languages.
• If it doesn’t provide a valid language, we move to the default.
Default to English (en-US):
• Ensures a valid language is always set, avoiding localization failures.
Save to cookie:
• The determined language (whether from query, cookie, header, or default) is stored in a cookie to persist user preference across sessions.
Avoiding code duplication in Beego
Enhanced PageController with Prepare
In web applications, repetitive logic for handling tasks like determining language preferences across multiple HTTP methods (e.g., GET and POST) can clutter your code and lead to duplication. Beego's Prepare method helps streamline such tasks by centralizing shared logic, ensuring cleaner and more maintainable code.
We use the Prepare method to centralize language detection and preference storage. This logic runs before any HTTP method handler, allowing the GET and POST methods to focus solely on rendering templates.
package controllersimport ( "strings" "github.com/beego/beego/v2/server/web" "github.com/beego/i18n")type PageController struct { web.Controller // Embeds Beego's base controller i18n.Locale // Embeds i18n.Locale for localization support}// Prepare handles common logic for determining the user's languagefunc (p *PageController) Prepare() { // Start with the "lang" query parameter lang := p.GetString("lang") // If query parameter is missing or invalid, fall back to the "lang_choice" cookie if lang == "" || !isSupportedLanguage(lang) { lang = p.Ctx.GetCookie("lang_choice") } // If the cookie is missing or invalid, fall back to the Accept-Language header if lang == "" || !isSupportedLanguage(lang) { lang = parseAcceptLanguageHeader(p.Ctx.Request.Header.Get("Accept-Language")) } // Default to English if no valid language is determined if lang == "" { lang = "en-US" } // Save the determined language in a cookie for future requests p.Ctx.SetCookie("lang_choice", lang, 3600, "/") // Cookie expires in 1 hour // Store the language in the Data map for use in templates p.Data["lang"] = lang}// Get handles GET requests by rendering the templatefunc (p *PageController) Get() { p.TplName = "page.tpl"}// Post handles POST requests by rendering the templatefunc (p *PageController) Post() { p.TplName = "page.tpl"}// isSupportedLanguage checks if the given language is supportedfunc isSupportedLanguage(lang string) bool { supportedLanguages := []string{"en-US", "fr-FR"} for _, supportedLang := range supportedLanguages { if lang == supportedLang { return true } } return false}// parseAcceptLanguageHeader parses the Accept-Language header and returns the first supported languagefunc parseAcceptLanguageHeader(header string) string { languages := strings.Split(header, ",") for _, lang := range languages { lang = strings.TrimSpace(lang) if isSupportedLanguage(lang) { return lang } } return ""}
Key updates
Centralized logic in Prepare:
Priority-based language determination:
lang query parameter (highest priority)
lang_choice cookie
Accept-Language header
Default to English (en-US)
The language preference is stored in the Data map and saved in a cookie for consistency across future requests.
Simplified HTTP method handlers:
The GET and POST methods only render the template, leveraging the centralized logic in Prepare, reducing redundancy and making the code easier to maintain.
Support for multiple HTTP methods:
The Prepare method ensures consistent behavior across GET and POST requests.
For POST, the lang parameter can be retrieved from the request body (e.g., x-www-form-urlencoded).
Handling date and time localization in Beego
In most web applications, working with localized dates and times is essential. Beego simplifies this with its built-in template functions for formatting date and time directly in templates. Let’s enhance our existing PageController to demonstrate date and time localization.
Step 1: Update the controller
We’ll add the current date and time to the Data map in our Prepare method so it’s available for rendering in templates:
import ( "strings" "time" // <--- make sure to import time package! "github.com/beego/beego/v2/server/web" "github.com/beego/i18n")func (p *PageController) Prepare() { // ... other code ... p.Data["currentDateTime"] = time.Now()}
Step 2: Register the Date template function
Add the following line to main.go before beego.Run() to make Beego’s Date function available in templates:
func main() { // Register the i18n function for templates beego.AddFuncMap("i18n", i18n.Tr) // Datetime l10n beego.AddFuncMap("datetimefmt", beego.Date) // Start the Beego application beego.Run()}
This registers the datetimefmt template function, which formats a Time object using PHP-style date-time syntax.
Step 3: Update the template
Modify the page.tpl template to display the localized date and time. Add the following line where you want the date-time to appear:
<p>Current Date and Time: {{datetimefmt .currentDateTime "Y-m-d H:i:s"}}</p>
Main things to note:
The .currentDateTime key refers to the Time object added in the Prepare method.
The format string "Y-m-d H:i:s" specifies the desired output format.
Localizing currency in Beego
Handling currency localization is a common requirement in web applications, especially for global audiences. While Beego doesn't have built-in support for currency formatting, we can use Go's golang.org/x/text package to add this functionality.
First, install the golang.org/x/text package to handle currency formatting:
go get golang.org/x/text
Next, create a helper function to format currency based on the user's language and locale. Add this function to the main.go file:
func formatCurrency(lang string, amount float64) currency.Amount { var currencyUnit currency.Unit switch lang { case "en-US": currencyUnit = currency.USD case "fr-FR": currencyUnit = currency.EUR default: currencyUnit = currency.USD } return currencyUnit.Amount(amount)}
Add the formatCurrency function to Beego’s template function map in main.go:
Pass a sample amount to the template in the Prepare method or specific HTTP handlers:
p.Data["amount"] = 1234.56
Finally, use the formatCurrency function in your template to display the localized currency:
<p>Total: {{formatCurrency .lang .amount}}</p>
This is it!
Localize with Lokalise
Congratulations! By now, you’ve tackled the challenge of internationalizing your Beego app, stepping beyond Go’s basic HTTP facilities, and making your web service accessible to a global audience. But managing translations efficiently can be tough, especially as your app grows.
This is where Lokalise, a powerful translation management system, comes in. Lokalise simplifies handling multilingual content with features like:
Seamless integration: Connect with various services and workflows.
Collaborative translation: Work with your team or professional translators.
Quality assurance: Catch errors and ensure consistent translations.
Centralized dashboard: Manage all your translations in one place.
With Lokalise, scaling your Beego app to support multiple locales becomes easier, faster, and more efficient, so you can focus on building great features instead of wrestling with localization files.
Getting started with Lokalise
To start off, sign up for a free trial (no credit card information required). Then you'll need to create a new Web and mobile project by clicking the New project button. Give it a name, choose the base language (English in our case) and the target language (French).
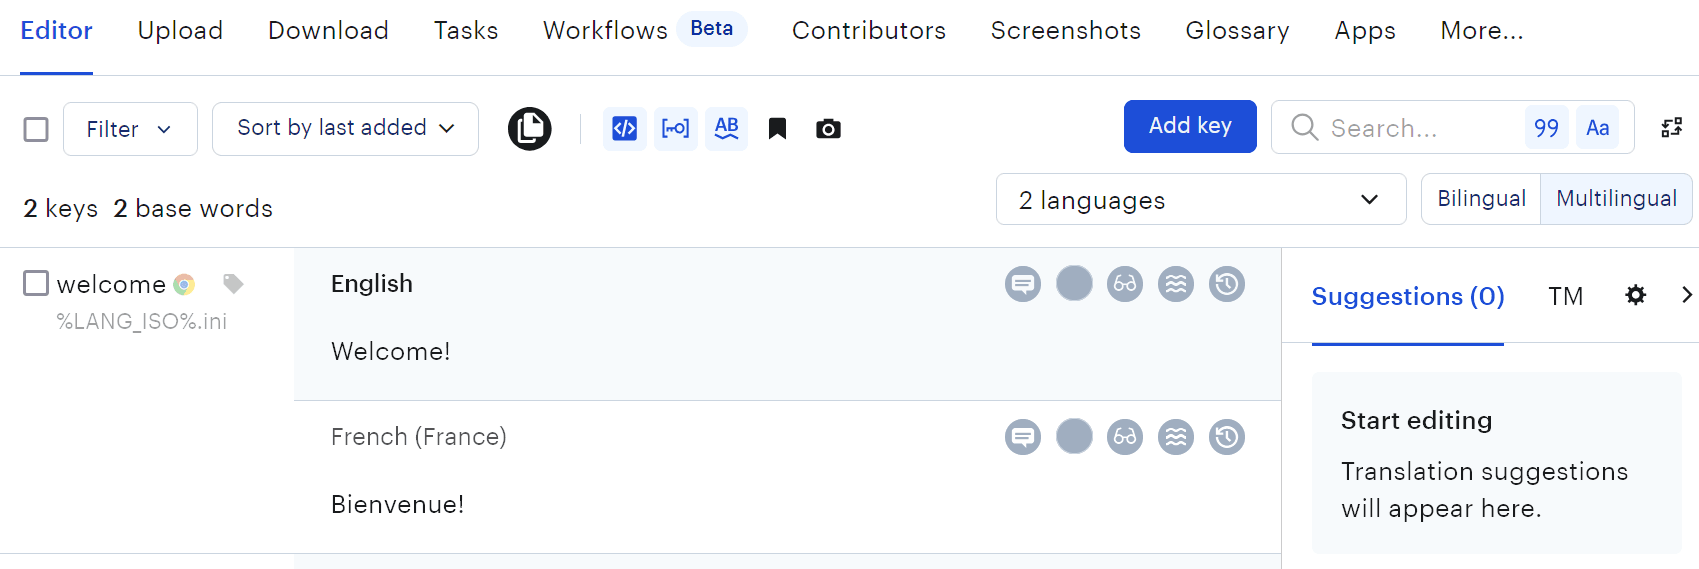
Once the project is created, proceed to the Upload page and choose your INI translation files. Hit Upload and then proceed to the Editor. You'll see the following interface:
You can edit your translations here, add new keys, languages, take advantage of the AI, invite more contributors, and perform numerous other actions. Please refer to the Getting started materials to learn more.
Once you are ready, navigate to the Download page, choose the INI file format from the dropdown and download updated files to your Beego project. This is it!
Conclusion
In this tutorial, we covered the essentials of a Beego i18n. From setting up a basic Beego project to adding locale files, we explored techniques to implement internationalization using URL parameters, Accept-Language headers, and cookies.
We also streamlined our code with the Prepare function to avoid duplication and added localized formatting for dates, times, and currency. Finally, we highlighted how a translation management system like Lokalise can simplify and enhance the localization process for growing applications.
With these tools and strategies, you're well-equipped to make your Beego app accessible to users around the globe. Now, it’s time to dive in and start building!
Ilya is the lead for content, documentation, and onboarding at Lokalise, where he focuses on helping engineering teams build reliable internationalization workflows. With a background at Microsoft and Cisco, he combines practical development experience with a deep understanding of global product delivery, localization systems, and developer education.
He specializes in i18n architectures across modern frameworks — including Vue, Angular, Rails, and custom localization pipelines — and has hands-on experience with Ruby, JavaScript, Python, Elixir, Go, Rust, and Solidity. His work often centers on improving translation workflows, automation, and cross-team collaboration between engineering, product, and localization teams.
Beyond his role at Lokalise, Ilya is an IT educator and author who publishes technical guides, best-practice breakdowns, and hands-on tutorials. He regularly contributes to open-source projects and maintains a long-standing passion for teaching, making complex internationalization topics accessible to developers of all backgrounds.
Outside of work, he keeps learning new technologies, writes educational content, stays active through sports, and plays music. His goal is simple: help developers ship globally-ready software without unnecessary complexity.
Build a smooth translation pipeline with Lokalise and Vercel
Internationalization can sometimes feel like a massive headache. Juggling multiple JSON files, keeping translations in sync, and redeploying every time you tweak a string… What if you could offload most of that grunt work to a modern toolchain and let your CI/CD do the heavy lifting? In this guide, we’ll wire up a Next.js 15 project hosted on Vercel. It will load translation files on demand f
Hands‑on guide to GitHub Actions for Lokalise translation sync: A deep dive
In this tutorial, we’ll set up GitHub Actions to manage translation files using Lokalise: no manual uploads or downloads, no reinventing a bicycle. Instead of relying on the Lokalise GitHub app, we’ll use open-source GitHub Actions. These let you push and pull translation files directly via the API in an automated way. You’ll learn how to: Push translation files from your repo to LokalisePull translated content back and open pull requests automaticallyWork w