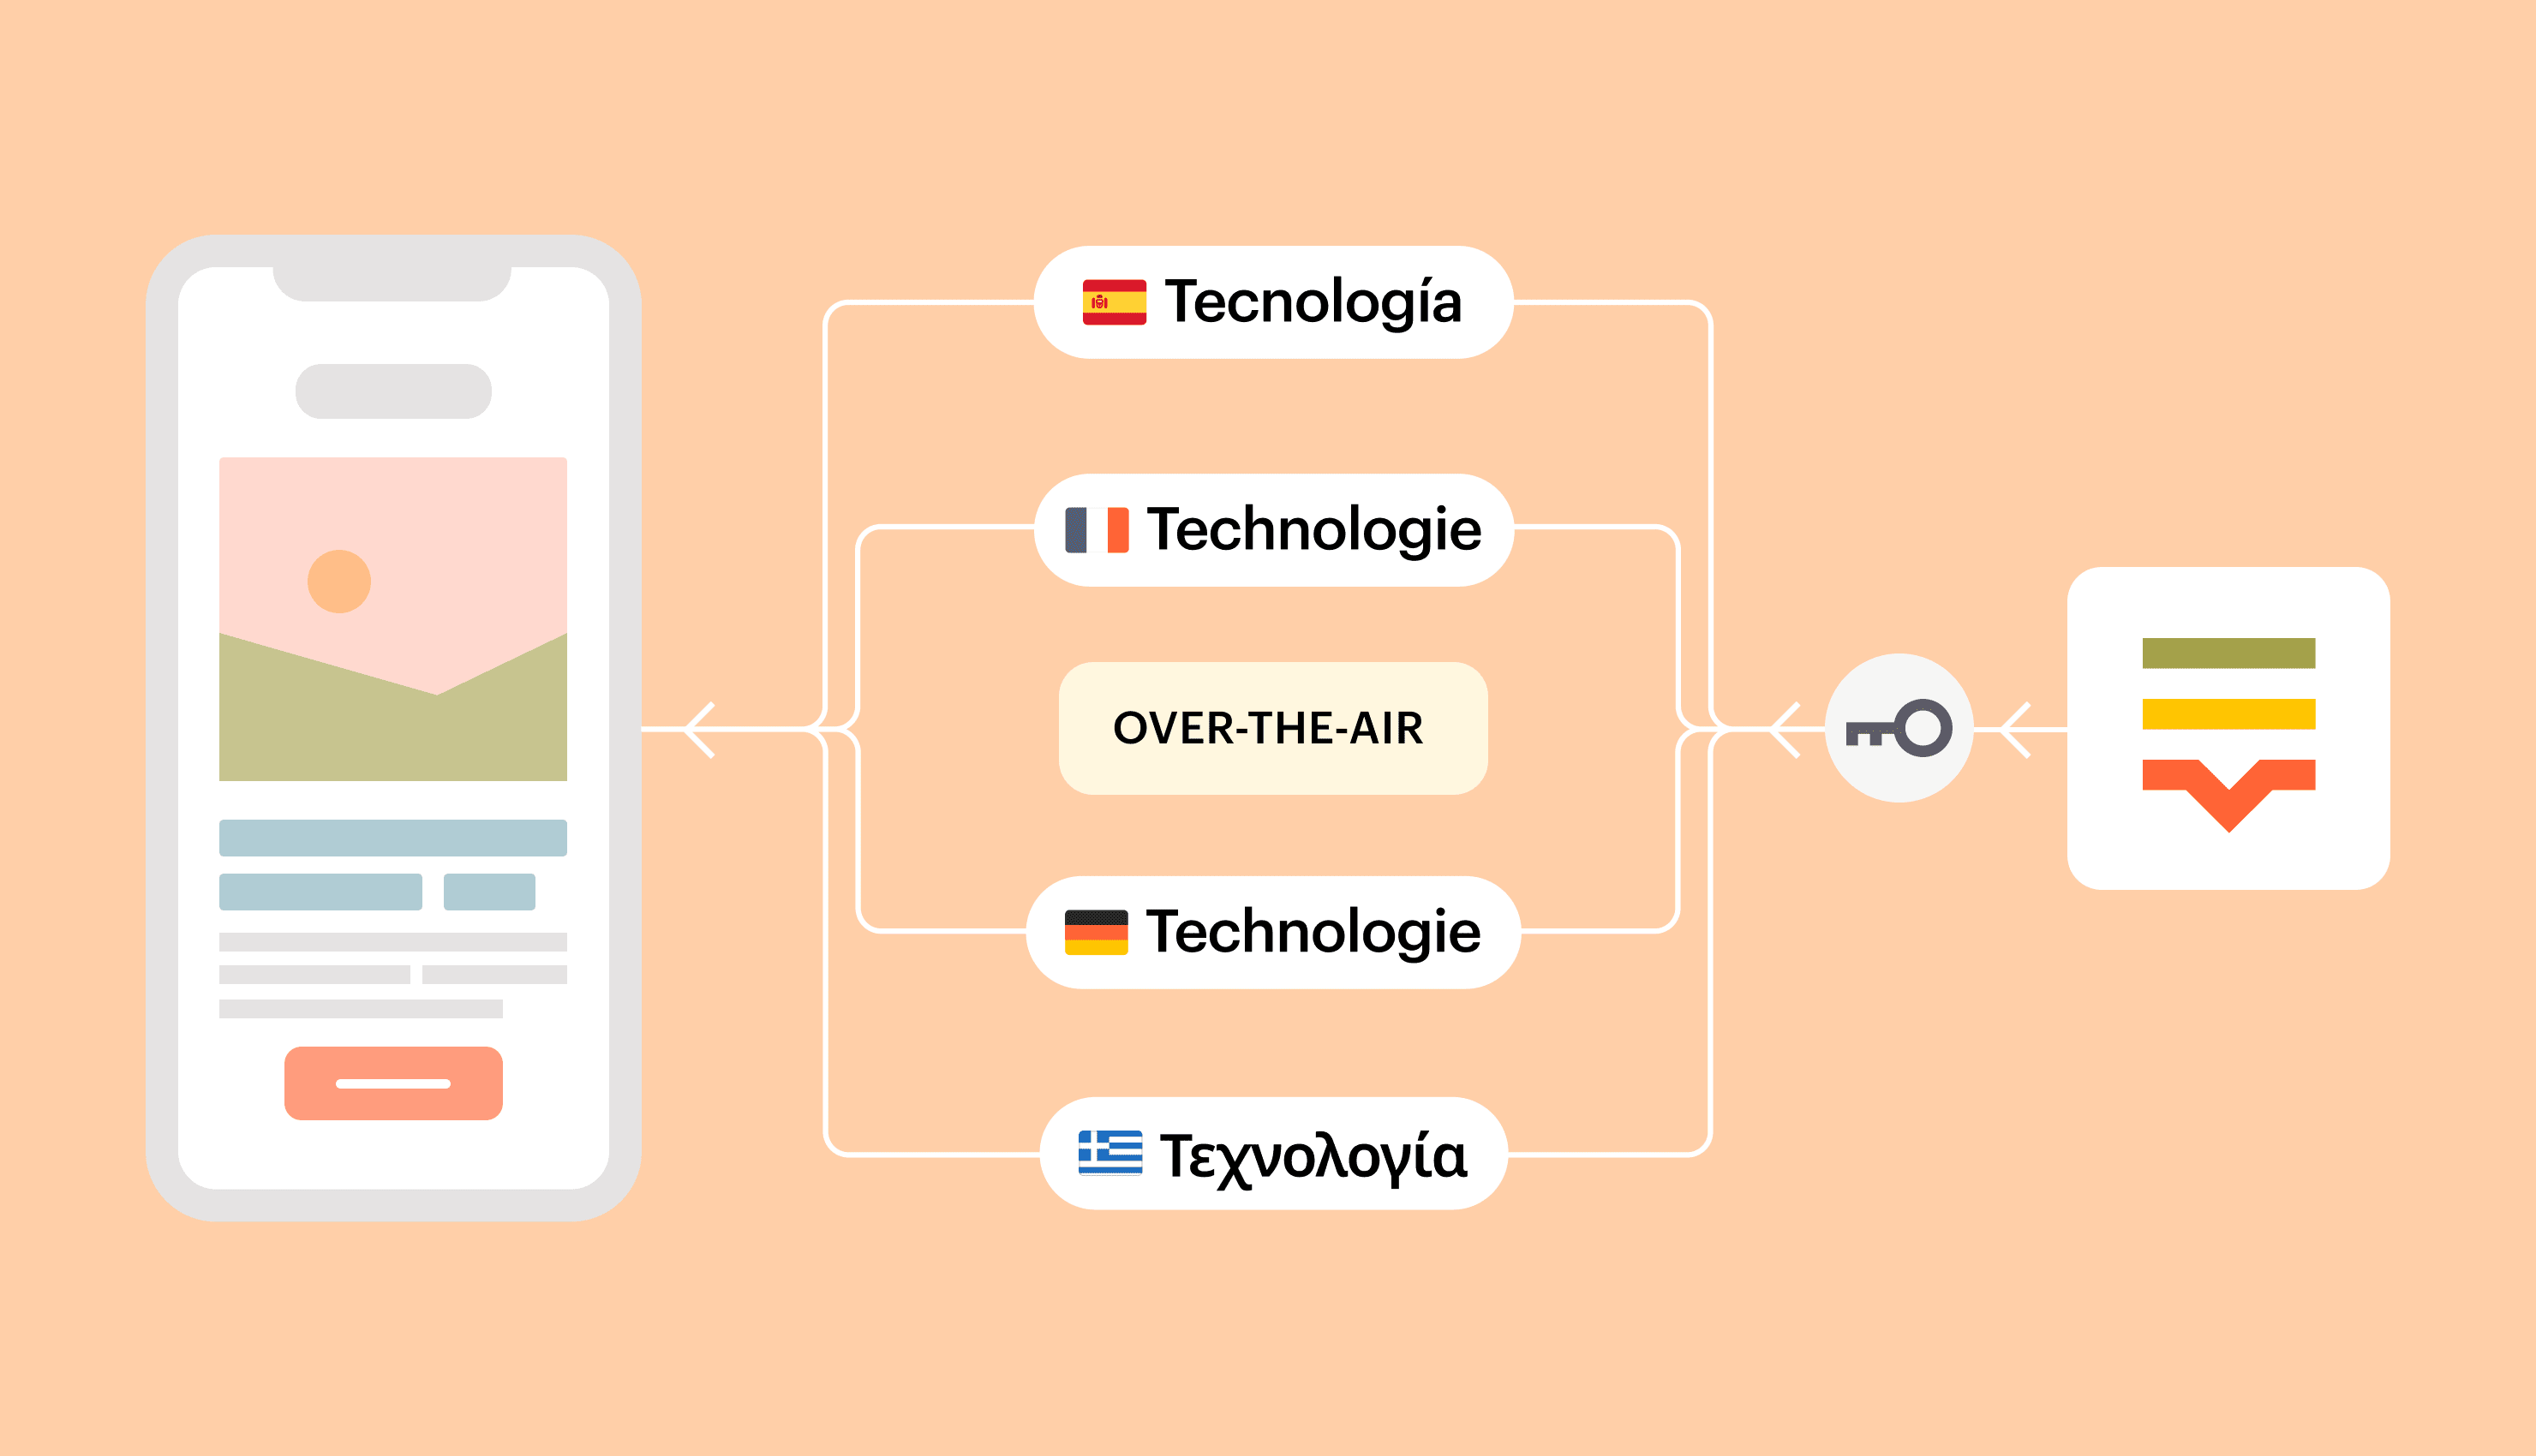
As you might know, we've updated over-the-air (OTA) pricing model. It is based on gigabytes of sent data rather than monthly active users (MAU). It is more fair for everyone because we’ll only charge real usage. There are three factors that impact data usage: users, bundle size, and number of bundle releases. If you benefit more from OTA, you’ll use more data and have higher fees. However, if you optimize your usage, e.g., by optimizing your bundle size, you can reduce those fees. This article presents some recommended practices related to SDK and OTA usage, and explains how to reduce bundle size so that you don't overpay.
First of all, we really recommend choosing a single source of truth for your translation data, and ideally it should be Lokalise. This means that all changes to your keys and values should be performed in a single place, for example our TMS. Then, these changes should be pushed to other locations: your local PC, other team members' computers, GitHub, your server, and so on. Avoid modifying translation keys and values in multiple places simultaneously. This will make managing these data much more complex and may result in various inconsistencies. Specifically, someone might accidentally overwrite new data or even remove newly created keys.
Also, keep in mind that our mobile SDKs cannot automatically export modified translations from your local PC to Lokalise: you'll have to utilize other tools for that.
Include all relevant translation data in your builds
Before performing a new mobile app build, make sure to include all translation data in that build. Also, ensure that your local files are synced with Lokalise before building an app. Why? Well, because that's likely to greatly reduce bundle size when using OTA later, especially if you are applying other techniques suggested in this article. Ideally, you should use the following approach:
Prepare the initial translation data locally and sync these data with Lokalise.
Make the first build (v1).
Deliver any modified translations using OTA.
Start preparing for the second build (v2). Sync your local files with Lokalise and be sure to include all translation data in the build. In other words, your local translations should be even with the translations on Lokalise.
You will probably want to create a bundle freeze saying that the bundle generated in step 3 should only be distributed for app v1 and not for v2. To learn more about bundle freezes, and to understand why it might be a good idea to freeze your bundle before making a build, please refer to tip #6.
Make the second build.
Once again, deliver any data modified since the second release using OTA. Please note: In this case you won't have to deliver any data from steps 1–6 because this data was already included in the build.
This approach can greatly reduce the size of your bundle and, consequently, the sum to pay. Always remember that OTA is meant to deliver modified translations to end users between app releases only.
By the way, if you are worried about potential issues with translations fallback, don't fret: Both the Android and iOS SDKs can now find proper fallbacks in the local translations.
Take advantage of Lokalise tags and filters
Before making an OTA bundle on Lokalise, be sure to include only the necessary keys. There's no need to include all translation data in every bundle; in fact, we highly recommend avoiding this approach. Please note that here we are discussing OTA bundles created on Lokalise, not app builds that you are performing locally. To summarize: App builds should include all the available translation data with all the recent changes. Conversely, OTA bundles should only include translations modified since the last build.
To choose only the relevant data, you can use Lokalise filters, and then tag the chosen data so it can be included in the bundle. Let's see a simple example.
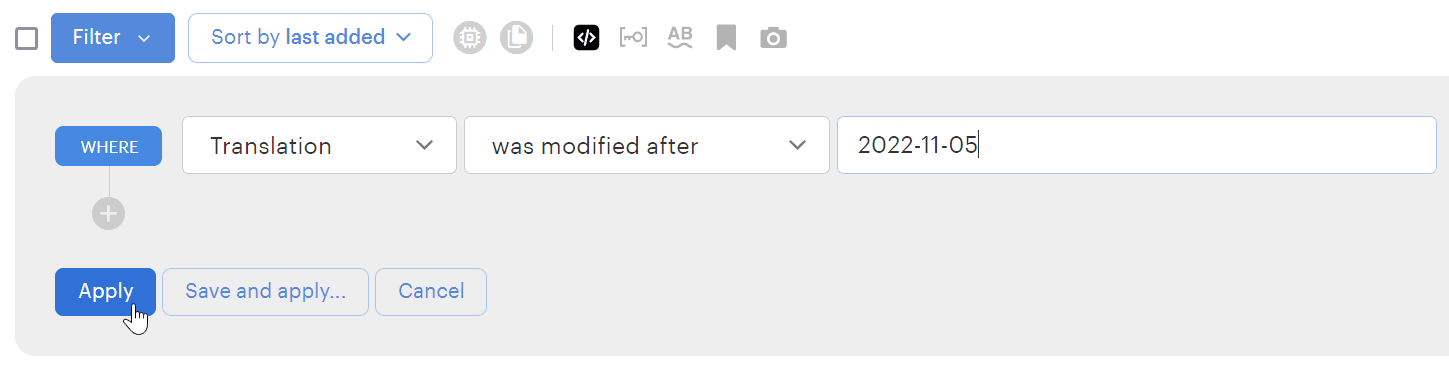
Suppose your app has 10 translation keys, and you are preparing the first release. You include all these keys in the build and publish the app on November 5, 2022 (2022-11-05). Then, the next day (2022-11-06), you see that two translations should be slightly modified. You open Lokalise and make the necessary changes or ask your translators to apply these changes. You would like to send these new changes to your users without making another build, thus you take advantage of OTA. But, do you have to include all translations in the bundle? Of course not!
To optimize the bundle size, open your project editor, and click Filter > New filter. Then choose the following: Translation — was modified after — 2022-11-05, and Apply:
This way, you will display only the translations that were modified after the app was built and released. In other words, these are translations that should be included in the OTA bundle!
Now, choose all translation keys by clicking the checkbox near the Filter dropdown, and choose Tags: add/remove from the bulk actions dropdown. Then, enter a unique tag name; for example, post-release-1 (please note that this is just an example and you can introduce your own naming pattern):
Then click Add. Now your updated translations are ready to include in the bundle; thus, proceed to the Download page.
Choose the SDK format that works for you, and then make sure to expand Content to export section. Add the post-release-1 tag to the Include tags field:
Adjust any other options as needed, then click Build only. Your bundle will contain only the modified data. Great!
Be mindful of bundle sizes
Remember that having a huge bundle doesn't just mean higher payments, it could also cause app performance to degrade. In our experience, bundle sizes larger than 2 MB cause significant issues. This can result in mobile apps starting to work slowly or hang. Therefore, be sure to optimize your bundles as much as possible. This advice is applicable mainly to Android apps as they use a dedicated database for translation storage and this adds certain performance overhead.
Don't overuse automated actions
Automating routine tasks is wonderful, and Lokalise provides useful tools, including the API, webhooks, and custom processors, for this purpose. However, when it comes to OTA bundle generation, we really recommend keeping things at a modest level, avoiding overuse of these tools. For example, some customers create webhooks that listen to every translation update and generate new OTA bundles every time. This is likely an undesirable approach as you'll end up generating way too many redundant bundles (even if you're using that cool technique with the tags explained above). Problem is, translators can, and probably will, make multiple changes to the same translation before delivering the final version. Thus, it makes little sense to generate new bundles every time and deliver intermediate translation versions to your users.
Instead, you can create a webhook that listens to events like project.task.closed (task has been closed) or team.order.completed (professional translation order has been completed), and generate a new bundle. This way you won't generate dozens of redundant bundles and overuse OTA.
Utilize bundle freezes
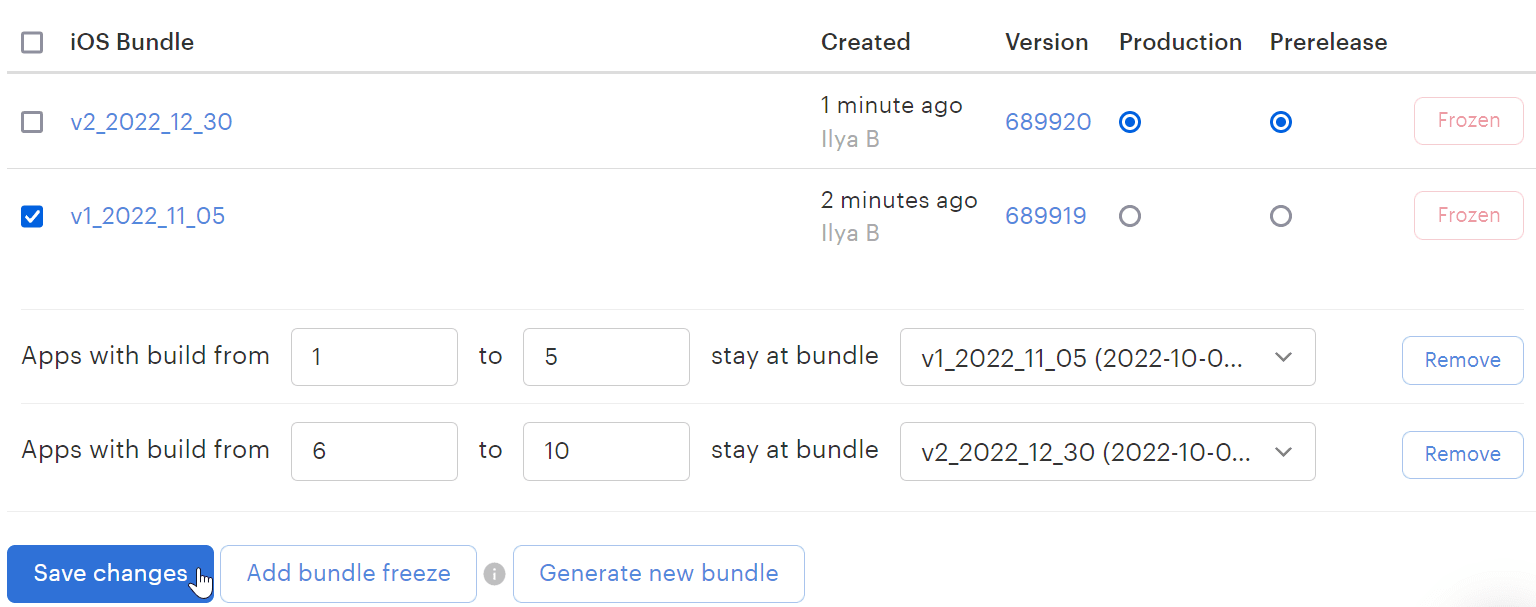
Bundle freezes can be a powerful tool as well, but some users are not aware of this feature's purpose. The idea is quite simple: you can choose a specific OTA bundle to serve to all users with a chosen app version.
In the example above, we are saying that all apps with builds 1 to 5 must always use the first version of the bundle (v1_2022_11_05). Conversely, later versions should utilize bundle v2_2022_12_30. This approach proves really useful, and you won't need to worry that some users might accidentally receive outdated translations.
Note that all other app builds not specified in the bundle freeze will be served as Production or Prerelease bundles as usual, as if the bundle freeze wasn't enabled. If you are wondering, what the purpose of Production and Prerelease switches is, the explanation is quite simple. Any bundle marked as Production will be served to your customers, unless the build is within the bundle freeze range. A Prelease bundle will be served only to users whose app has a prerelease switch enabled. For example, to enable Prerelease on Android, you would say Lokalise.setPreRelease(true);. Apps built with this flag will consume Prerelease bundles.
Bundle freezes, OTA, and local translations
Now that you know how bundle freeze works, we can return to the discussion from the second tip and understand the necessity of creating a bundle freeze before building and publishing the second version of the app. Here's a simple scenario:
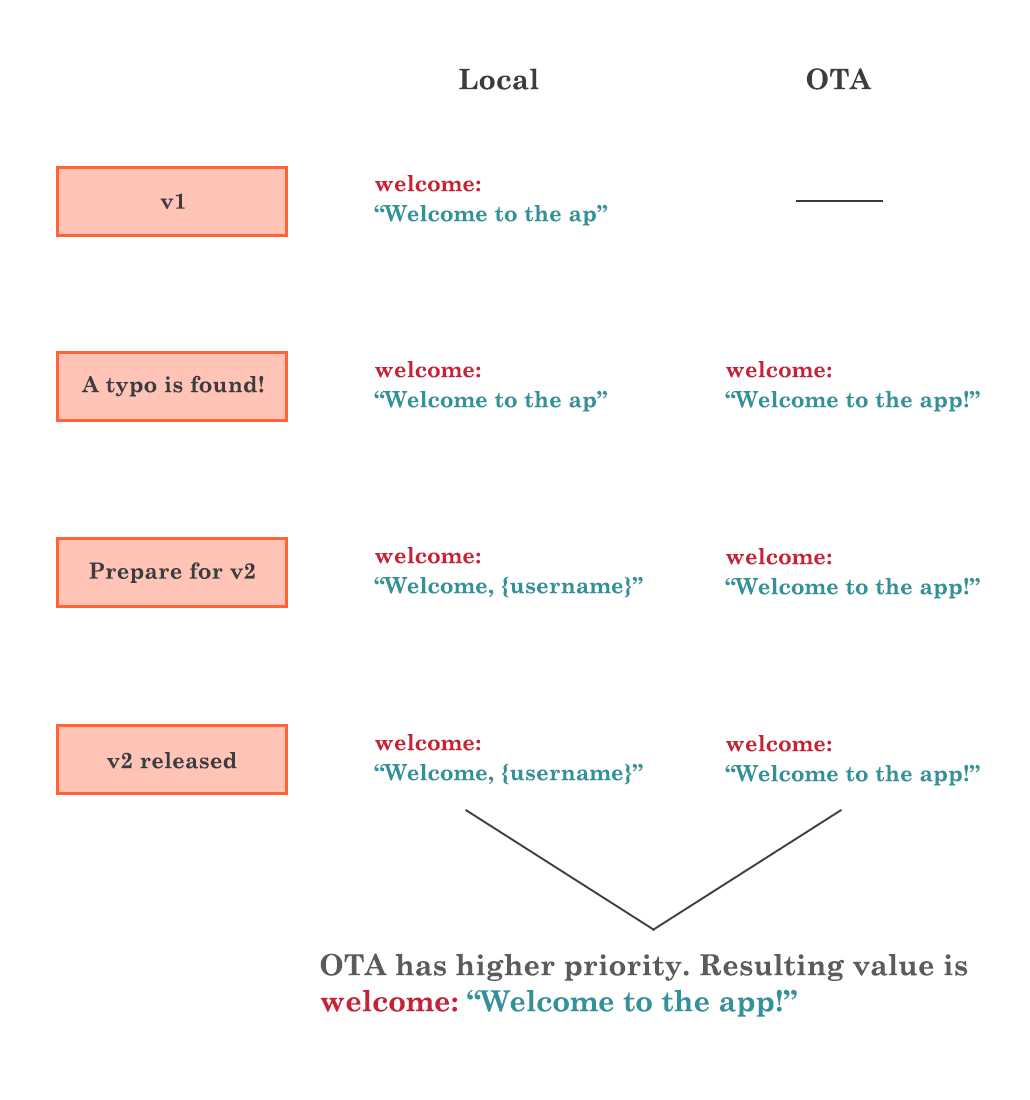
You are building and publishing v1 with all translations included locally.
Then, Sam — your translator — notices a small typo in the English translation of the welcome key and fixes it. You generate a new bundle on Lokalise containing this change and use OTA to deliver it to end users.
Next, you are preparing to build app v2. Sam changes the welcome key translation again to adapt it to the new design released along with v2. You do not generate a new OTA bundle at this step as you are planning to include this change in the second version of the app.
You sync the local translation files with Lokalise, downloading all the recent changes including those made at step 3. App v2 is built and published.
Your beta testers report that they see the old welcome key translation text, which was apparently present at step 2. The changes made by Sam at step 3 are not visible for some reason.
So, why is this happening? Well, here are three important things to keep in mind:
Whenever a user opens a mobile app, the Lokalise SDK will automatically request the most recent OTA bundle. The downloaded bundle will then be cached on the user's device. It will not be re-downloaded every time if the bundle is the same and the app version has not changed.
However, if you release a new version of the app, the bundle will be downloaded again even if it was cached previously because the app version has changed.
OTA translations have higher priority over local ones. In other words, OTA translations will overwrite any local value for the same key.
Here's a simple schema demonstrating this scenario:
Now we understand what's going on! Basically, once a user installs app v2 on their smartphone and opens it, the Lokalise SDK downloads the most recent OTA bundle. This bundle contains the welcome key translation from the second step and it overwrites the local translation (third step) for the same key. That's why your testers cannot see the new value; it was simply overridden by the value from the OTA bundle.
So, how do you overcome this problem? The solution is straightforward: You should create a bundle freeze before proceeding to step 4 (before v2 is built and released). This way, you're able to distribute your OTA bundle v1_2022_11_05 only to app v1 and not to v2.
Lite bundles
Once again, please note that all other app builds not specified in the bundle freeze will continue to receive Production or Prerelease bundles as has been mentioned previously. For example, suppose you've released a new version 3 of your app while keeping all bundle freezes intact. As long as there's no bundle freeze for the v3, does it mean no OTA bundle will be downloaded for this version? No, it does not. Let's return to the screenshot shown above:
We can see that the v2_2022_12_30 bundle is set a Production. Therefore, this bundle will still be downloaded when launching the app v3 even though there are no bundle freezes related to this version. However, this behavior may be undesired as the app v3 might contain all the necessary translations locally, and downloading the OTA bundle is effectively redundant. To fix this problem, you can use a lite bundle trick. Basically, you can create an OTA bundle containing a single key with all the project languages, and then distribute this bundle only to v3 by creating a new bundle freeze. This way your customers will still download the bundle but as long as it has a very small size, the impact will be minimal.
Mobile SDKs are not a replacement for inbuilt l10n tools
The final thing to remember is that Lokalise mobile SDKs were created to enhance the localization process, not to completely replace native solutions. In other words, you should still use inbuilt libraries and plugins to translate your apps, and include local translation files in your builds. Use OTA only to deliver translation data that were modified between releases. OTA is not meant to be a single mechanism for delivering all the translations added or modified since the very first app release.
Conclusion
So, in this article we have covered some tips that can help you optimize your download bundles and over-the-air localization process. Hopefully you found it useful!
If you have any further questions, don't hesitate to reach out to us. Thank you for staying with me today, and until next time.
Ilya is the lead for content, documentation, and onboarding at Lokalise, where he focuses on helping engineering teams build reliable internationalization workflows. With a background at Microsoft and Cisco, he combines practical development experience with a deep understanding of global product delivery, localization systems, and developer education.
He specializes in i18n architectures across modern frameworks — including Vue, Angular, Rails, and custom localization pipelines — and has hands-on experience with Ruby, JavaScript, Python, Elixir, Go, Rust, and Solidity. His work often centers on improving translation workflows, automation, and cross-team collaboration between engineering, product, and localization teams.
Beyond his role at Lokalise, Ilya is an IT educator and author who publishes technical guides, best-practice breakdowns, and hands-on tutorials. He regularly contributes to open-source projects and maintains a long-standing passion for teaching, making complex internationalization topics accessible to developers of all backgrounds.
Outside of work, he keeps learning new technologies, writes educational content, stays active through sports, and plays music. His goal is simple: help developers ship globally-ready software without unnecessary complexity.
Libraries and frameworks to translate JavaScript apps
In our previous discussions, we explored localization strategies for backend frameworks like Rails and Phoenix. Today, we shift our focus to the front-end and talk about JavaScript translation and localization. The landscape here is packed with options, which makes many developers a
Syncing Lokalise translations with GitLab pipelines
In this guide, we’ll walk through building a fully automated translation pipeline using GitLab CI/CD and Lokalise. From upload to download, with tagging, version control, and merge requests. Here’s the high-level flow: Upload your source language files (e.g. English JSON files) to Lokalise from GitLab using a CI pipeline.Tag each uploaded key with your Git branch name. This helps keep translations isolated per feature or pull request
Build a smooth translation pipeline with Lokalise and Vercel
Internationalization can sometimes feel like a massive headache. Juggling multiple JSON files, keeping translations in sync, and redeploying every time you tweak a string… What if you could offload most of that grunt work to a modern toolchain and let your CI/CD do the heavy lifting? In this guide, we’ll wire up a Next.js 15 project hosted on Vercel. It will load translation files on demand f