If you are reading this, you (or your organization) have already taken the right step toward reaching across multiple platforms using Xamarin.Forms. But just it's as important, if not more so, to speak your customers' language, am I right? In other words, internationalization (i18n) has transformed from being something that is nice-to-have to being a need: a functional requirement.
In the Information Age we're living in, it's not an exaggeration to say the whole world is becoming an interconnected global village day by day. Hence, it is our duty as app developers to adapt and provide support when not just one locale, but a much wider audience is reaching for our applications.
So, without further ado, it is time to discover how to internationalize your Xamarin.Forms application.
In this article, we will take a look at Xamarin.Forms internationalization using step-by-step examples.
We will cover the following topics in this tutorial:
I18n on Xamarin.Forms.
.NET RESX resource file format and its uses.
String localization through XAML and C# code-behind changes.
Changing language direction using the VisualElement.FlowDirection property.
First and foremost, let's set up a simple Xamarin.Forms application on which we'll perform our internationalization tasks.
Let's open up Visual Studio and create a project with the following configuration:
Name: XamarinI18nProject Template: Mobile App (Xamarin.Forms) App Template: Blank
Note: Make sure to choose both the Android and iOS options when you are creating the application.
Add resource files
Alright, we now have our blank Xamarin.Forms internationalization-expecting application awaiting localization (l10n). As our first step, let's fill up our XamarinI18n app with language resources from different locales.
Resurrect RESX
The .NET framework provides a resource file format named RESX (.resx) and we can easily use it for our resource file handling purposes.
It would be beneficial for us to quickly take note of these points on RESX before we move on:
Think of RESX files as XML files with added compatibility with Xamarin and Visual Studio.
RESX files compile to binary resource files (.resources) readable by a Xamarin application.
For any given RESX resource file, Visual Studio 2019 can generate a C# code-behind class holding a static property to access this resource within the code.
Let's create a resources directory inside our XamarinI18n app. Now, we can use the Add New Item option in the IDE and choose the Resources File to add a Lang.resx resource file inside the resources directory.
Let's go ahead and stock this Lang.resx resource file with some sentences we can localize later on:
Name Valuewelcome Welcome to my app!switch-en Switch to Englishswitch-it Switch to Italian
Note: This Lang.resx will act as the default resource file for our XamarinI18n project.
Rules for setting resource access modifier in Visual Studio
Take a look at the Access Modifier option on the Lang.resx tab – this lets us decide how Visual Studio will deal with the static property generation I mentioned earlier.
If the Access Modifier is set to Internal or Public, Visual Studio will generate an applicable C# code-behind providing the mentioned accessibility level to its resources. But in the case that it's set to No code generation as you might expect, the IDE will not generate a code-behind.
So, you might be wondering, how can we choose this?
It all boils down to the Xamarin.Forms design for handling internationalization-related resource files. Xamarin.Forms expect us to set:
The default resource file in the project to generate a C# code-behind class file.
Any additional resource files created to represent other cultures to not generate a C# code-behind class file, i.e., set to No code generation.
Since our resource files are in a resources folder, it'll be wise to set the Lang.resx accessibility level to Public. This way, our IDE will generate a C# code-behind for Lang.resx making its resources accessible from anywhere within the project.
Lastly, let's add another resource file to the same resources folder to hold localization resource values for the Italian culture. Create a Lang.it.resx resource file and fill it up like so:
Name Valuewelcome Benvenuto nella mia app!switch-en Passa all'Ingleseswitch-it Passa all'italiano
Note: Make sure to set the Lang.it.resx resource file's Access Modifier to No code generation since we are adding an additional culture to our XamarinI18n project.
Xamarin.Forms allow us to write a shared code that works on all platforms once coded in the Core Project aka the Shared project. Let's find out how this becomes useful when setting up internationalization in our applications.
String l10n
We already have resource files for two cultures added in our XamarinI18n project. Let's see how we can create a simple XAML page that localizes its strings to each culture at the click of a button.
Localizing through XAML
Add a new XAML page, SwitchPage.xaml, to the Shared project and fill its StackLayout as follows:
The langres prefix is added to access the XamarinI18n.resources namespace. The prefix is added to the root element ContentPage so that all its child elements will inherit this prefix.
The x:Static XAML markup extension will access the localized static properties Lang.welcome, Lang.switch_en, and Lang.switch_it.
Localizing through C# code-behind
We can achieve the same result by retrieving localized values from the C# code-behind.
Let's head over to the SwitchPage.xaml.cs file and change it as follows:
Add UI elements within the SwitchPage class.
Label welcomeLabel = new Label{ Text = resources.Lang.welcome,};Button switchENButton = new Button{ Text = resources.Lang.switch_en,};Button switchITButton = new Button{ Text = resources.Lang.switch_it,};
Set page content by adding a StackLayout within the SwitchPage class constructor.
Content = new StackLayout{ Children = { welcomeLabel, switchENButton, switchITButton }};
Important Note: Make sure to always set page content after the InitializeComponent() call to avoid UI elements not being recognized by the SwitchPage code-behind.
Test it out
Let's add some functionality to the buttons on our UI.
Open up SwitchPage.xaml and add a Clicked event attribute to each button:
Let's not forget to set the new starting page of the application to SwitchPage. Let's open up the App.xaml.cs file within our XamarinI18n project and change its MainPage value as follows:
MainPage = new SwitchPage();
This will instruct Xamarin to load the SwitchPage.xaml code-behind class as the starting page of our application.
That's it! We can now run our XamarinI18n internationalization-savvy application to see text localization at the click of a button.
Note: However, that the behavior of the System.Globalization.CultureInfo.CurrentUICulture language switches, depends on the platform. iOS will show the text localization straightaway, but due to Android's caching you might need to close the app and reopen it to observe the language changes.
Changing language direction
Even though the majority of languages are written and read from left to right, some languages such as Arabic and Hebrew work in the opposite direction. So, as Xamarin.Forms developers dealing with internationalization, it's important for us to know how to handle language directions on our applications.
Xamarin.Forms provides us with a VisualElement.FlowDirection property that helps with configuring language directions using a single line of code.
Changing language direction based on device language
Open the SwitchPage.xaml file of our XamarinI18n application and change its root element as follows:
Note: Placing a this.FlowDirection = Device.FlowDirection; line inside the SwitchPage.xaml.cs constructor can achieve the same result.
Android changes
Android has provided native RTL support starting from Jelly Bean (version 4.2.x). Hence, we have to make sure to configure our project with a minimum API level of 17 and declare that our app supports RTL mirroring.
Let's head over to the AndroidManifest.xml file on our XamarinI18n.Android application and make these changes:
As we did when adding default and supported localizations, iOS also requires us to add all the right-to-left languages we plan to use in the Info.plist file of our app.
So, let's open up the Info.plist file present within our XamarinI18n.iOS project as a text file, and add an RTL language to it:
That's all! Let's change our device language to Arabic (ar) and run the application. We'll notice that our XamarinI18n application has reversed its language reading directions, helping our Xamarin.Forms app reach another set of cultures on its internationalization journey.
Forcefully changing language direction to right-to-left
Don't do this in production servers but, just for testing purposes, we can forcefully hardcode the VisualElement.FlowDirection property of our Xamarin.Forms application to a direction of our choice. This way, the application's language direction stays put with the direction we set, regardless of the device language and its direction.
Let's change the SwitchPage.xaml file of our XamarinI18n application to show its UI values in a right-to-left direction:
<ContentPage. FlowDirection="2">
Setting the FlowDirection enum value to "2" forces the page to be loaded with its text displayed with an RTL orientation.
Platform-specific localization
Alright, Xamarin.Forms helps us take a huge workload from our internationalization schedules thanks to its cross-platform functionalities. But on the other hand, we're talking about well-developed platforms with their very own built-in i18n functionalities here. So sometimes, it's best to resort to platform-specific functionalities when localizing our applications. Let's take a look at a few instances where Xamarin itself also recommends leaving it to them.
Image localization
Imagine our XamarinI18n application includes an image greeting its visitors:
An Italian user would feel right at home if it greeted them with Ciao! instead, don't you think? To make this happen, let's find out how we can internationalize an image in our XamarinI18n application.
Store images according to platform preferences
RESX is more than capable of storing images; but when it comes to handling various mobile devices of different screen sizes and densities, it is best to use platform-specific functionalities for storing them. However, in doing so, we'll have to adhere to their specific rules regarding image storage.
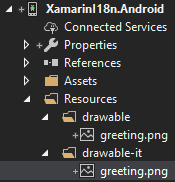
Android image storage
As you may already know that Android natively stores images belonging to a project in its drawable directories. So, let's go ahead and place our default image file greeting.png in the drawable folder of the XamarinI18n.Android project:
Now, let's see how to save another greeting image in our XamarinI18n application, which is localized for Italians:
When it comes to saving localized images, we will have to follow these rules:
Localized images must be placed in separate folders in the Resources directory.
Each localized image folder name must conform to this syntax:
Important Note: Notice the additional letter r right before the region code. This is a requirement specified by Android for naming language and region when providing alternative resources.
Each localized image must preserve the same name throughout all localized image folders.
Following the rules, let's name our localized image with this name, greeting.png, and place it in a drawable-it folder:
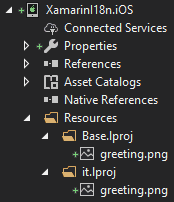
iOS image storage
iOS asks us to follow these rules when storing localized images in our Xamarin.iOS internationalization-conscious application:
The default folder must be named Base.lproj.
Localized images must be stored in separate folders in the Resources directory.
Folder names for localized images must abide by this syntax:
The name of each localized image must be the same throughout all localized image folders.
So, let's be lawful coders and place our localized images as requested by iOS. Put the default greeting.png image file inside Base.lproj and the localized greeting.png image file inside a new it.lproj directory:
Making layout changes
Now, let's go ahead and add this localized image in our XamarinI18n shared app. Head on over the to SwitchPage.xaml.cs file in our XamarinI18n app and add a XAML image element inside the StackLayout:
That's it! Now, let's run the app for each language to see our Xamarin.Forms application greeting its English users with Hi! and its Italian users with Ciao!, nicely complementing its internationalization facilities.
Note: Due to Android caching behaviors, closing and reopening the Xamarin.Forms app might not show localized changes to the image. You might have to change the device language to test out this internationalization feature.
Localizing an app name
For a second, assume our XamarinI18n app posts train schedules and it's named 'Train Station'. Suppose a Chinese lady is late for work and browsing her iPhone App Store trying to find an app that can quickly help her catch a train. There's a much greater chance she'd search for '火车站' than 'train station', isn't there? If our app name was localized, she would have caught a train much faster and we would have gained another customer.
So, unless your app name is a trademark, it's a pretty smart idea to consider localizing your Xamarin.Forms app name along with the rest of the application when working on internationalization. Let's see how we can do this on Xamarin.Forms.
Setting an app name on Android
Firstly, let us set up a default app name for our XamarinI18n.Android application.
Let's open up our XamarinI18n.Android application and create a Strings.xml file inside its values directory. Then, let's populate it as follows:
This line holds an XML string resource with a resource ID for the app_name which stores the default name of our XamarinI18n.Android application.
Secondly, let's go to the MainActivity class and change its Label property, like so:
[Activity(Label = "@string/app_name" ...
This simply accesses the app_name string property we set earlier and sets it as the title of the Android app.
Now, to localize this app name, let's simply add another Strings.xml of the same structure holding a localized app_name property, but this time, placed within a folder with a values-<language code> syntax.
So, in our case, let's add the below in a Strings.xml file inside a values-zh-rCN folder:
And we're done! Run this Xamarin.Forms application and switch its languages to see the app displayed with a localized app name in your app drawer, ensuring the magic of internationalization works as expected.
Let's discover how we can use them to our advantage when setting a localized app name.
First off, let's open up our XamarinI18n.iOS project and place an InfoPlist.strings file in its Base.lproj folder. Then, let's set a "CFBundleDisplayName" key inside it, with a value holding our default app name:
"CFBundleDisplayName" = "Train Station";
Time to localize it. So next up, we'll create a new InfoPlist.strings file inside an zh_CN.lproj folder, and fill it as follows:
"CFBundleDisplayName" = "火车站";
This holds the localized app name value for the Chinese region.
Et voilà! Run the Xamarin.Forms app on an iOS device to see the app name localize when the device language is switched between the two languages. Therefore, the app name has now linked up with the rest of the application regarding its internationalization practices.
Some Xamarin.Forms l10n extras
We walked through the fundamental areas of Xamarin.Forms internationalization. Now, let's have a brief look at a few extras you can add to your Xamarin localization arsenal.
Setting default culture
Alright, pretend you have gloriously localized your Xamarin.Forms application to all the regions you or your team ever planned to reach. That doesn't mean you want your program to crash the moment someone outside those regions tries to access your application, right?
So, let's find out how you can set up a default culture on your application. Like so, when a user from an unsupported culture opens up your app, they'll simply be shown the app content in a widely recognized language.
Open up the AssemblyInfo.cs class on your Xamarin.Forms Core application and add a line as follows:
[assembly: NeutralResourcesLanguage("en")]
Now, whenever the application's ResourceManager encounters a culture with no resource file dedicated to it inside the app, ResourceManager will fall back to the specified default language en in runtime and use its RESX file to show the content.
Important note: If a default culture isn't specified, ResourceManager will return a null value for all unsupported cultures in the application.
Date localization
Setting a date or time in your Xamarin.Forms app might feel like it should be a piece of cake.
I mean... it's just setting a DateTime object in the app, with a date or time, right?
Wrong.
When your app is localized, things get a bit more complicated. Imagine your Xamarin.Forms app delivers birthday gifts, and a user from the US orders a gift to reach her on exactly 01/04/2021. The gift arrives at her home not on the 4th of January, but instead on April Fool's Day. This is because she was using the month-day-year format while your app was using day-month-year.
Let's see how to avoid this and localize dates so that our app talks dates in the way our user understands.
Xamarin.Forms provides a DatePicker class that helps us with date l10. Let's see how we can put it to use.
Firstly, let's head over to the SwitchPage.xaml file on our XamarinI18n shared app, and add the following inside its StackLayout:
That's it! Open up the XamarinI18n application with your device language set to different locales. Choose a date using the DatePicker and you'll be able to see LabelCurrentDate displaying the current date localized to the applicable format.
Working with time zones
If your Xamarin application is limited to a miniature local community—and planned to stay that way forever—you won't need to read this section. But, then again, if that was the case you probably wouldn't have read this far, right? So, surely you must be planning to have your Xamarin.Forms app reach multiple regions within multiple time zones.
Let's see how Xamarin.Forms helps us work with time zones and the different challenges that come with this.
First up, let's open the SwitchPage.xaml file inside our XamarinI18n app and add some labels, as shown below, in the StackLayout element:
<StackLayout> . <Button Text="Get Time zone details" Clicked="Button_Get_TZ_Clicked" /> <!--1--> <Label x:Name="LabelCurrentTimeZone" Text="Current time zone: "/> <Label x:Name="LabelCurrentTimeZoneValue"/> <!--2--></StackLayout>
A button was added to fire a Button_Get_TZ_Clicked event when it's pressed.
A label to hold the current time zone value set by the event handler.
Then, it's time to set up the event handler. Let's go to the SwitchPage.xaml.cs file and code it:
Ergo, we know all about about Xamarin I18n, it's time to get hammerin'.
But, what if I said there's a much easier,1000x faster, and more convenient, way to handle this whole internationalization ball game?
Meet Lokalise, the translation management system that takes care of all your Xamarin.Forms application internationalization needs. With features like:
Easy integration with various other services
Collaborative translations
Quality assurance tools for translations
Easy management of your translations through a central dashboard
Plus, loads of others
By using a translation management system, you can streamline your workflow and ensure consistency across all your localized content. Lokalise will make your life a whole lot easier by letting you expand your Xamarin.Forms app to all the locales you’ll ever plan to reach.
Upload your translation files and edit them as required.
That’s all! You have already completed the baby steps toward Lokalise-ing your web application. See the Getting Started section for a collection of articles that will provide all the help you’ll need to kick-start the Lokalise journey. Also, refer to Lokalise API Documentation for a complete list of REST commands you can call on your Lokalise translation project.
Conclusion
In this tutorial, we took a look at how we can localize to several locales and integrate internationalization into a Xamarin.Forms project. We developed a basic Xamarin.Forms project together and implemented cross-platform functions like string localization, language direction change, and platform-specific localizations like image l10n and app name localization.
Going a bit deeper, we learned some extras like how to set the default culture on our Xamarin.Forms app, perform date localization, and work with time zones, all of which are quite important for the app's internationalization.
And with that, I’ll be signing off. Drop me a line if you have any questions, and don’t hesitate to leave a comment.
Till we meet again, wash your hands, stay home, and may Santa bring you that vaccine!
Dasun is a Technical Writer-slash-Backend Developer that—after a midlife crisis—realized his quite perfectionist self belongs in the writer's realm. Here's a guy that shifted from 9 to 5 jobs to freelancing full-time, just to follow his passion-the art of coding-the way he always planned to do so.
Dasun is a Technical Writer-slash-Backend Developer that—after a midlife crisis—realized his quite perfectionist self belongs in the writer's realm. Here's a guy that shifted from 9 to 5 jobs to freelancing full-time, just to follow his passion-the art of coding-the way he always planned to do so.
Syncing Lokalise translations with GitLab pipelines
In this guide, we’ll walk through building a fully automated translation pipeline using GitLab CI/CD and Lokalise. From upload to download, with tagging, version control, and merge requests. Here’s the high-level flow: Upload your source language files (e.g. English JSON files) to Lokalise from GitLab using a CI pipeline.Tag each uploaded key with your Git branch name. This helps keep translations isolated per feature or pull request
Read more Syncing Lokalise translations with GitLab pipelines
Build a smooth translation pipeline with Lokalise and Vercel
Internationalization can sometimes feel like a massive headache. Juggling multiple JSON files, keeping translations in sync, and redeploying every time you tweak a string… What if you could offload most of that grunt work to a modern toolchain and let your CI/CD do the heavy lifting? In this guide, we’ll wire up a Next.js 15 project hosted on Vercel. It will load translation files on demand f
Read more Build a smooth translation pipeline with Lokalise and Vercel
Hands‑on guide to GitHub Actions for Lokalise translation sync: A deep dive
In this tutorial, we’ll set up GitHub Actions to manage translation files using Lokalise: no manual uploads or downloads, no reinventing a bicycle. Instead of relying on the Lokalise GitHub app, we’ll use open-source GitHub Actions. These let you push and pull translation files directly via the API in an automated way. You’ll learn how to: Push translation files from your repo to LokalisePull translated content back and open pull requests automaticallyWork w
Read more Hands‑on guide to GitHub Actions for Lokalise translation sync: A deep dive