With the arrival of Kotlin and its almost instant fame among the Android developer community, localizing Kotlin applications has become more than just an afterthought. In this piece, we'll delve into how Kotlin handles internationalization, including aspects such as localized time to ensure a seamless user experience across different regions.
How many languages do you speak? One? Two? Or maybe more. If I'm not mistaken, your answer will depend on the countries and locales you happen to deal with in your everyday life. But what about that cool Kotlin application you've been developing? How many dialects can it speak? Perhaps the answer is "just one". Or, since you're reading this article, your answer might be something along the lines of, "My app speaks a few languages, but rewriting my code for each one is taking up half my development time and effort."
One way or another, as time progresses it is becoming an important necessity to internationalize your applications so they can speak the consumer's language. Surely no Kotlin application is exempt from this requirement.
So, in this article, let's take a look at how we can approach Kotlin internationalization by using step-by-step examples. Since this is the first Kotlin use case, we decided to look into i18n of an Android app coded using Kotlin.
We will cover the following topics in this tutorial:
First up, we'll create a simple Kotlin Android project that we can use as a playground to test out the upcoming internationalization-related features. Let's open up Android Studio and make a new project based on an "Empty Activity" template with the following configuration:
Name: KotlinI18nPackage name: com.lokalise.kotlini18nLanguage: KotlinMinimum SDK: API 28
Note: You are free to choose any API version before or equal to API level 30 (the latest version at the time of writing).
Set up the application interface
Browse the res/layout directory and open the activity_main.xml file inside our IDE.
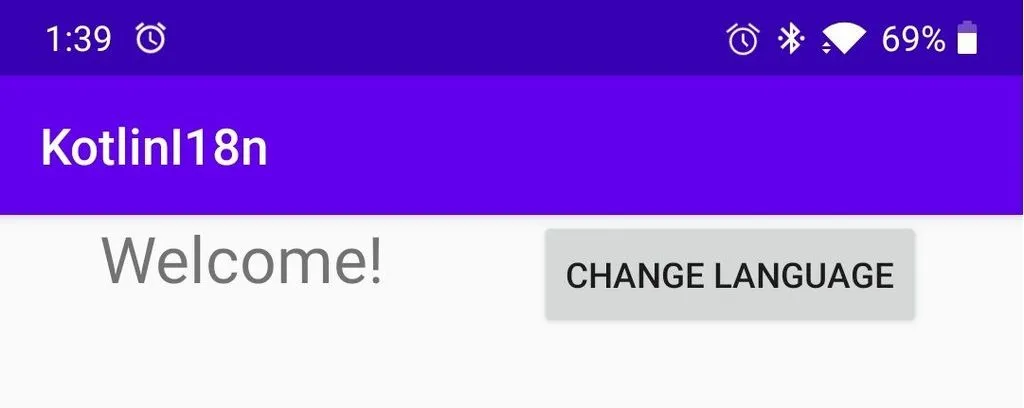
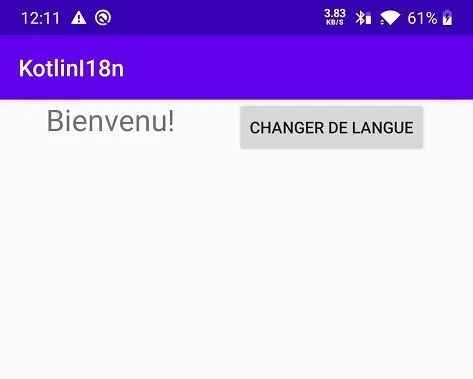
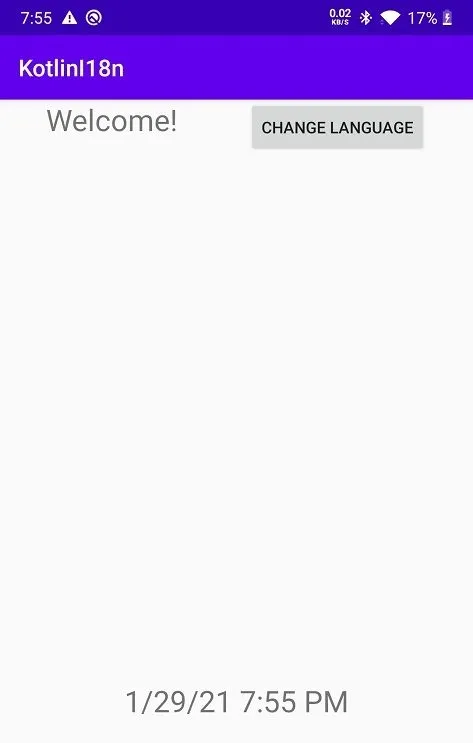
Let us fill it up with a simple TextView displaying a "Welcome!" message along with a Button we can use to change the language of our KotlinI18n application:
Of course, our IDEs are screaming about being unable to resolve the @string/welcome and @string/change_lang symbols. Let's say we quickly add those resources to our project in the next section.
Add language resources
Now, let's go ahead and add some text resources to be used in our KotlinI18n application.
Open up the strings.xml file in the res/values directory and add the following string:
Note: the strings.xml file will act as the default resource file with regard to l10n of our KotlinI18n application.
Now let's take our KotlinI18n app for a test run, shall we?
Alright! We have created our Kotlin app and it is waiting to enter the world of internationalization. It's time to localize it!
Let there be i18n
Localize to more locales
Our KotlinI18n application won't be localized if it only contains resources for a single language, right? So, we will add a few more resource files representing our language resources for other locales.
As you probably know already, Android asks us to follow a specific pattern when naming our alternative resource files.
We can use the assistance of Android Studio IDE functions to perform this a bit more conveniently.
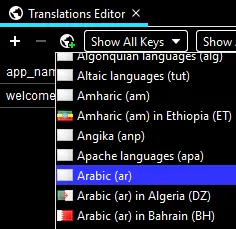
Firstly, let's right click on the strings.xml option within the Project Browser and select Open Translations Editor:
We'll be able to recognize our resources and their default values listed in a table-like structure.
Secondly, click on the Add Locale icon and select the Arabic (ar) option:
Thirdly, let's go ahead and fill out the welcome key with a value localized to the Arabic language.
Lastly, we will follow the same procedure to also add the French (fr) locale to our KotlinI18n application.
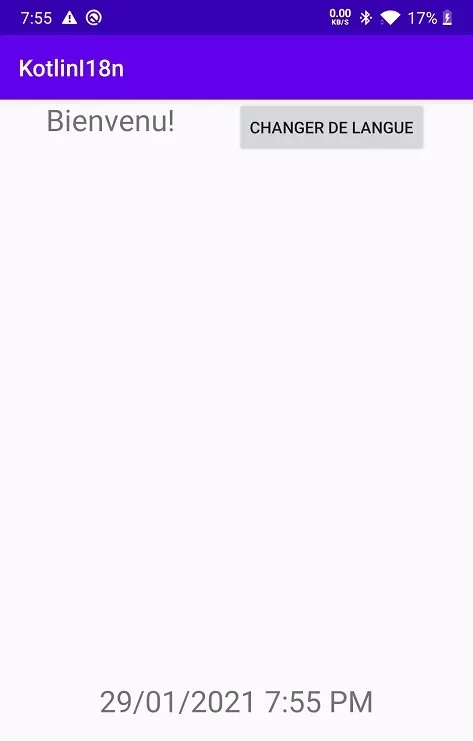
Done! We have localized our Kotlin internationalization-expecting app across three languages in a flash. We can simply run the application on an Android device, then switch its language between English, Arabic, and French to see the app automatically changing to its localized variant.
But you must be thinking...
Hold up, where does the Kotlin internationalization code come in?
Do my app consumers have to change their mobile language settings just to switch the app language?
Be patient, all your questions will be answered in due course.
Access resources dynamically
Last time we asked our KotlinI18n application's attributes themselves to fetch localized text from the app's resources. What if we need to set the text on our attributes programmatically instead of setting it via an XML file? Let's discover how to do this.
We will start by opening up the MainActivity file of our KotlinI18n application and adding the below to its onCreate function:
override fun onCreate(savedInstanceState: Bundle?) { ... val welcomeTextView: TextView = findViewById(R.id.textViewWelcome) // 1 val changeLangButton: Button = findViewById(R.id.buttonChangeLang) // 2 welcomeTextView.setText(R.string.welcome) // 3 changeLangButton.setText(R.string.change_lang) // 4}
Assign the welcomeTextView constant with a TextView that has the ID textViewWelcome.
Assign the changeLangButton constant with a Button that has the ID buttonChangeLang.
Set the text of the TextView referenced by welcomeTextView to a localized string text resource with a welcome key.
Set the text of the Button referenced by changeLangButton to a localized string text resource with a change_lang key.
Programmatically change the application locale
Important Note: This section consists of Android l10n-related content thoroughly covered in our 'Android localization: Step-by-step' article. Thus, to stay within the scope of this article, we will speed through the setup covering the overall approach. Please check the following section in our 'Android localization: Step-by-step' article for a detailed explanation on resource loading on any Android platform, including legacy APIs:
It is time to program the functionalities of the buttonChangeLang button in our KotlinI18n application layout.
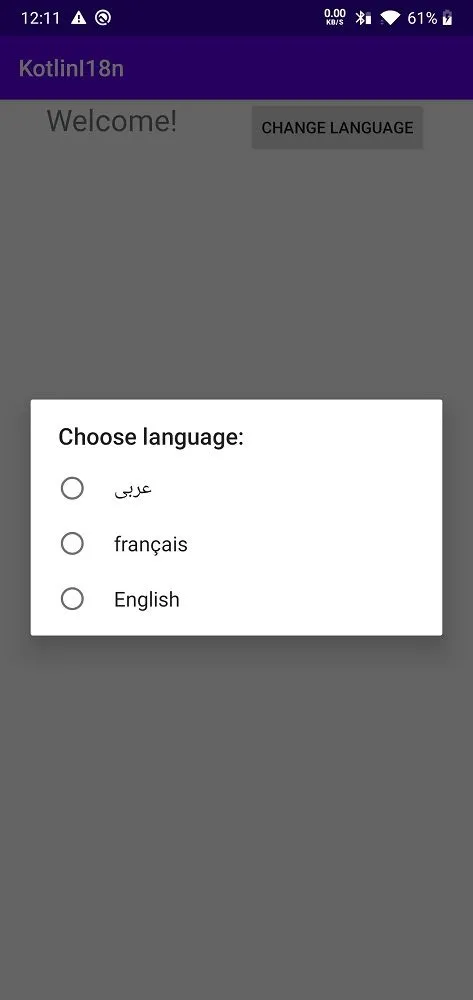
Firstly, let's set an OnClickListener for changeLangButton . Go ahead and add the following code snippet in the onCreate function of the MainActivity file:
This code sets up an AlertDialog to help us choose a locale for our KotlinI18n application.
Secondly, let's not forget to add a private function in MainActivity to hold the locale setting functionalities:
private fun setLocale(localeToSet: String) { val localeListToSet = LocaleList(Locale(localeToSet)) LocaleList.setDefault(localeListToSet) resources.configuration.setLocales(localeListToSet) resources.updateConfiguration(resources.configuration, resources.displayMetrics) val sharedPref = getSharedPreferences("Settings", Context.MODE_PRIVATE).edit() sharedPref.putString("locale_to_set", localeToSet) sharedPref.apply()}
Thirdly, we'll add a loadLocale private function that we can use to load the locale that was set within setLocale:
private fun loadLocale() { val sharedPref = getSharedPreferences("Settings", Context.MODE_PRIVATE) val localeToSet: String = sharedPref.getString("locale_to_set", "")!! setLocale(localeToSet)}
Remember to execute loadLocale in the onCreate function right before the setContentView method call:
override fun onCreate(savedInstanceState: Bundle?) {
    super.onCreate(savedInstanceState)
    loadLocale()
    setContentView(R.layout.activity_main)
    .
    }
Et voilà! Now, we can run our KotlinI18n application to test out the changeLangButton functionality.
When the CHANGE LANGUAGE button is clicked:
After selecting French from the AlertDialog:
Number formatting
Let's imagine that our KotlinI18n application needs to display a floating point number. This could be a two-second job if our app supported only one language. However, things can become a bit ambiguous when we're dealing with multiple locales.
Thankfully, Kotlin allows us to use format strings to handle this using a single line of code, making our internationalization a tad easier.
Let's open our KotlinI18n application's MainActivity file and add this function:
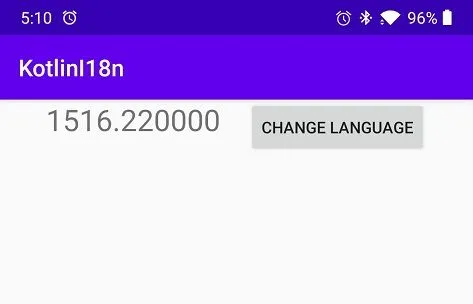
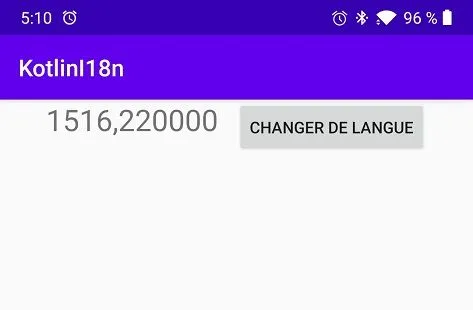
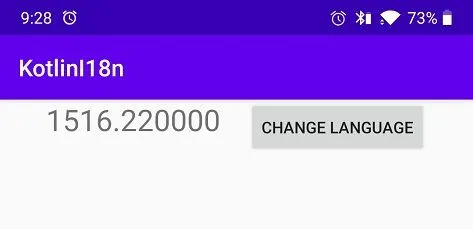
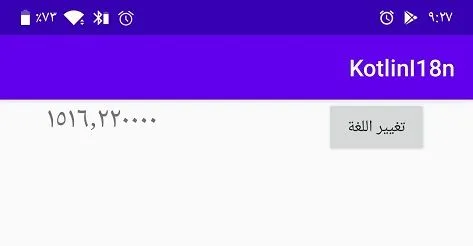
private fun numFormat() { val num = 1516.22 // 1 val numAsString = String.format("%f", num) // 2 val welcomeTextView: TextView = findViewById(R.id.textViewWelcome) welcomeTextView.text = numAsString // 3}
The decimal value is stored inside num as a Double.
The String.format() function is used to parse num as a localized String. The parsed String will hold a Float value localized to suit the number format preferences of the app's current locale.
The text of the TextView referenced by welcomeTextView is replaced by the value stored in numAsString.
Let's run our KotlinI18n application and check out whether the number formatting works as expected.
Important Note: Don't forget to call the numFormat function within the onCreate method in the MainActivity class.
Changing text reading direction
As app creators building our Kotlin internationalization-wielding apps, localized for various worldwide languages, we can't forget those who require text that is written from right to left.
Let's see how to set up RTL support on our KotlinI18n application.
Firstly, open the build.gradle (Module) file and make sure the project's target SDK version is set to API level 17 or above:
targetSdkVersion 17
Secondly, open up the project's AndroidManifest file, and add the following line in its <application> tag if it doesn't already exist:
android:supportsRtl="true"
Those would be the basic changes needed to apply RTL support.
But hold up, it's big brain time! Think of an element we once asked to maintain a 40dp margin from the left of its layout. Would this not get confused when the whole application's right and left are switched?
So finally, it's time to update the existing elements on our KotlinI18n application layout to support this direction-changing behavior.
Head over to the activity_main.xml file and make the changes shown below:
Replace android:layout_marginLeft="40dp" in the textViewWelcomeTextView tag as follows:
android:layout_marginStart="40dp"
Replace android:layout_marginRight="40dp" in the buttonChangeLangButton tag as follows:
Let's run our KotlinI18n application and switch the device language between English and Arabic. We'll be able to see the layout and its elements nicely changing directions:
LTR layout for English:
RTL layout for Arabic:
What about before Jelly Bean?
So, we have successfully added RTL support to our Kotlin internationalization app... but, there's a catch! What if our app happens to target devices below API level 17? In other words, our Kotlin Android application might require a compatibility workaround so that it could run on legacy devices running API levels where the android:supportsRtl attribute was yet to be introduced to the Android platform?
Keep both android:layout_marginLeft="40dp" and android:layout_marginStart="40dp" attributes in our textViewWelcomeTextView tag in the activity_main.xml file.
Similarly, keep both android:layout_marginRight="40dp" and android:layout_marginEnd="40dp" attributes in our buttonChangeLangButton tag.
Note: Making your Kotlin Android app compatible with both text directions could require a few more logic alterations based on the elements present in your application layout.
Formatting mixed-direction text
It's safe to say that text formatting is a widely used function in Kotlin Android apps with internationalization capabilities.
Thus, once we added support for the RTL text direction, we were able to perform text formatting for both LTR and RTL directions in our Kotlin application. But what if a given text consisted of both directions at the same time?
Imagine a situation like this:
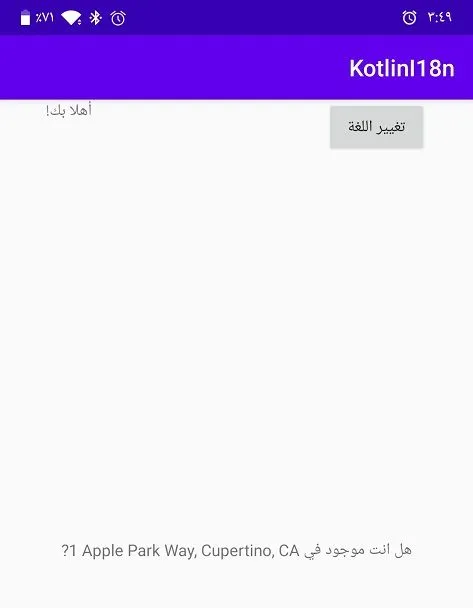
Assume our KotlinI18n application serves as a taxi service. An Arabic user is located in California (U.S.) but prefers to use his native language, Arabic, to maneuver through our Kotlin Android taxi app. This was supposed to contain internationalization features to support Arabic. However, when he opened our application for the first time, he tried to enter his address. Each time he tried, he correctly entered his address, 1 Apple Park Way, Cupertino, CA in the app, but he got a confirmation message with a scrambled address like so:
?Apple Park Way, Cupertino, CA 1 هل انت موجود في
If we look closely, we can see the house number "1" has been moved all the way to the end of the address. Instead, it was supposed to be the Arabic equivalent of the English confirmation message shown here:
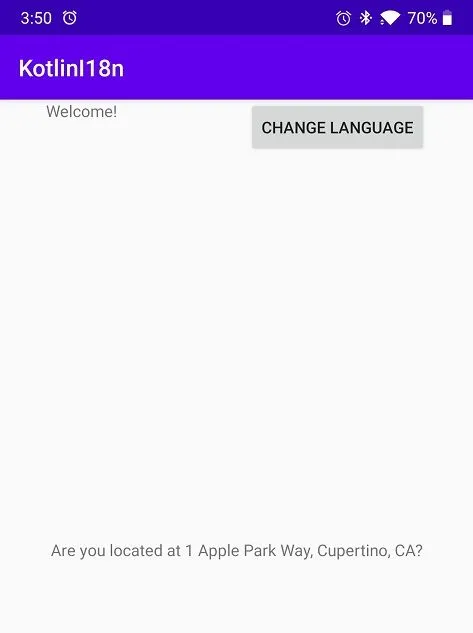
Are you located at 1 Apple Park Way, Cupertino, CA?
This scrambling error happened simply because our KotlinI18n application wasn't previously informed of what direction to read the user-entered address query. Hence, the application took a wild guess and incorrectly assumed the house number must be a part of the RTL text.
Let's see how we can fix this.
Unicode to the rescue
First off, let's add a new located_at resource to our KotlinI18n application to hold the localized confirmation message format string.
In the default strings.xml file in the res/values directory holding localized values for English it is:
<resources> ... <string name="located_at">"Are you located at %s?"</string></resources>
In the strings.xml file inside the res/values-ar directory holding localized values for Arabic it is:
<resources> . <string name="located_at">"هل انت موجود في %s?"</string></resources>
For the strings.xml file inside the res/values-fr directory holding localized values for French it is:
<resources> ... <string name="located_at">"Êtes-vous situé à %s?"</string></resources>
Secondly, let us introduce a TextView to the activity_main.xml template to hold the localized confirmation message, like so:
Finally, let's head over to the MainActivity file in our KotlinI18n application and add this function to it:
fun textFormat() { val address = "1 Apple Park Way, Cupertino, CA" // 1 val bidiFormatter: BidiFormatter = BidiFormatter.getInstance() val unicodeWrappedAddress = bidiFormatter.unicodeWrap(address) // 2 val formatStr = getString(R.string.located_at) // 3 val locatedAtQuestionStr = String.format(formatStr, unicodeWrappedAddress) // 4 val addressTextView: TextView = findViewById(R.id.textViewAddress) addressTextView.text = locatedAtQuestionStr // 5}
The address value is stored in address constant.
The unicodeWrap method inside the BidiFormatter Android utility class is used to accurately detect the text direction of the address. Once detected, unicodeWrap encloses the address value in Unicode formatting characters marking the detected direction.
The localized confirmation message format string located_at is retrieved and stored in formatStr constant.
String.format() function is used to parse formatStr passing the unicodeWrappedAddress as an argument.
locatedAtQuestionStr is set as the text displayed on the textViewAddress referenced by addressTextView constant.
That's it! Next, let's run our KotlinI18n application and test whether the localized confirmation messages are displayed as expected.
Important Note: Remember to call the textFormat function within the onCreate method in the MainActivity class.
Arabic:
English:
Some Kotlin internationalization extras
Here's a quick peek at a few more Kotlin internationalization-related extras that might just save you a load of trouble.
Pluralization
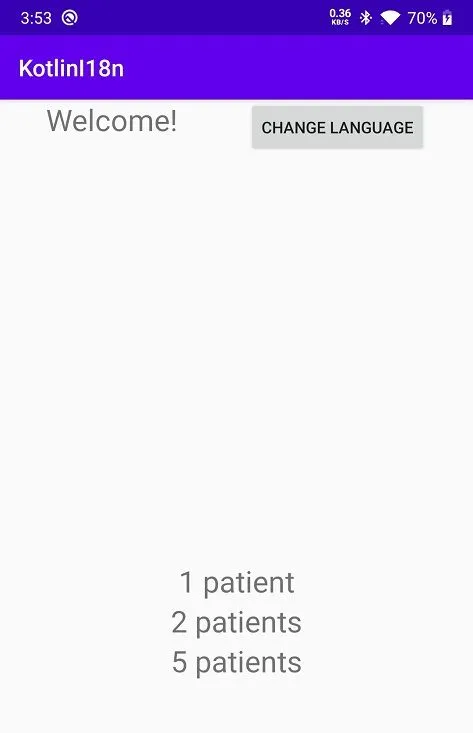
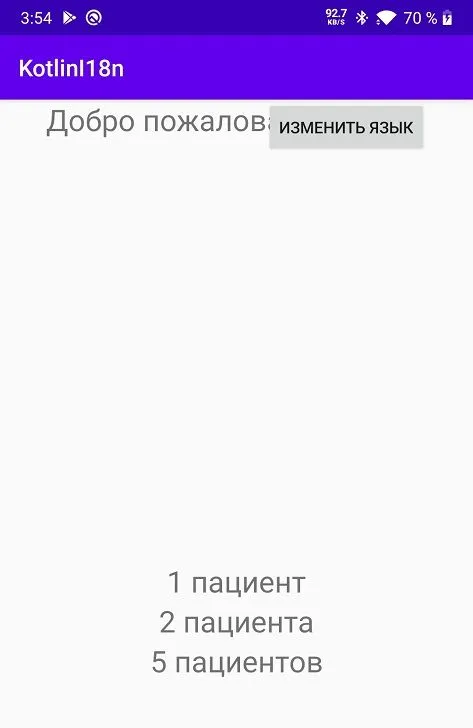
When developing Kotlin apps with internationalization facilities, we might come across instances where we have to display quantities for the content. For example, imagine our KotlinI18n application displayed the number of COVID-19 patients found in a day. For a particular day, assume this number was 2 . But, what if our flashy Kotlin internationalization-ready app displayed this as "2 patient" and vice versa, if this number was 1 and our app showed it as "1 patients"? Both these scenarios would either confuse thousands of users or simply make our app appear poorly developed. Let's discover how we can fix this by using quantity strings (plurals).
Add some layout elements
Firstly, let's add a few more TextView elements inside our KotlinI18n application's activity_main.xml:
These will act as placeholders to hold one, few, and many quantities of objects in succession.
Time for plurals
Pluralization rules could differ between different languages. English has two pluralization forms, for example:
1 patient
2 patients
At the same time, Russians use three variations when they count whole numbers, such as:
1 пациент
2 пациента
5 пациентов
This is where the requirement for plurals/quantity strings comes in. Android provides a getQuantityString method, also directly provided in Kotlin language, to help face this.
So secondly, let's add pluralization to our KotlinI18n application's respective language resource files:
Add a plurals element in res/values/strings.xml as follows:
Note: Only the plurals element and the values inside it (highlighted) are relevant to this section. Other elements were added simply for consistency of the article and proper compilation of the project.
Don't forget to add the newly added l10n in the language selector we set up in our application layout. Then, thirdly, let's open up the MainActivity inside our KotlinI18n app and make the following highlighted changes in the OnClickListener for the changeLangButton:
Most importantly, remember to call this pluralization function in the onCreate method inside the MainActivity class.
Take it for a test drive
So, that's it! We've successfully set up pluralized text representations for both English and Russian. Let's run our KotlinI18n app just to check it out:
In English:
In Russian:
Date and time internationalization
Kotlin developers have introduced a new datetime library. However, since it was in the early stages at the time of writing, and Kotlin internationalization-related functions are out of the library scope according to the library's README, we'll revert to the date and time functionalities provided through the Android platform for the time being.
The getDateTimeInstance static function in the Android DateFormat class presents us with an easy way to retrieve the localized date and time within our internationalized Kotlin apps. Let's see how we can use this in our KotlinI18n application.
First off, let's put a new textViewDateTime TextView in the activity_main.xml. The textViewDateTime will be used to hold the date and time localized to the current locale:
Now, open the MainActivity class and insert a dateAndTime function as shown here:
fun dateAndTime() { val currentDateTime = Date() // 1 val currentLocale = Locale.getDefault() // 2 val dateTimeInstance = DateFormat.getDateTimeInstance(SHORT, SHORT, currentLocale) // 3 val dateTimeTextView: TextView = findViewById(R.id.textViewDateTime) dateTimeTextView.text = dateTimeInstance.format(currentDateTime) // 4}
Retrieve a Date object using its no-argument constructor, which makes it hold the exact date and time at which it was allocated.
Note: At the moment, Kotlin doesn't have a package with a Date API of its own for us to use in our internationalization-related tasks. Hence, we'll fall back on the Date class provided with Java.
Get the current locale used in the application using the Locale.getDefault method.
Use the DateFormat.getDateTimeInstance static function to retrieve a date/time formatter saved in the currentLocale. This formatter will hold its values localized to the supplied currentLocale and use the SHORT style pattern to parse both date and time.
The format function is used to format currentDateTime using the date/time formatter stored in dateTimeInstance.
Also, be sure to add a line within the onCreate method inside the MainActivity class to call this dateAndTime function.
So, let's run our KotlinI18n app and see if it works. Switch the application between languages to watch the current date and time display in a localized manner.
In English:
In French:
Turn to Lokalise
Let me take a wild guess. I bet you (or your team) chose Kotlin as your go-to language because it has heaps less boilerplate code and hence, takes less development time and code management.
Nonetheless, while Kotlin app internationalization is important, it sort of defeats the whole purpose of Kotlin, its simplicity, to learn loads of functions and APIs just to add your internationalization.
With that in mind, allow me to suggest a true translation management system (TMS) capable of carrying out all the i18n/l10n functions of your Kotlin app. In return, this will save you plenty of time to use on other critical parts of your application.
Meet Lokalise, the TMS that takes care of all your Kotlin application internationalization needs. With features like:
Easy integration with various other services
Collaborative translations
Translation quality assurance tools
Easy translation management via a central dashboard
Plus, loads more.
Lokalise will make your life a whole lot easier by letting you expand your internationalized Kotlin app to all the locales you could ever plan to reach.
Upload your translation files and edit them as required.
And done! You have already taken the baby steps toward Lokalise-ing your Kotlin application. See the Getting Started section for a collection of articles that will provide all the help you’ll need to kick-start the Lokalise journey. Also, refer to Lokalise API Documentation for a complete list of REST commands that you can call on your Lokalise translation project.
Conclusion
In this tutorial, we took a look at how we can localize a Kotlin application for multiple languages. We observed how we could dynamically access language resources, and switch locales at the click of a button. Moreover, we looked into how to format numbers using Kotlin format strings and change the app layout direction using android:supportsRtl , including workarounds for legacy APIs. We found out how mixed-direction text could become a hassle and how to overcome it with the help of the BidiFormatter.unicodeWrap function.
Reaching a bit further, we checked out how to perform text pluralization using plurals and tackled date-time localization.
So, with that, it's time for me to wrap up. Drop me a line if you have any questions, and don’t hesitate to leave a comment.
Till we meet again, happy bug-free coding fellow power users!
Dasun is a Technical Writer-slash-Backend Developer that—after a midlife crisis—realized his quite perfectionist self belongs in the writer's realm. Here's a guy that shifted from 9 to 5 jobs to freelancing full-time, just to follow his passion-the art of coding-the way he always planned to do so.
Dasun is a Technical Writer-slash-Backend Developer that—after a midlife crisis—realized his quite perfectionist self belongs in the writer's realm. Here's a guy that shifted from 9 to 5 jobs to freelancing full-time, just to follow his passion-the art of coding-the way he always planned to do so.
Libraries and frameworks to translate JavaScript apps
In our previous discussions, we explored localization strategies for backend frameworks like Rails and Phoenix. Today, we shift our focus to the front-end and talk about JavaScript translation and localization. The landscape here is packed with options, which makes many developers a
Character encoding: Types, UTF-8, Unicode, and more explained
In this article, we’ll explore various types of character encoding used in the world of information technology. We’ll break down why encoding matters, explain how they function, and highlight the key differences between ASCII, UTF-8, UTF-16, and the Unicode Standard. Understanding these differences is essential for correctly handling text in any software application, especially when working with localized time and date formats that rely on proper ch
Syncing Lokalise translations with GitLab pipelines
In this guide, we’ll walk through building a fully automated translation pipeline using GitLab CI/CD and Lokalise. From upload to download, with tagging, version control, and merge requests. Here’s the high-level flow: Upload your source language files (e.g. English JSON files) to Lokalise from GitLab using a CI pipeline.Tag each uploaded key with your Git branch name. This helps keep translations isolated per feature or pull request