Building a global user base means making your app accessible in multiple languages, which is essential for software internationalization. In this tutorial, we'll guide you through internationalizing your React application using react-i18next. You'll learn how to set up and manage translation files, ensuring effective translation management system throughout the process. You’ll learn how to initialize i18next, translate text, handle advanced features like pluralization and date formatting, and add a language switcher. We'll also show you how to simplify the translation process using Lokalise.
Incorporating a structured localization process will not only streamline translation management but also ensure that your application meets the specific needs of global users.
By the end, your React app will be ready to serve users around the world seamlessly. Shall we start?
React internationalization (usually shortened to i18n) is the process of building a React app so it can support multiple languages and regional formats without hardcoding everything into the UI. Instead of manually rewriting components for every language, you keep translations separate and let the app load the right content dynamically.
In the React world, the go-to solution is usually react-i18next. It gives you stuff like the useTranslation hook, the Trans component, lazy-loaded translation files, language detection, interpolation, and pluralization support without turning your codebase into spaghetti.
Quick difference before we move on:
i18n (internationalization) = preparing your app to support different languages and locales.
l10n (localization) = translating and adapting the app for a specific region or language.
And yeah, there’s a reason basically everyone uses i18next in React apps now. The ecosystem is huge, it works well with modern React patterns, supports SSR, and pulls in more than 6.3 million weekly npm downloads. That’s production-grade territory, not random side-project energy.
A modern React app usually needs i18n for way more than just button text:
UI labels and menus
validation and error messages
dates and time formatting
currencies and numbers
pluralization rules
dynamic content
RTL layouts for languages like Arabic
localized routes and SEO metadata
So if your app is headed beyond one language — or even might someday — setting up proper React i18n early saves a lot of pain later.
i18next vs React-Intl — which should you use?
When building a modern multilingual React app in 2026, the two libraries you'll run into most often are react-i18next and react-intl. Both solve the same core problem, but take pretty different approaches.
Feature
react-i18next
React-Intl
Approach
Flexible translation framework with plugins and namespaces
ICU-first formatting library
Plurals
Built-in pluralization rules for tons of languages
Excellent ICU MessageFormat support
React bindings
Native React hooks and components
Native React components and hooks
Translation loading
Lazy loading, namespaces, backend plugins
Usually manual message loading
Ecosystem
Huge ecosystem with plugins for detection, caching, SSR, backends, and more
Smaller but stable ecosystem
Best fit
Most React apps and scalable frontend teams
Apps heavily using ICU message syntax and complex formatting
For most teams, react-i18next is the safer and more flexible choice. It scales well, works nicely with code splitting, supports async translation loading out of the box, and doesn’t force you into a super strict message format.
It’s especially good when:
your app keeps growing
you want namespace-based translations
you need dynamic language loading
you care about SSR or Next.js support
multiple teams touch translations
React-Intl is still a solid option, especially if your product relies heavily on ICU message formatting or your translators already work with ICU syntax everywhere. But for the average React app? Most devs end up happier with i18next because it stays out of your way and adapts better to real-world frontend chaos.
Prerequisites
For this tutorial, we’ll use a modern React setup:
The wizard might suggest installing create-vite — simply press Enter. It might take some time to create the new project, so grab a tea or coffee in the meantime. Then jump into the project folder:
cd lokalise-react-i18next
Now let’s add the i18n packages we’ll use in this tutorial:
i18next — our main star today.
react-i18next — the library that brings i18next goodies for React.
i18next-browser-languagedetector — a plugin that detects the user's language in the browser, supporting session storage, local storage, paths, and HTML tags across multiple locales.
i18next-http-backend — loads translation files over HTTP, which is exactly what we want for a scalable frontend setup.
That’s the boring setup part done. Now we’ve got a Vite + React + TypeScript app with the right i18next tools installed.
Translation files structure for React i18next
BeBefore we configure i18next, let’s add a place for our translation files. In a Vite app, static files live in the public folder. Anything you put there is served from the root of your app, so the path public/locales/en/translation.json will be available in the browser as /locales/en/translation.json. Nice and predictable, and we like that.
Create a locales folder inside public, then add one folder per language. For this tutorial, we’ll use English, Spanish, and Latvian:
public└── locales ├── en │ └── translation.json ├── es │ └── translation.json └── lv └── translation.json
Each translation.json file will contain the strings for that language. For example:
{ "main": { "header": "Welcome to the app!" }}
Using en, es, and lv is totally fine for this tutorial. In production, you might use more specific locale codes like en-US, en-GB, or pt-BR if your app needs regional differences.
For now, one translation.json file per language is enough. Later, if the app grows, you can split translations into namespaces like common.json, auth.json, or dashboard.json instead of dumping everything into one huge file like a maniac. I'll show you how to do it later in this post.
Later, if the app grows, you can add more namespaces; no need to shove the whole product into one giant JSON file and suffer.
load: 'languageOnly' keeps things simple. If the browser reports en-US, i18next will load en instead of trying to find an en-US folder that we don’t have.
backend.loadPath tells i18next-http-backend where to load translation files from.
detection checks local storage first, then the browser language, then the HTML tag. It also saves the selected language to local storage, so users don’t have to switch languages again every time they refresh the app.
Finally, escapeValue: false is the usual React setup because React already escapes rendered values by default.
Now import this file in your Vite entry point. Open src/main.tsx and add the i18n import near the top:
import { StrictMode, Suspense } from 'react';import { createRoot } from 'react-dom/client';import './index.css';import './i18n/i18n';import App from './App.tsx';createRoot(document.getElementById('root')!).render( <StrictMode> <Suspense fallback={<div>Loading translations...</div>}> <App /> </Suspense> </StrictMode>,);
We use Suspense here because translation files are loaded asynchronously. While i18next is fetching /locales/en/translation.json or another locale file, React needs something to render instead of just standing there awkwardly.
The t function is what we’ll use to translate text.
The i18n object gives us access to the active language, loaded resources, and methods like changeLanguage, which we’ll use later for the language switcher.
Now the app is ready to load translations from the public/locales folder. Next, let’s actually add some translated strings and make the UI say something useful.
Translating plain text with React-i18next
Adding translation keys
Of course, you’re eager to see how to actually translate something instead of just configuring packages all day.
First, we have to provide translations in our JSON files. Open the public/locales/en/translation.json file and add the following:
{ "main": { "header": "Welcome to the app!" }}
header is the translation key that we’ll use inside the source code. Using nested keys like main.header is a pretty common pattern in larger React apps because it keeps translation files organized instead of turning them into an unreadable wall of JSON pain.
The "Welcome to the app!" string is a value that will be displayed to the user if they have chosen the English locale.
So far so good. Next, let’s provide Latvian translations in the public/locales/lv/translation.json file:
{ "main": { "header": "¡Bienvenido/a a la app!" }}
Awesome!
Using the useTranslation hook
How do we use these translations? It’s simple really: you just have to call the t function that we created in the previous section and pass the key name to it. Then, when the app is served to the end user, the corresponding translation value will be displayed automatically. However, if you use nesting, be sure to use the dot notation when providing key names, for example: main.header.
Let’s go to the src/App.tsx file and provide a new translation for the h1 tag:
import { useTranslation } from 'react-i18next';export default function App() { const { t, i18n } = useTranslation(); return ( <main> <h1>{t('main.header')}</h1> <p> Current language: {i18n.resolvedLanguage ?? i18n.language} </p> </main> );}
So, the t('main.header') works its magic here and shows the translated text to the user.
Now simply boot the app by running:
npm run dev
Vite will print the local URL in your terminal. It’s usually http://localhost:5173. Open it in your browser and you should see the translated heading.
To quickly test another language, you can set the detected language in the browser console:
The t function is perfect for plain text, but sometimes translations need markup inside the sentence. For example, maybe you want part of the text to be a link or bold text. Don’t split the sentence into three separate translations — that makes life painful for translators. Use the Trans component instead.
First, add this key to your English translation file:
{ "main": { "description": "Edit <strong>src/App.tsx</strong> and read the <docsLink>React i18next docs</docsLink>." }}
Add the Latvian version:
{ "main": { "description": "Rediģē <strong>src/App.tsx</strong> un izlasi <docsLink>React i18next dokumentāciju</docsLink>." }}
Spanish version:
{ "main": { "description": "Edita <strong>src/App.tsx</strong> y lee la <docsLink>documentación de React i18next</docsLink>." }}
That’s the whole trick: use t() for plain strings, and use Trans when the translated sentence needs React elements inside it.
Adding a language switcher
Right now, the app can detect a language, but users still can’t choose one manually. Pretty rude, so let’s fix that. First, create a shared language config inside src/i18n/languages.ts:
type="button" prevents the button from accidentally behaving like a form submit button later. Tiny thing, annoying bug.
aria-pressed helps screen readers understand which language is currently active.
disabled={isActive} prevents users from clicking the already selected language again for no reason.
And because the selected language is cached in localStorage by i18next-browser-languagedetector, the app remembers the user’s choice after refresh. No extra state needed. Great!
Now let’s add the language switcher in src/App.tsx:
// other imports ...import { LanguageSwitcher } from "./components/LanguageSwitcher";export default function App() { const { t } = useTranslation(); return ( <main> <LanguageSwitcher /> {/* other tags ... */} );}
The important part is this: t('main.newMessages', { count: messages }).
count does two jobs here:
It tells i18next which plural form to use.
It lets us insert the actual number into the translated string with {{count}}.
Small but important: for pluralization, the variable must be called count. Not messages, not total, not numberOfTinyMessageGremlins.
Now update the English translation file:
{ "main": { "addMessage": "+1 message", "newMessages_zero": "You have no new messages", "newMessages_one": "You have one new message", "newMessages_other": "You have {{count}} new messages" }}
{ "main": { "addMessage": "+1 ziņa", "newMessages_zero": "Tev ir {{count}} jaunu ziņu", "newMessages_one": "Tev ir {{count}} jauna ziņa", "newMessages_other": "Tev ir {{count}} jaunas ziņas" }}
One little Latvian gotcha: its zero plural form is not just “exactly zero.” Numbers like 10, 20, and 100 can also fall into that category. So don’t write newMessages_zero as “You have no messages” for Latvian unless you’re handling the empty state separately.
That’s it. No manual plural logic in React, no string concatenation, no cursed "message" + (count === 1 ? "" : "s") nonsense. Let i18next do the boring grammar work.
Date and time formatting in i18next
Date and time is another thing you should not hardcode by hand. Different languages and regions format them differently, and nobody wants to maintain that mess with string templates. Good news: we don’t need Luxon, date-fns, or any extra package for this basic case. i18next can use the built-in JavaScript Intl.DateTimeFormat API under the hood.
{ "main": { "currentDate": "Today is {{date, datetime}}" }}
Spanish translations:
{ "main": { "currentDate": "Hoy es {{date, datetime}}" }}
And new Latvian translations:
{ "main": { "currentDate": "Šodien ir {{date, datetime}}" }}
The datetime formatter tells i18next to format the value as a localized date. The formatParams.date.dateStyle = 'long' part tells it to use a long date format, so the same Date object will be displayed differently depending on the active language.
That means English, Spanish, and Latvian users all get a date format that feels natural for their locale, without you manually slicing dates like it’s 2009.
Adding context and working with gender information
Sometimes a translation needs to change depending on context. A common example is pronouns:
Ann says: How are you?She says: How are you?He says: How are you?They say: How are you?
You could try to glue this together manually in React, but please don’t. That road leads straight to messy conditional logic and weird grammar bugs. Instead, use i18next context. First, add a small example sender in src/App.tsx:
type SenderPronouns = 'male' | 'female' | 'neutral';const sender: { name: string; pronouns: SenderPronouns; message: string;} = { name: 'Ann', pronouns: 'female', message: 'How are you doing?',};
Here, body and from are regular interpolated values.
The special part is: context: sender.pronouns.
Now add English translations:
{ "main": { "incomingMessage": "You have a new message from {{from}}", "messageContents_male": "He says: {{body}}", "messageContents_female": "She says: {{body}}", "messageContents_neutral": "They say: {{body}}" }}
Latvian:
{ "main": { "incomingMessage": "Tev ir jauna ziņa no {{from}}", "messageContents_male": "Viņš saka: {{body}}", "messageContents_female": "Viņa saka: {{body}}", "messageContents_neutral": "Viņi saka: {{body}}" }}
Finally, Spanish translations:
{ "main": { "incomingMessage": "Tienes un nuevo mensaje de {{from}}", "messageContents_male": "Dice: {{body}}", "messageContents_female": "Dice: {{body}}", "messageContents_neutral": "Dice: {{body}}" }}
Small real-world note: don’t infer pronouns from a name. Names are not reliable, languages are complicated, and users hate when apps get this stuff wrong. Use stored user preferences when you have them, and keep a neutral fallback when you don’t.
RTL language support
English, Latvian, and Spanish are all left-to-right languages, so our app doesn’t need RTL support yet. But if you ever add a right-to-left language like Hebrew or Arabic, don’t wait until the UI explodes. Handle text direction as part of your language config now. It’s a tiny change, and future-you will not hate you.
This updates the root HTML element, for example <html lang="he" dir="rtl">. That matters because browsers, screen readers, form fields, text alignment, and layout behavior can all use this information.
Adding localized routes and lazy-loaded namespaces
Router and routes
So far, our app can switch languages, handle plurals, format dates, and deal with RTL direction. Nice.
But the URL still doesn’t know anything about the current language. That’s not ideal, because localized app should usually have localized routes too:
This makes pages easier to share, bookmark, and crawl. Also, the URL becomes the source of truth for the current language, which is way less chaotic than fighting between local storage, browser detection, and app state.
Let’s add routing and split translations into namespaces at the same time. First, install React Router:
npm install react-router
Translation file structure with namespaces
Now update the translation file structure. Instead of one translation.json, we’ll use one namespace per page:
We load the home namespace by default. The dashboard namespace will be loaded only when the dashboard page actually needs it. That’s the lazy-loading part. No need to ship every page’s translations upfront like a frontend goblin with a backpack full of JSON.
Locale layout and language switcher for lazy loading
Now create a layout that reads the language from the route and syncs it with i18next. Add a new file: src/components/LocaleLayout.tsx. Place the following content inside:
import { useEffect, useState } from 'react';import { Navigate, Outlet, useParams } from 'react-router';import { useTranslation } from 'react-i18next';import { fallbackLanguage, isSupportedLanguage, type LanguageCode,} from '../i18n/languages';import { LanguageSwitcher } from './LanguageSwitcher';import { MainNavigation } from './MainNavigation';export function LocaleLayout() { const { lng } = useParams<{ lng: string }>(); const { i18n } = useTranslation(); const currentLanguage: LanguageCode | null = isSupportedLanguage(lng) ? lng : null; const [readyLanguage, setReadyLanguage] = useState<LanguageCode | null>(null); useEffect(() => { if (!currentLanguage) { return; } const language = currentLanguage; let cancelled = false; async function syncLanguage() { setReadyLanguage(null); await i18n.changeLanguage(language); if (cancelled) { return; } document.documentElement.lang = language; document.documentElement.dir = i18n.dir(language); setReadyLanguage(language); } void syncLanguage(); return () => { cancelled = true; }; }, [currentLanguage, i18n]); if (!currentLanguage) { return <Navigate to={`/${fallbackLanguage}/home`} replace />; } if (readyLanguage !== currentLanguage) { return <div>Loading translations...</div>; } return ( <main> <LanguageSwitcher /> <MainNavigation /> <Outlet /> </main> );}
This layout:
Reads the current locale from the URL, like en in /en/home.
Redirects unsupported locales to the fallback language.
Syncs the route locale with i18next and updates <html lang> / <html dir>.
Shows shared navigation, then renders the current page through <Outlet />.
Now create the dashboard page at src/pages/DashboardPage.tsx.
import { useTranslation } from 'react-i18next';export default function DashboardPage() { const { t } = useTranslation('dashboard'); return ( <section> <h1>{t('dashboard.title')}</h1> <p>{t('dashboard.description')}</p> </section> );}
This line is the important one: const { t } = useTranslation('dashboard');. When the dashboard route renders, react-i18next asks i18next for the dashboard namespace.
The home page loads the home namespace. The dashboard page loads the dashboard namespace only when that route is opened.
That gives us a much better setup:
the URL controls the language
each page can have its own namespace
translation files stay smaller
dashboard translations are lazy-loaded
the language switcher keeps users on the same route
This is the kind of structure that still feels simple in a tutorial but doesn’t fall apart the moment your React app grows past three buttons.
Simplifying the translation process with Lokalise
At this point, our React app has a pretty normal production-ish i18n setup: locale-based routes, namespaces, lazy-loaded translation files, plurals, interpolation, date formatting, and RTL support. Cool. But editing JSON files by hand forever? Nah. That gets old fast.
For a real team, you usually want a translation management system where developers, translators, reviewers, and product people can work without passing home.json around like it’s a sacred scroll. That’s where Lokalise fits in.
Developers keep source translation files in GitHub (or a similar platform).
Lokalise pulls those files into a translation project.
Translators, reviewers, or AI translation workflows update the strings.
Lokalise sends the updated files back to GitHub as a pull request.
Developers review and merge the translation update like normal code.
Much better than “who changed this JSON file and why is there a trailing comma?”
Using the Lokalise GitHub integration
You don’t have to rely only on CLI commands. Lokalise has a GitHub integration that can exchange translation files with your repository, pull files from GitHub, and create pull requests back to your repo when translations are ready. It supports manual pulls, automatic pulls through GitHub webhooks, and PR creation from Lokalise’s download flow.
Select the translation files you want Lokalise to pull.
Map each file to the correct language.
When translations are ready, export them back as a GitHub pull request.
Your repo stays the source of truth for code, Lokalise becomes the workspace for translation work, and updates come back through PRs instead of random file dumps.
Using GitHub Actions
If your team prefers CI/CD-style automation, Lokalise also provides workflows with GitHub Actions. The idea is simple: GitHub Actions can push updated source files to Lokalise, pull translated files back, run on schedules, or run manually depending on how your release process works. I've penned a dedicated guide on our GitHub Actions that covers all the necessary info and helps you get started.
That setup is useful when you want localization to behave like the rest of your frontend pipeline:
Developer updates home.json ↓GitHub Action sends source strings to Lokalise ↓Translations are updated ↓GitHub Action pulls translated JSON files back ↓Translation update lands in a PR or commit
For teams with stricter repo access rules, GitHub Actions can also be a better fit because the automation runs from your repository workflow instead of relying only on a connected app. Lokalise’s GitHub Actions article specifically discusses using Actions to move localization files between GitHub and Lokalise and automate push/pull flows.
Using the Lokalise CLI
You can also take advantage of our CLIv2. This command line tool can manage projects, files, keys, translations, comments, contributors, and other workspace objects through the Lokalise API.
For example, you can upload your English home namespace like this:
--format json because our React app uses JSON translation files.
--plural-format i18next because we want plural keys like _one, _other, and _zero.
--original-filenames=true because we want files like home.json and dashboard.json to stay as separate namespace files.
--unzip-to ./public/locales because that’s where i18next-http-backend loads translations from.
CLI is great when you want control. GitHub integration is better when you want a nice review workflow with pull requests.
Using AI translation
Lokalise also supports AI-assisted translation workflows. Depending on your setup, you can use AI suggestions inside the editor, AI translation tasks, machine translation, glossaries, style guides, and translation memory to speed things up without making every string a manual job.
That’s the sweet spot: automation handles the boring first pass, humans keep quality under control, and your React app still consumes plain JSON files from /public/locales. So no, you don’t need to manually babysit every translation key forever. Once the app structure is solid, tools like Lokalise help turn localization from “someone’s Friday evening nightmare” into a normal part of the development workflow.
Extracting translations
Writing translation keys by hand is fine at the beginning. But once the app grows, you’ll want tooling that can scan your code and keep translation files in sync. The old-school options were tools like i18next-parser and i18next-scanner. They still exist, but for a modern React + TypeScript setup, the better default is now i18next-cli.
It’s the official i18next CLI, and it can extract keys from JavaScript and TypeScript files, check translation status, sync locale files, lint hardcoded strings, and even generate TypeScript types. Basically, it does the boring i18n maintenance work so you don’t have to cosplay as a JSON janitor.
Install it as a dev dependency:
npm install --save-dev i18next-cli
Then create a config file in the project root: i18next.config.ts. Add this config:
This matches the structure we’re already using. The important part is this: output: 'public/locales/{{language}}/{{namespace}}.json'. That lets the extractor write keys into namespace files like home.json and dashboard.json, instead of dumping everything into one translation.json file.
const { t } = useTranslation('dashboard');t('dashboard.title');
So keys from the dashboard page can land in public/locales/en/dashboard.json instead of getting mixed into the home page namespace. The official CLI docs specifically call out support for React patterns like useTranslation('namespace'), multiple namespaces, Trans, aliased t functions, and getFixedT.
You can also check translation coverage:
npm run i18n:status
Or check only one namespace:
npx i18next-cli status --namespace dashboard
For CI, run extraction with the CI flag:
npx i18next-cli extract --ci
That way, your build can fail when translation files are outdated instead of letting missing strings sneak into production like tiny goblins. The CLI docs explicitly mention extract --ci for CI/CD checks.
One note: extraction tools work best with static keys, so this is risky:
t(`main.${section}.${item}`)
Static analysis tools can’t always understand dynamic key generation. If you really need dynamic keys, keep them predictable and preserve them explicitly in your config. For example:
extract: { preservePatterns: ['main.dynamic.*'],}
Finally, if the extractor creates empty values for new keys, make sure your i18next config doesn’t silently render empty strings. Add this to src/i18n/i18n.ts: returnEmptyString: false. Now, if a translation value is empty, i18next won’t quietly render nothing. You’ll actually notice the missing text during development, which is much better than shipping a button with the emotional presence of a wet napkin.
Frequently asked questions
What is the best React i18n library?
For most React apps, react-i18next is the best default choice. It’s flexible, mature, works nicely with hooks, supports namespaces, lazy loading, pluralization, interpolation, language detection, SSR setups, and the wider i18next plugin ecosystem.
React-Intl is also solid, especially if your project is heavily built around ICU message formatting. But for most teams trying to internationalize a React app without fighting the tooling every week, react-i18next is usually the smoother pick.
How do I add a language switcher in React with i18next?
Use the i18n.changeLanguage() method for a basic switcher:
import { useTranslation } from 'react-i18next';export function LanguageSwitcher() { const { i18n } = useTranslation(); return ( <button type="button" onClick={() => i18n.changeLanguage('es')}> Español </button> );}
For apps with localized routes, it’s better to change the URL instead, like /en/home → /es/home, and then sync i18next from the route. That keeps the URL, language, and page state much cleaner.
How do I handle pluralization in react-i18next?
Pass a count value to the t() function:
t('main.newMessages', { count: messages });
Then define plural forms in your translation file:
{ "main": { "newMessages_one": "You have one new message", "newMessages_other": "You have {{count}} new messages" }}
The variable must be called count, because i18next uses it to choose the correct plural form. Different languages have different plural rules, so don’t try to solve this with manual if/else logic unless you enjoy pain.
Does react-i18next support TypeScript?
Yes. react-i18next works well with TypeScript, and you can use it in Vite, Next.js, Remix, React Router apps, and other modern React setups.
For small apps, basic TypeScript usage is usually enough:
const { t } = useTranslation();
For larger apps, you can go further and generate types for your translation keys, so TypeScript can catch missing or mistyped keys before runtime.
How do I lazy load translations in React?
Use i18next-http-backend and split your translations into namespaces.
When the dashboard page renders, i18next loads the dashboard namespace on demand. That keeps the initial app load lighter, especially when your product has lots of screens and languages.
What is the difference between i18next and react-i18next?
i18next is the core internationalization framework. It handles translation lookup, interpolation, pluralization, fallback languages, formatting, plugins, and resource loading.
react-i18next is the React integration for i18next. It gives you React-friendly tools like:
const { t } = useTranslation();
and:
<Trans i18nKey="main.description" />
So the short version is: i18next does the i18n engine work, and react-i18next makes it nice to use inside React components.
Conclusion
In this tutorial, we discussed internationalization of React applications. We used the react-i18next library, which is the React.js i18next adapter for internationalization. We learned how to translate plain texts, use different date formats using the Luxon library, apply pluralization techniques, and much more related to the world of localization.
Additionally, we created a simple React application and used internationalization techniques in it. Finally, we discussed how we can integrate the Lokalise translation management system into our application to automate the translation process.
Learn more about how Lokalise can help with React app internationalization with a product demo or a free trial today!
Ilya is the lead for content, documentation, and onboarding at Lokalise, where he focuses on helping engineering teams build reliable internationalization workflows. With a background at Microsoft and Cisco, he combines practical development experience with a deep understanding of global product delivery, localization systems, and developer education.
He specializes in i18n architectures across modern frameworks — including Vue, Angular, Rails, and custom localization pipelines — and has hands-on experience with Ruby, JavaScript, Python, Elixir, Go, Rust, and Solidity. His work often centers on improving translation workflows, automation, and cross-team collaboration between engineering, product, and localization teams.
Beyond his role at Lokalise, Ilya is an IT educator and author who publishes technical guides, best-practice breakdowns, and hands-on tutorials. He regularly contributes to open-source projects and maintains a long-standing passion for teaching, making complex internationalization topics accessible to developers of all backgrounds.
Outside of work, he keeps learning new technologies, writes educational content, stays active through sports, and plays music. His goal is simple: help developers ship globally-ready software without unnecessary complexity.
Build a smooth translation pipeline with Lokalise and Vercel
Internationalization can sometimes feel like a massive headache. Juggling multiple JSON files, keeping translations in sync, and redeploying every time you tweak a string… What if you could offload most of that grunt work to a modern toolchain and let your CI/CD do the heavy lifting? In this guide, we’ll wire up a Next.js 15 project hosted on Vercel. It will load translation files on demand f
Hands‑on guide to GitHub Actions for Lokalise translation sync: A deep dive
In this tutorial, we’ll set up GitHub Actions to manage translation files using Lokalise: no manual uploads or downloads, no reinventing a bicycle. Instead of relying on the Lokalise GitHub app, we’ll use open-source GitHub Actions. These let you push and pull translation files directly via the API in an automated way. You’ll learn how to: Push translation files from your repo to LokalisePull translated content back and open pull requests automaticallyWork w
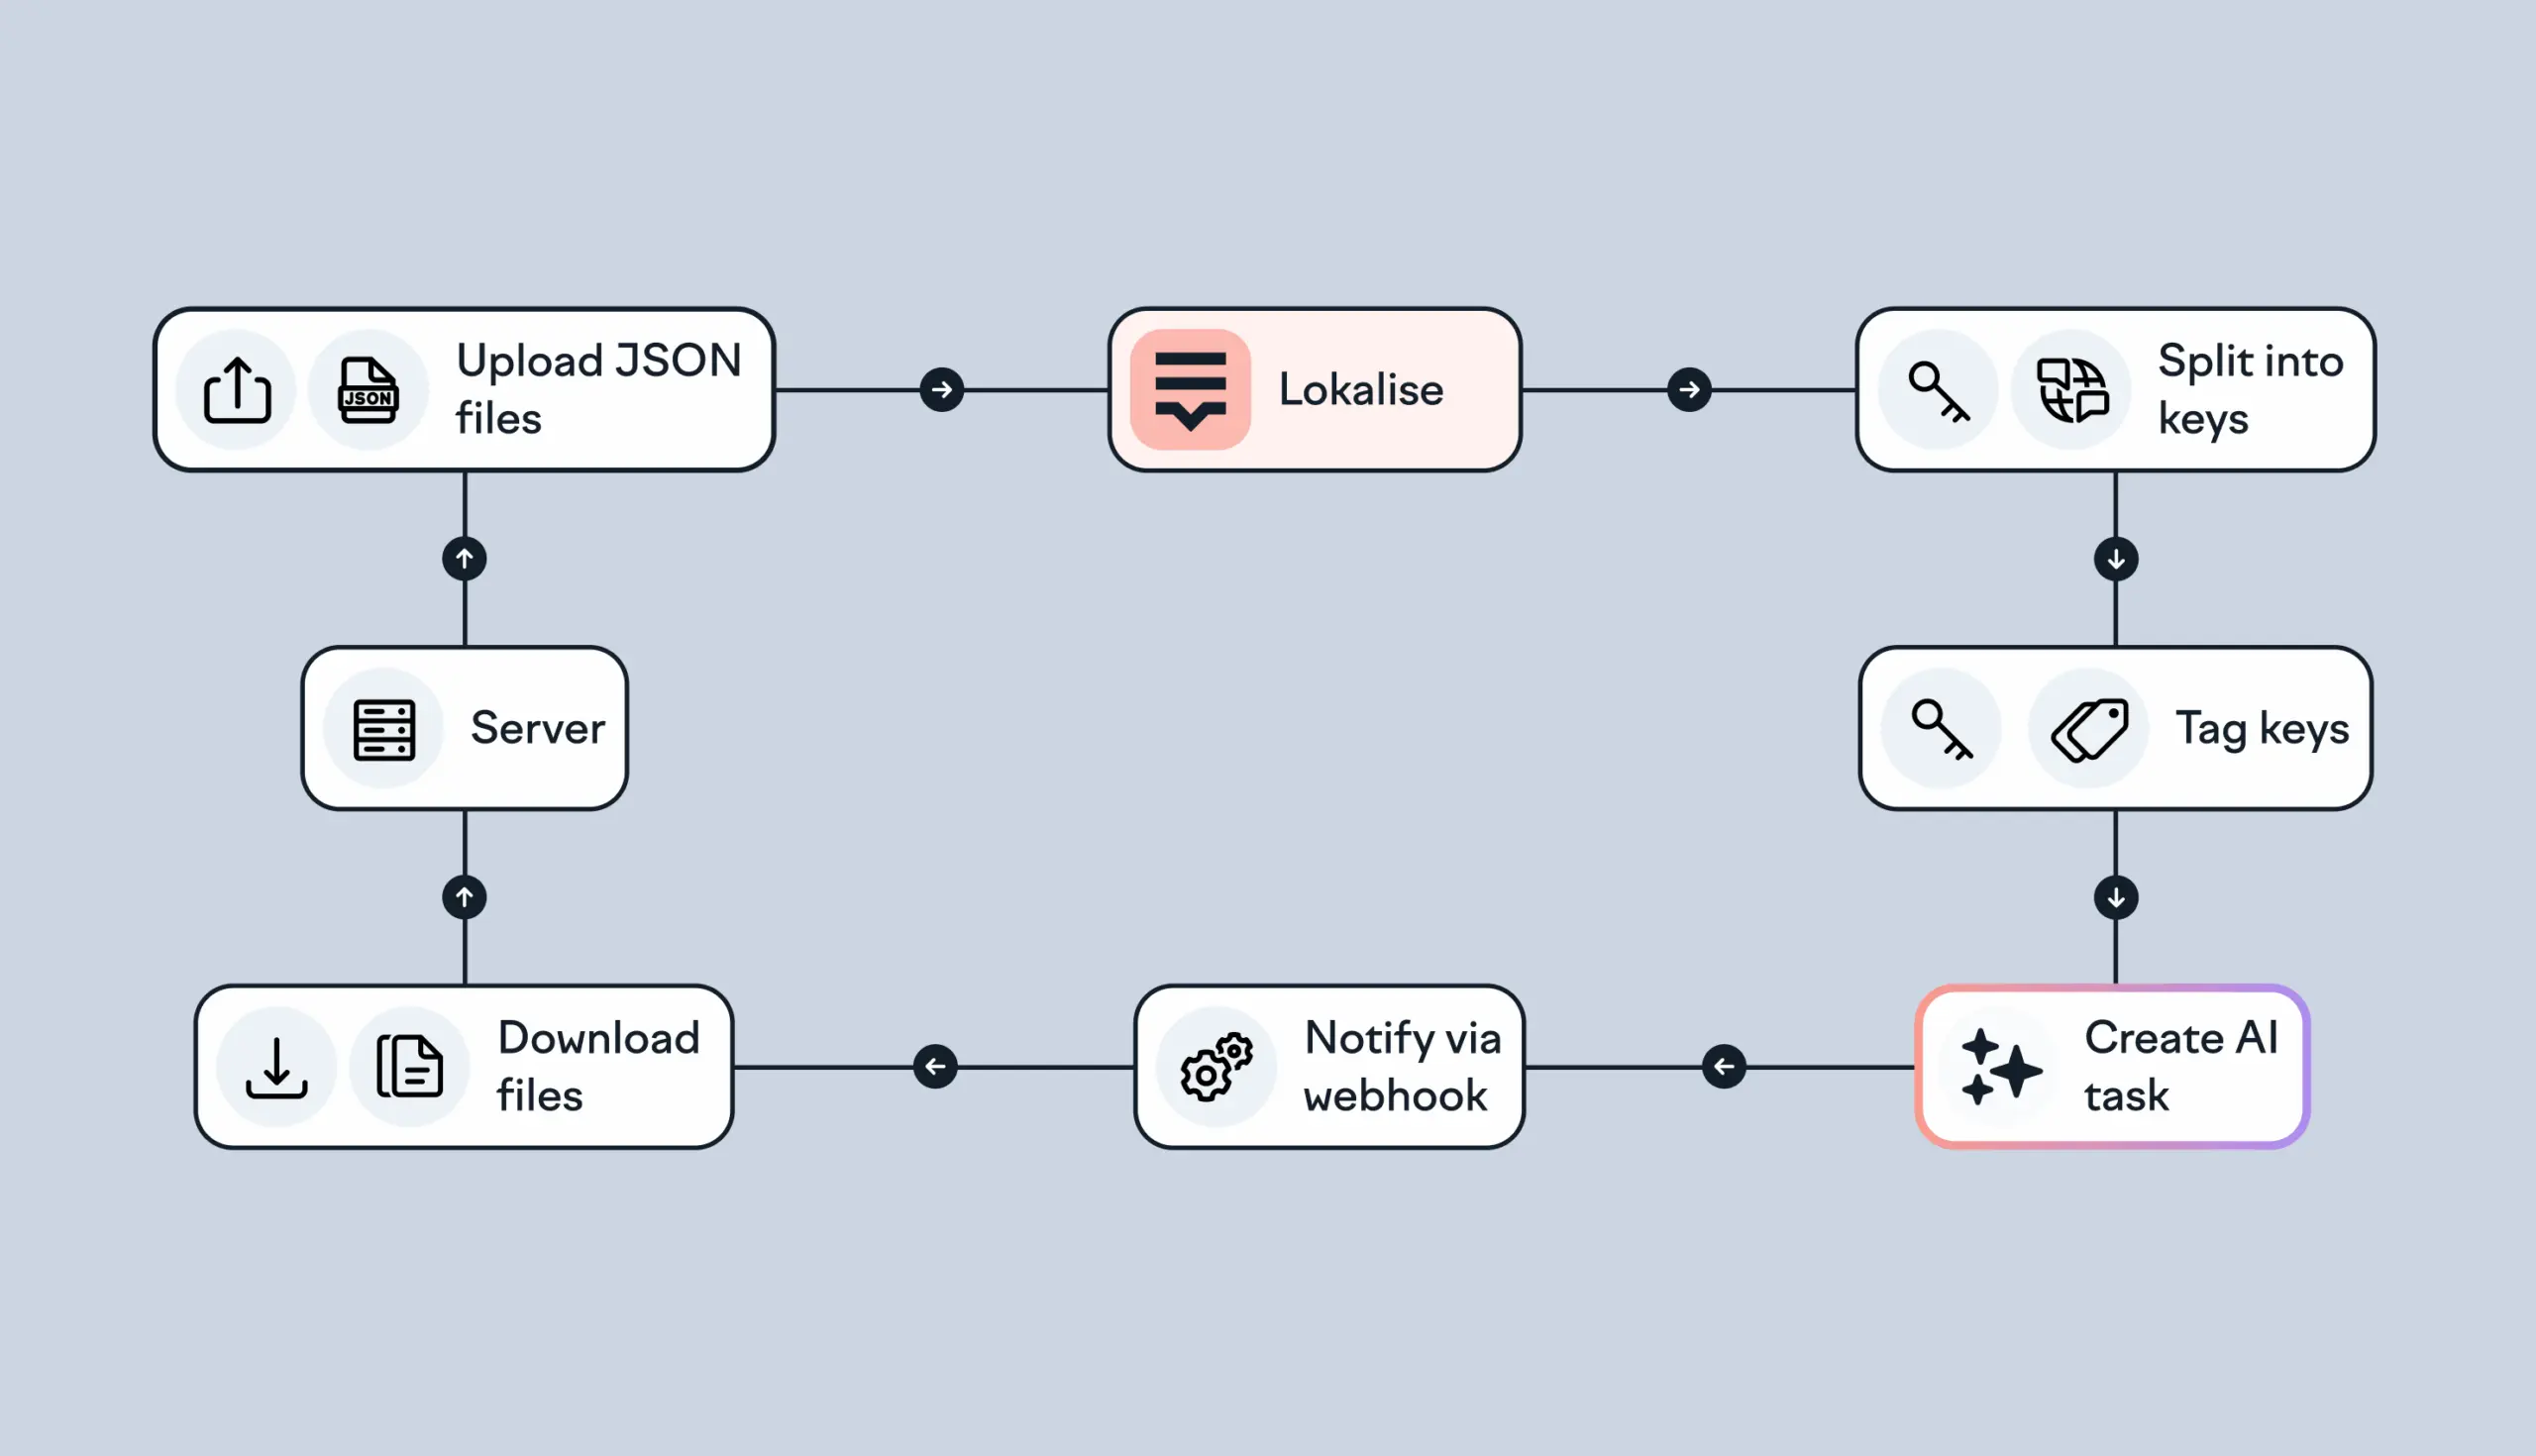
Building an AI-powered translation flow using Lokalise API and webhooks
Managing translations in a growing product can quickly become repetitive and error-prone, especially when dealing with frequent content updates or multiple languages. Lokalise helps automate this process, and with the right setup you can build a full AI-powered translation pipeline that runs with minimal manual input. In this guide, you’ll learn how to: Upload translation files to Lokalise automaticallyCreate AI-based translation tasksUse webhooks to downloa