In this article, you will learn with examples how to get started with Angular i18n using the built-in internationalization module. We will cover the following topics:
Setting up the Angular application and configuring the built-in localize module.
Performing simple translations and providing additional translation data.
Extracting translations to XLF files using a special tool.
Working with pluralization and gender information.
Working with Angular pipes.
Performing translations within components.
Adding a language switcher.
Working with Angular routes.
Building the app using the AOT compiler and deploying to production.
For the purposes of this Angular i18n internationalization/localization tutorial, we'll be using version 21, which is the most recent version at the time of writing. Most of the concepts I'm going to show you are applicable for versions 9.1 and above. These updates include enhancements in translation and localization capabilities to make multi-language support more efficient.
Understanding software internationalization is essential for leveraging Angular's built-in i18n features effectively, allowing your application to cater to a diverse global audience.
We'll require the Angular CLI, so be sure to install it by running:
npm install -g @angular/cli
Next, create a new Angular 21 application using the following command:
ng new i18n-angular-lokalise
Follow the installation wizard's instructions:
Stylesheet system to use (this is up to you really; I'm not planning to apply any styling so I'll stick with plain old CSS).
Use SSR/SSG — no, we're not going to discuss these topics
AI tools to use — none
Next, simply wait a couple of minutes and then make sure the app is starting without any issues:
cd i18n-angular-lokaliseng serve --open
The ng serve --open command should open the application in your browser. After you've made sure everything is working, stop the server and install a localize package:
ng add @angular/localize
This is a new package introduced in Angular 9, which will add internationalization support to the app.
Next, we'll need to modify angular.json. I've pinpointed the relevant lines here:
Adding the i18n section. Be sure to add it under the project config.
Setting the source language of the application to en-US (this is the default one, adjust as needed).
Adding support for other locales.
Specifically, I would like to translate my app into Latvian (the lv locale). Feel free to add any other languages as necessary.
Translations for this language will live in the src/i18n/messages.lv.xlf file. Note that in the previous versions of Angular you would provide the --i18n-locale option when creating translations using command-line interface, but this option is no longer used.
Set localize to true in order to generate application variants for each locale. We'll use the ahead-of-time compilation. Note that this applies to the production build only. The Angular development server supports one locale per build, so multi-locale localization is automatically disabled in dev mode and you'll see a warning about it.
Report any missing translations upon building the app.
Now we can proceed to working with Angular internationalization examples!
Getting started with Angular internationalization
Marking the text for translation
In order to translate text, use the i18n attribute. Let's see it in action by replacing the src/app/app.html content with the following:
<h1 i18n>Hello world!</h1>
i18n is a special attribute that is recognized by the localize package. During the compilation it will be removed, and the tag content will be replaced with the proper translations.
This attribute may contain translation metadata such as this:
Moreover, it is possible to provide the intended meaning of the translation. Just separate the meaning and description with a pipe | character, like so:
This additional data provides context for your translators. Specifically, you may also explain on what pages the translation will be displayed, what tone should be used, and so on.
Creating translation files
Now, where and how do we store translations for Angular i18n? Usually, they live in the src/i18n or src/locale folder. As for the translation format, there are multiple options:
Let's stick with the default option, but the next question is: How do we actually create translation files? Should we do it manually? No! There is a special command-line tool called extract-i18n, which does the heavy lifting for us and extracts all the translations to a separate file.
Extracting translations
Simply run the following command to create a new translation file under the src/locale folder:
ng extract-i18n --output-path src/locale
In the src/locale, you will find a messages.xlf file in XLIFF 1.2 format. This is the base translation file with the following contents:
trans-unit is the tag containing a single translation; id is a translation identifier and has a special meaning — extract-i18n generates the id for us so do not modify it here! We will discuss this attribute later in more detail.
source contains translation source text.
context-group specifies where exactly the given translation can be found.
context-type="sourcefile" shows the file where the translation lives.
context-type="linenumber" shows the actual line of code.
Also, there are two note tags that provide the translation description and meaning, respectively.
Next, you can copy the messages.xlf file and name your copy messages.lv.xlf. This new file is going to store Latvian translations. In order to translate something, add a target tag immediately after the source in the trans-unit as follows:
Also, it is a good idea to provide the target-language attribute for the file tag so that translation management systems can detect the locale properly – see below:
We're adding a new configuration specifically for the lv locale.
This configuration should be available when serving the app in development.
Now we can easily use the ng serve command and instruct Angular to show us the Latvian version of the app:
ng serve --configuration=lv --open
Ensure that the translation is displayed properly, and proceed to the next section.
Translation identifiers
I've already mentioned that translation IDs (the id attribute for the trans-unit tag) have special meanings. These IDs are unique and extract-i18n generates them based on the combination of the source text and its meaning. Therefore, whenever you update the translation source or its meaning, the ID will change. For instance, let's modify our translation text as follows:
Note that if you have multiple occurrences of the same source text and meaning, all of them will have the same translation. This is due to the fact that their identifiers are similar.
Custom translation identifiers
So, having auto-generated translation IDs is not very convenient because they depend on the source text and the meaning. However, it is possible to provide custom identifiers using the @@ prefix – for example:
The ID is now set to welcome, and it will not change even if you modify the source text. Don't forget to provide a new ID in the messages.lv.xlf file and adjust translation accordingly:
Be sure to assign unique custom identifiers for different translations! If you provide the same IDs, only the first translation will be extracted:
<h1 i18n="main header|Friendly welcoming message@@welcome">Hello everyone!</h1><!-- "Other text" will be ignored. Translation for "Hello everyone!" will be used here instead: --><p i18n="@@welcome">Other text</p>
The Angular i18n module allows us to translate both tag content and attributes. Suppose there is a link to your portfolio in the src/app/app.component.html:
The link text will be translated properly, but what about the title and href? To deal with these attributes, provide the i18n-ATTRIBUTE_NAME attributes in the following way:
We have translated the link text, the URL, and the title!
Performing pluralization
We'll continue our Angular localization tutorial by discussing pluralization. Imagine that we'd like to show how many ongoing tasks the user has. The built-in i18n module utilizes an ICU message format which may seem a bit complex at first:
<span i18n> {tasksCount, plural, zero {no tasks} one {one task} other {{{tasksCount}} tasks} }</span>
tasksCount is the variable that we'll create in a moment.
plural is the name of an ICU expression.
zero provides text when there are no tasks.
one contains text when there is 1 task.
other covers all other cases.
Don't forget to create a new variable in the src/app/app.ts file as below:
// ...export class App { tasksCount = 3;}
Extract the new translations and update the src/i18n/messages.lv.xlf file as follows:
<trans-unit id="2380939390102386148" datatype="html"> <source> <x id="ICU" equiv-text="{tasksCount, plural, zero {no tasks} one {one task} other {{{tasksCount}} tasks} }" xid="9057336704109090456"/> </source> <context-group purpose="location"> <context context-type="sourcefile">src/app/app.html</context> <context context-type="linenumber">8,13</context> </context-group></trans-unit><trans-unit id="324706692010051697" datatype="html"> <source>{VAR_PLURAL, plural, zero {no tasks} one {one task} other {<x id="INTERPOLATION"/> tasks}}</source> <target>{VAR_PLURAL, plural, zero {nav uzdevumu} one {viens uzdevums} other {<x id="INTERPOLATION"/> uzdevumi} }</target> <context-group purpose="location"> <context context-type="sourcefile">src/app/app.html</context> <context context-type="linenumber">8,11</context> </context-group></trans-unit>
Choosing translation with select
Another useful ICU expression is select. It allows you to choose one of the translations based on a value. For example, it is very helpful when working with gender information:
Once a button is clicked, the message with the gender info will be updated instantly.
Translation without a tag
All the examples we've seen previously required some sort of tag. Sometimes, you may need to translate plain text without rendering any tags at all. Angular allows this by applying the i18n attribute to a structural wrapper such as ng-container:
<ng-container i18n>Copyright 2026</ng-container>
Upon page display, ng-container will be gone, and you'll have simple plain text. Extract the text and provide the corresponding Latvian translation as usual:
The built-in i18n module plays nicely with common pipes used for localization in Angular: DatePipe, CurrencyPipe, DecimalPipe, and PercentPipe.
Now the locale data are loaded and we can use the pipes mentioned above. For instance, let's perform date localization:
<p>{{today | date:'fullDate'}}</p>
Create a new today variable in the src/app/app.ts file and make sure to properly import the DatePipe class:
import { DatePipe } from '@angular/common';// ...@Component({ selector: 'app-root', imports: [ DatePipe, // ... ], templateUrl: './app.html', styleUrl: './app.css'})export class App { today: number = Date.now(); // ...}
Upon running the Latvian version of the app, you will see the localized date!
Translations within components
Sometimes you may need to localize strings directly inside your component class. Angular supports this through the $localize() tagged template function.
For example, add the following lines to src/app/app.ts:
// ...export class App { company = "Lokalise"; created_by = $localize`Created by ${this.company}`;}
And use the variable inside your template:
<p>{{ created_by }}</p>
Now run the extractor again — it should detect the newly added content properly.
Add Latvian the translation to the src/i18n/messages.lv.xlf file. Don't forget to provide placeholders, for instance:
Now the created_by variable has the correct translation!
$localize also supports providing a custom meaning, description, and translation ID. The format follows the same pattern as template-level i18n: meaning|description@@id, wrapped between colons at the start of the message.
created_by = $localize`:used on the main page|explains who created the app@@created_by: Created by ${this.company}`;
The metadata inside the colons is used by Angular’s localization system and will appear in the extracted translation file.
Adding a language switcher
The next thing I would like to show you in this Angular internationalization tutorial is how to create a simple language switcher.
First, add a new localesList variable to the src/app/app.ts file in the following way:
So, we have finished building our Angular i18n sample app, and now it is time to share our work with the world!
Preparing for deployment
In this section, I will show you how to deploy to Firebase. Therefore, you'll need to create a new account there to get started.
Then, install Firebase tools:
npm install -g firebase-tools
Log in to Firebase locally using the following command:
firebase login
Performing the deployment
At this point, we're ready to get rolling. Compile your application with an ahead-of-time compiler (which is the preferred method):
ng build
This will create both English and Latvian versions of the app under the dist directory in one go. This is very convenient because in previous Angular versions we had to build each application separately and this took significantly more time. It still possible to provide a specific version of the app to build, like so:
ng build --configuration=production,lv
Once the build is finished, let's add a special package for Firebase:
ng add @angular/fire
Once the package is installed, you'll need to answer a couple of questions:
Features to use: choose "hosting"
What Firebase account to use
Which project and website to use (you'll have an option to create a new Firebase project)
Having done that, run the following command:
ng deploy
After a few moments your site will be up and running!
Problem is, at the time of writing the @angular/fire package is not yet fully compatible with Angular 21. If you're experiencing a similar issue, you can either try installing a release candidate:
npm i firebase @angular/fire@21.0.0-rc.0
Or simply use Firebase tools to create a new project (or create one manually). Here's the sample firebase.json config:
At this point your application should work fine on Firebase. However, if you are going to implement a routing system, additional steps have to be taken.
Creating components and routes
Let's create two simple routes – /home and /about – that should utilize HomeComponent and AboutComponent, respectively. Start by creating these two components:
ng generate component homeng generate component about
Next, open app.routes.ts and provide the actual routes:
As you can see, I've adjusted the language switcher so that it does not display a link for the currently chosen locale. We can detect the current locale easily inside app.ts by using LOCALE_ID. Also let's include the RouterLink properly:
The most important step here is configuring Firebase properly. As long as we're using the AOT compiler, Firebase will effectively serve two different applications (for the Latvian and English locales). Thus, to make Firebase play nicely with our Angular routes, we should adjust the rewrite rules. To achieve this, open firebase.json and make sure you have the following lines:
This is the final version of our firebase.json config file.
Deploying once again
We have now dealt with all the Firebase issues, so you can build and deploy your application again:
ng buildng deploy
Great job!
Managing translations at scale with Lokalise
By now we’ve successfully implemented Angular’s built-in i18n and even deployed a localized multi-build app. Everything works, but you’ve probably noticed one thing already: even with a small set of strings, translation files get messy fast. XLIFF is powerful, but it’s also:
full of tags and placeholders that non-technical translators may struggle with, and a single misplaced tag can break the entire string,
easy to damage accidentally, since deleting or moving even a tiny piece of markup often leads to invalid or unusable translations,
difficult to maintain once multiple languages and translators join the workflow, especially when everyone edits raw XML files independently,
and still limited in terms of real-world context. XLIFF notes (description, meaning) help, but sometimes translators need to see where the text appears (screenshots, UI previews) or ask quick clarifying questions, which is much easier to handle inside a TMS with built-in comments/chat.
This becomes a real problem as soon as you want to collaborate with non-technical translators or use AI translation tools that rely heavily on context. This is where a translation management system (TMS) becomes essential, and Lokalise fits naturally into this workflow.
Why use a TMS instead of translating XLIFF by hand:
More context. You can attach screenshots or short notes so translators see where the text is actually used.
Consistent terminology. All product-specific terms stay in one place, so translations don’t drift.
Consistent style. You can define the tone once (formal, casual, whatever) and keep it the same across languages.
AI with project knowledge. Translations can be based on your existing content, glossary, style guide, or translation memory — not random guesses done in isolation.
Easy communication. Translators can ask questions or leave comments directly on a key instead of guessing what you meant.
No file juggling. You don’t have to import or export XLIFF manually. Lokalise introduces various tools to help you configure complex automated workflows easily.
Setting up Lokalise for Angular i18n
Create a Lokalise account. Register for free and test drive all Lokalise features for 14 days. No credit card needed, and later you can stay on the Free plan for as long as you wish.
Generate an API token. Go to Personal profile > API tokens and create a read-write token. We'll need this token later.
Create a new project:
Click New project
Choose Web and mobile
Give it a name
Set the base language (must match your Angular source locale, e.g., en-US)
Add target languages: pick any extra locales you need (e.g., Latvian, French, German). I'm going to select Latvian and French (fr). Yes, we haven't yet introduced support for the fr locale but it's not a problem: we'll employ AI for translation.
Copy your project ID. Open More > Settings and make a note of it.
At this point Lokalise is set up, and we’re ready to upload the XLIFF files generated by Angular (src/locale/messages.xlf, messages.lv.xlf, etc.).
Configuring automations for AI-powered translations
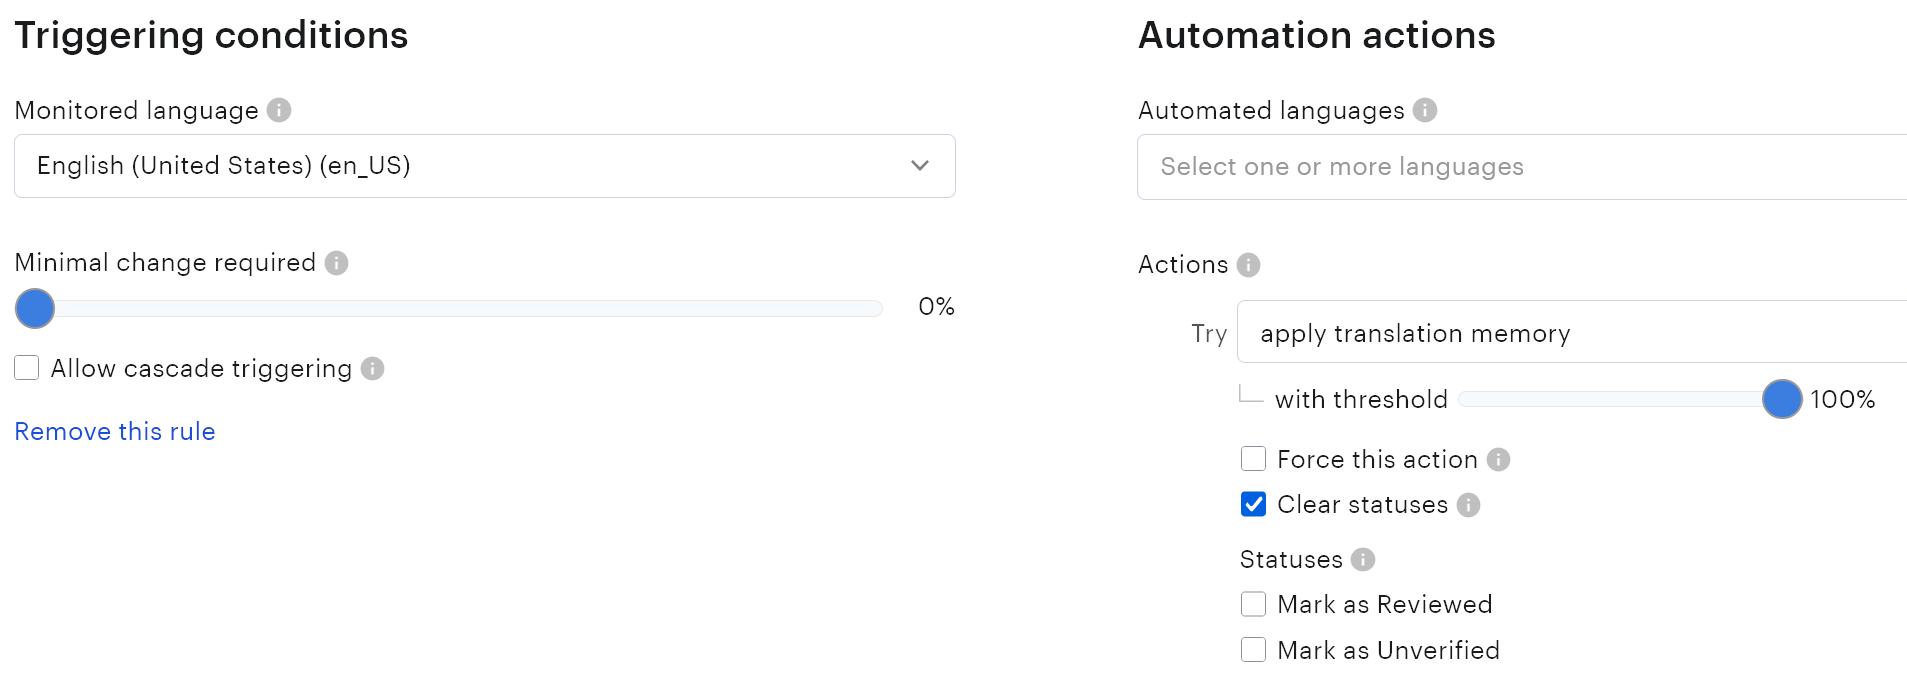
Now let’s set up a simple automation in Lokalise that will auto-translate updated keys using AI. To achieve that, open your Lokalise project, click More > Automations, and then press Create. You'll see the following interface:
Let's cover the most important settings:
Monitored language — choose your main source language (in our case, English).
Automated languages — select the languages you want to translate into (for example, Latvian and French).
Actions — pick Use Lokalise Pro AI.
Enable Apply key descriptions as translation context so the AI can use the notes you added in XLIFF.
Save the automation — that’s it! Now whenever English strings change, Lokalise will automatically generate translations for the selected languages.
A couple of notes:
By default, any small update triggers the automation. If you want AI to react only to bigger edits, adjust Minimal change required.
AI doesn’t overwrite existing translations unless you explicitly allow it. To force updates for non-empty translations, enable Force this action.
Using GitHub Actions to push translations files
Sure, we could upload the translation files to Lokalise manually through the UI, and that works perfectly fine. But it’s not very exciting, and if you prefer a more advanced setup that can be automated later, there are better options. Lokalise offers several ways to sync translations: you can hit the API directly, use the CLI tool, rely on SDKs for various languages, connect integrations for GitHub or GitLab (and other services), or even use framework-specific solutions that handle file exchange automatically (we currently have ready-made setups for Ruby on Rails and JavaScript apps). In other words, you’re not short on choices.
In this tutorial, though, I want to highlight another approach I recently prepared: GitHub Actions for sending and pulling translation files. These actions are available on the GitHub Marketplace, they’re open source, and they work with basically any framework (unless you have some very unusual, highly customized setup). First of all, let's see how to configure the "push" action that is going to upload our XLIFF files to Lokalise.
Notes on XLF files
As you already know, Angular stores the "base" translations in a file called messages.xlf. This works fine for Angular, but it’s not ideal when you start using a TMS; having one file without a locale code makes things harder to distinguish later. A simple fix is to extract the base locale into a properly named file:
ng extract-i18n --output-path src/locale --out-file messages.en-US.xlf
This recreates your English source messages inside messages.en-US.xlf. You can keep messages.xlf if you like, or remove it once your workflow no longer relies on it.
Another thing worth mentioning: placeholders and plural/select rules inside XLIFF are fragile. ICU expressions often get split into multiple lines, and sometimes you’ll see unexpected \n characters or odd whitespace. A practical workaround is to keep ICU expressions on a single line in your templates, for example:
<span i18n>{tasksCount, plural, zero {no tasks} one {one task} other {{{tasksCount}} tasks}}</span>
This usually results in cleaner XLF output. If something still looks strange, you can adjust the formatting later inside your TMS.
Finally, even if you’re using AI-powered translations, always review anything that involves ICU. AI normally won’t touch placeholders, but it can still mis-handle plural forms, skip branches in select, or misinterpret gendered wording. A quick manual check saves a lot of trouble.
Workflow configuration
Let's suppose you already have a GitHub repository to host your code (if not, create one now!). Add a new file in your Angular app: .github/workflows/push.yml. Paste the following inside:
api_token — your Lokalise API token generated in the personal profile. Store it in repo secrets (I’ll show where to configure them in a moment). Never hard-code tokens inside workflows! Keep in mind that a token has the same permissions as your user account, so if you don't have access to a project, the token won’t have it either.
project_id — your Lokalise project ID. It’s not sensitive information, but you can still place it in secrets if you prefer.
file_ext — the extension of your translation files without a leading dot. Since we’re using XLIFF, that would be xlf.
translations_path — the folder that contains your translation files, e.g., src/locale. Don’t add leading dots or prefixes like ./ as the action resolves paths relative to the repo root automatically.
base_lang — your source language, in our case English (United States). Note that Lokalise uses an underscore in region codes (for example: en_US).
name_pattern — provide a proper pattern for the "base" file with translations. The pattern supports more complex expressions, such as en/**/custom_*.json, which would match all nested JSON files under the en folder inside translations_path.
Finally, I’m also passing a couple of optional Lokalise API parameters via additional_params. We're converting placeholders into universal format (useful when exporting to different file types later) and enabling ICU plural detection since we’re using plurals in this project.
Repository configuration
We also need to make some changes in your GitHub repo. Proceed to Settings > Actions > General and set Workflow permissions to Read and write permissions. This is required because the push action creates system tags to track its own status. Also, if you're planning to configure the pull action later, tick Allow GitHub Actions to create and approve pull requests.
Next, switch to Secrets and variables > Actions. Here, create a new secret named LOKALISE_API_TOKEN and paste your token as a value. Add other variables as needed.
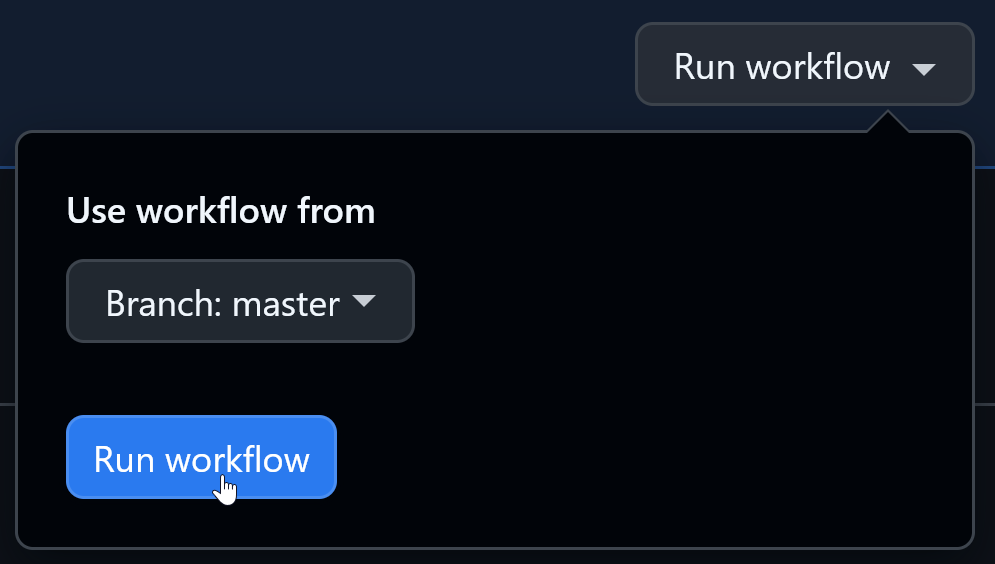
Running the push action
Awesome, now you can commit and push your changes to GitHub. Then, proceed to the Actions tab and find the "Push" action. Switch to it and click Run workflow.
A few notes:
You can choose any repo branch to run the workflow for.
The workflow might take 1-2 minutes to complete because your configured automation will translate texts into the target languages. You can adjust timeouts easily (if you have long-running workflows) — check the docs to learn more.
The push action always uploads translation files for the base language only. This is by design. Later you can reupload, say, Latvian translation manually via Lokalise UI while ticking Detect ICU plurals and Replace modified values. But as long as we've already configured an automation, your Latvian texts will appear on Lokalise anyways.
Initially the push action uploads all base language files. On subsequent runs it will detect changes to these files since the last commit and upload only the files that had any modifications. If you prefer to compare changes between action runs (not between last two commits), set the use_tag_tracking parameter to true.
And here's the result on Lokalise:
The master tag has been assigned automatically to represent the branch that triggered the workflow.
Once again: make sure to check the AI-generated translations, especially the ones that involve ICU expressions!
Using GitHub Actions to pull translations files
Workflow configuration
Okay, now let’s set up a workflow that downloads updated translation files from Lokalise back into the repo. Create a new file in your Angular project: .github/workflows/pull.yml. Paste the following:
Many parameters here mirror those used in the push action, but here are the key new ones:
base_lang — set to en-US (with a dash) to match Angular’s locale format. If regional variants annoy you (and the app doesn't rely on them), using just en as your base locale is also fine.
flat_naming — enable this because our translation files sit directly inside src/locale. If your repo organizes translations into folders like locale/en/…, then keep this option off.
additional_params — several useful adjustments:
plural_format / placeholder_format = icu — ensures correct ICU handling.
include_description = true — pulls key descriptions when available.
language_mapping — demonstrates how to map en_US → en-US. This isn’t required for our current setup, because the pull action usually downloads only target languages. But if you ever enable always_pull_base, mapping becomes necessary.
You can also fine-tune downloads further. For example, adding filter_langs helps restrict which languages are pulled, making the overall workflow faster and the bundle smaller.
Running the pull action
Commit your workflow, push it to the repo, then go to the Actions tab. Find the “Pull from Lokalise” workflow and trigger it manually. After a short delay, you should see an automatically created pull request containing updated translation files (unchanged files are left untouched).
That’s it! Review the PR and merge when ready. After pulling the updates locally, your Angular app will use the newly downloaded translations.
At this point you can also add French (or any other language) to your supported locales by adjusting your Angular configuration as described earlier.
Next steps and further reading
In this article, we explored how to implement internationalization in an Angular application using the built-in localization system. We configured locale builds, added translations to templates and components, worked with ICU pluralization and select rules, and created a simple language switcher. We also added routing, verified that localization works across multiple pages, and deployed a fully localized multi-build application to Firebase Hosting.
That's all for today, folks. I hope you found this article useful. Thanks for staying with me, and I'll see you next time!
Easily manage angular i18n translation files
Grab a FREE Lokalise trial and start internationalizing your Angular app
Ilya is the lead for content, documentation, and onboarding at Lokalise, where he focuses on helping engineering teams build reliable internationalization workflows. With a background at Microsoft and Cisco, he combines practical development experience with a deep understanding of global product delivery, localization systems, and developer education.
He specializes in i18n architectures across modern frameworks — including Vue, Angular, Rails, and custom localization pipelines — and has hands-on experience with Ruby, JavaScript, Python, Elixir, Go, Rust, and Solidity. His work often centers on improving translation workflows, automation, and cross-team collaboration between engineering, product, and localization teams.
Beyond his role at Lokalise, Ilya is an IT educator and author who publishes technical guides, best-practice breakdowns, and hands-on tutorials. He regularly contributes to open-source projects and maintains a long-standing passion for teaching, making complex internationalization topics accessible to developers of all backgrounds.
Outside of work, he keeps learning new technologies, writes educational content, stays active through sports, and plays music. His goal is simple: help developers ship globally-ready software without unnecessary complexity.
Build a smooth translation pipeline with Lokalise and Vercel
Internationalization can sometimes feel like a massive headache. Juggling multiple JSON files, keeping translations in sync, and redeploying every time you tweak a string… What if you could offload most of that grunt work to a modern toolchain and let your CI/CD do the heavy lifting? In this guide, we’ll wire up a Next.js 15 project hosted on Vercel. It will load translation files on demand f
Hands‑on guide to GitHub Actions for Lokalise translation sync: A deep dive
In this tutorial, we’ll set up GitHub Actions to manage translation files using Lokalise: no manual uploads or downloads, no reinventing a bicycle. Instead of relying on the Lokalise GitHub app, we’ll use open-source GitHub Actions. These let you push and pull translation files directly via the API in an automated way. You’ll learn how to: Push translation files from your repo to LokalisePull translated content back and open pull requests automaticallyWork w
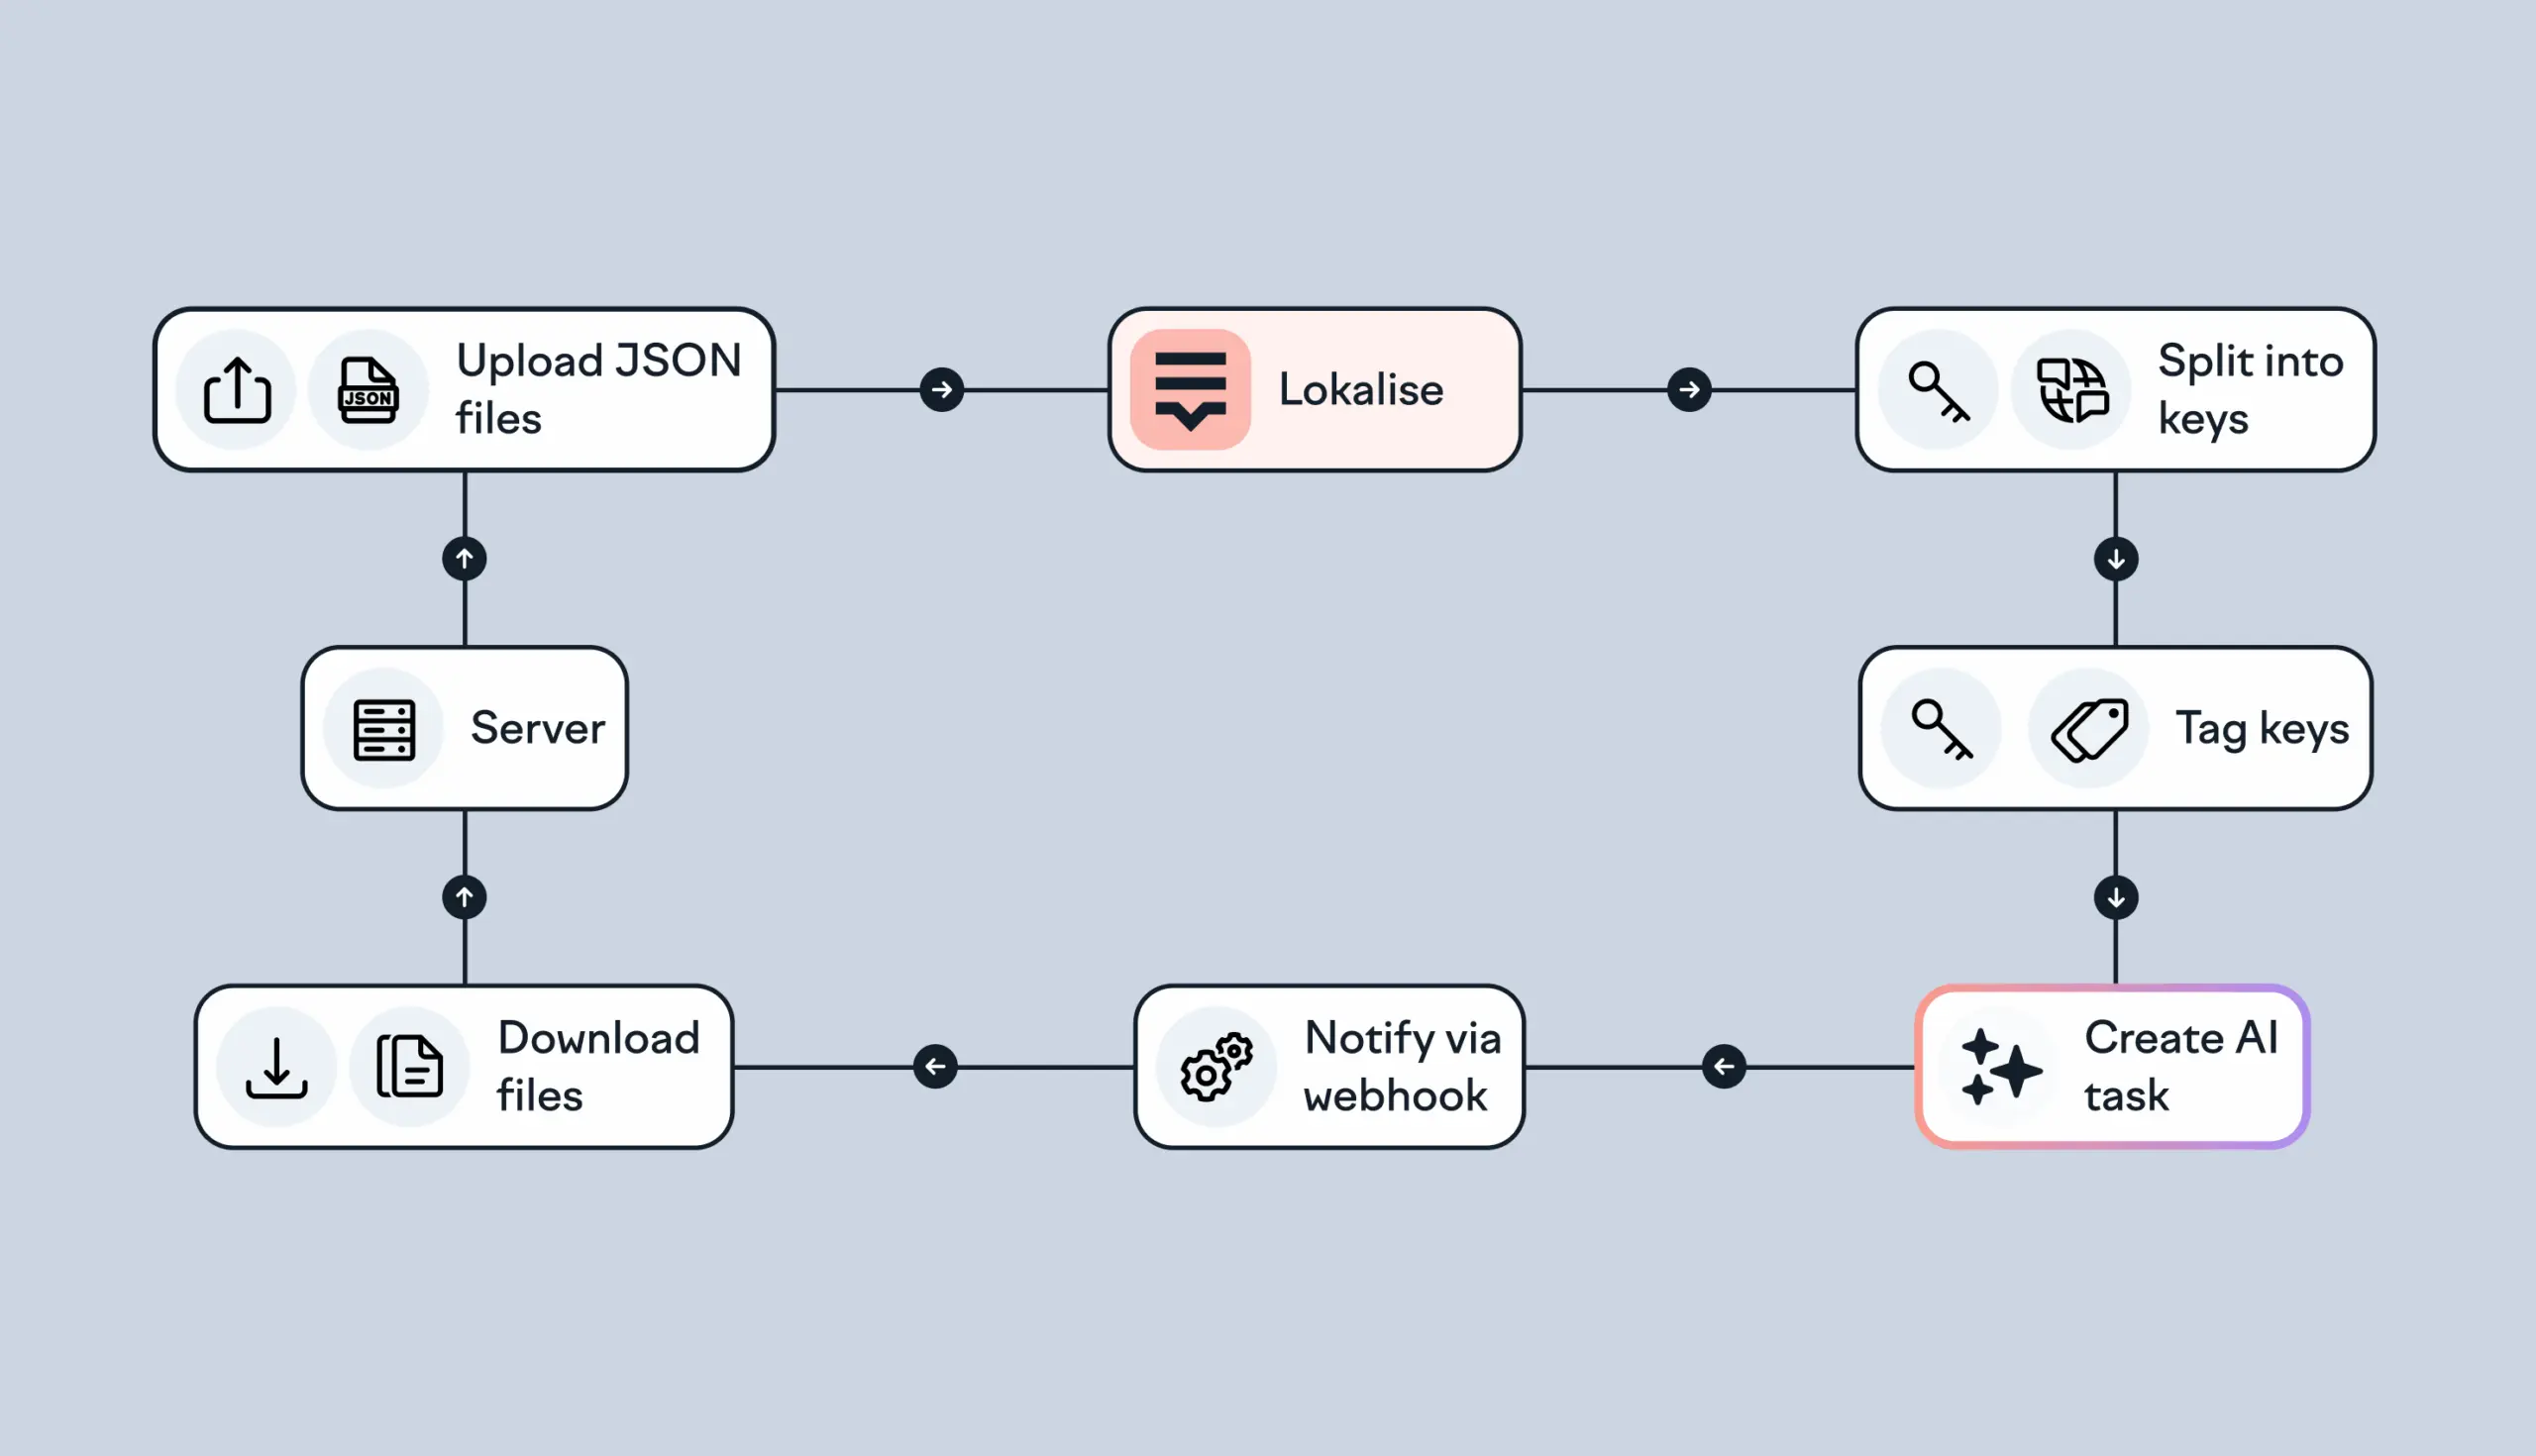
Building an AI-powered translation flow using Lokalise API and webhooks
Managing translations in a growing product can quickly become repetitive and error-prone, especially when dealing with frequent content updates or multiple languages. Lokalise helps automate this process, and with the right setup you can build a full AI-powered translation pipeline that runs with minimal manual input. In this guide, you’ll learn how to: Upload translation files to Lokalise automaticallyCreate AI-based translation tasksUse webhooks to downloa

![2026-01-26 19_55_35-Lokalise translations update by github-actions[bot] · Pull Request #3 · bodrovis.webp](https://lokalise.com/uploads/2026_01_26_19_55_35_Lokalise_translations_update_by_github_actions_bot_Pull_Request_3_bodrovis_117815c87d.webp)